
Basic Operation Guide 2013/06

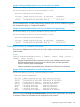
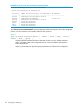
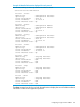


Table Of Contents
- Switch Software
- Contents
- 1 Commands found in the Basic Operation Guide
- 2 Getting started
- 3 Using the Menu Interface
- 4 Using the Command Line Interface (CLI)
- Overview
- Accessing the CLI
- Using the CLI
- Return message types with CLI commands
- CLI interactive commands
- CLI control and editing
- 5 Using the HP WebAgent
- 6 Switch memory and configuration
- Overview
- Configuration file management
- Using the CLI to implement configuration changes
- Creating a custom default configuration
- Using the menu and WebAgent to implement configuration changes configuration file
- Zeroization
- Using Primary and Secondary flash image options
- Multiple configuration files
- Display configuration of selected interface
- Automatic configuration update with DHCP Option 66
- 7 Interface access and system information
- 8 Configuring IP addressing
- Overview
- IP configuration
- Loopback interfaces
- IP Preserve: retaining VLAN-1 IP addressing across configuration file downloads
- Configuring a single source IP address
- 9 Software management
- Downloading switch documentation and software from the web
- Viewing or downloading the software manual set
- Downloading software updates for your switch
- Software signing and verification
- Saving configurations while using the CLI
- Important: Best Practices for software updates
- Updating the switch: overview
- Updating the switch: detailed steps
- Rolling back switch software
- Viewing or transferring alternate configuration files
- Downloading switch documentation and software from the web
- Index

3. Execute the terminal emulator commands to begin the Xmodem transfer. For example, using
HyperTerminal:
a. Click on Transfer, then Send File.
b. Type the file path and name in the Filename field.
c. In the Protocol field, select Xmodem.
d. Click on the Send button.
The download can take several minutes, depending on the baud rate used in the transfer.
4. If you increased the baud rate on the switch (1), use the same command to return it to its
previous setting. (A baud rate of 9600 bits per second is recommended for most applications.)
Remember to return your terminal emulator to the same baud rate as the switch.
5. Use the show flash command to verify that the new software version is in the expected flash
area (primary or secondary).
6. Reboot the switch from the flash area that holds the new software (primary or secondary).
After the switch reboots, it displays the CLI or Main Menu, depending on the Logon Default
setting last configured in the menu’s Switch Setup screen.
Using USB to download switch software
To use the USB port on the switch to download a software version from a USB flash drive:
• The software version must be stored on the USB flash drive, and you must know
the file name (such as K_15_10_0001.swi).
• The USB flash drive must be properly installed in the USB port on the switch.
NOTE: Some USB flash drives may not be supported on your switch. For information on USB
device compatibility, refer to the HP networking support ( www.hp.com/networking/support).
Syntax:
copy usb flash <filename> [ <primary | secondary> ]
For example, to download a software file named K_15_10_0001.swi from a USB flash drive:
1. Execute the copy command as shown below:
HP Switch# copy usb flash K_15_10_0001.swi
secondary
The secondary OS image will be deleted. continue
[y/n]? Y
03125K
2. When the switch finishes downloading the software file from the server, it displays the progress
message
Validating and Writing System Software to FLASH...
3. When the CLI prompt re-appears, the switch is ready to reboot to activate the downloaded
software:
a. Use the show flash command to verify that the new software version is in the expected
flash area (primary or secondary)
b. Reboot the switch from the flash area that holds the new software (primary or secondary),
using the following command:
Syntax:
boot system flash [ [<primary] | secondary> ]
130 Software management