
Basic Operation Guide 2013/06


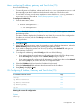

Table Of Contents
- Switch Software
- Contents
- 1 Commands found in the Basic Operation Guide
- 2 Getting started
- 3 Using the Menu Interface
- 4 Using the Command Line Interface (CLI)
- Overview
- Accessing the CLI
- Using the CLI
- Return message types with CLI commands
- CLI interactive commands
- CLI control and editing
- 5 Using the HP WebAgent
- 6 Switch memory and configuration
- Overview
- Configuration file management
- Using the CLI to implement configuration changes
- Creating a custom default configuration
- Using the menu and WebAgent to implement configuration changes configuration file
- Zeroization
- Using Primary and Secondary flash image options
- Multiple configuration files
- Display configuration of selected interface
- Automatic configuration update with DHCP Option 66
- 7 Interface access and system information
- 8 Configuring IP addressing
- Overview
- IP configuration
- Loopback interfaces
- IP Preserve: retaining VLAN-1 IP addressing across configuration file downloads
- Configuring a single source IP address
- 9 Software management
- Downloading switch documentation and software from the web
- Viewing or downloading the software manual set
- Downloading software updates for your switch
- Software signing and verification
- Saving configurations while using the CLI
- Important: Best Practices for software updates
- Updating the switch: overview
- Updating the switch: detailed steps
- Rolling back switch software
- Viewing or transferring alternate configuration files
- Downloading switch documentation and software from the web
- Index

value provided by the DHCP or Bootp server will be used. If the switch has a manually configured
default gateway, then the switch uses his gateway, even if a different gateway is received via
DHCP or Bootp on the primary VLAN. This is also true for manually configured TimeP, SNTP, and
Time-To-Live(TTL). (In the default configuration, VLAN 1 is the Primary VLAN.) Refer to the information
on Primary VLANs in the Advanced Traffic Management Guide for your switch.
Packet Time-To-Live (TTL). This parameter specifies the maximum number of routers (hops) through
which a packet can pass before being discarded. Each router decreases a packet’s TTL by 1 before
forwarding the packet. If decreasing the TTL causes the TTL to be 0, the router drops the packet
instead of forwarding it. In most cases, the default setting (64) is adequate.
Just want a quick start with IP addressing?
If you just want to give the switch an IP address so that it can communicate on your network, or if
you are not using VLANs, HP recommends that you use the Switch Setup screen to quickly configure
IP addressing. To do so, do one of the following:
• Enter setup at the CLI Manager level prompt.
HP Switch# setup
• Select 8. Run Setup in the Main Menu of the menu interface.
For more on using the Switch Setup screen, refer to the Installation and Getting Started Guide you
received with the switch.
IP addressing with multiple VLANs
In the factory-default configuration, the switch has one, permanent default VLAN (named
DEFAULT_VLAN) that includes all ports on the switch. Thus, when only the default VLAN exists in
the switch, if you assign an IP address and subnet mask to the switch, you are actually assigning
the IP addressing to the DEFAULT_VLAN.
NOTE:
• If multiple VLANs are configured, then each VLAN can have its own IP address. This is because
each VLAN operates as a separate broadcast domain and requires a unique IP address and
subnet mask. A default gateway (IP) address for the switch is optional, but recommended.
• In the factory-default configuration, the default VLAN (named DEFAULT_VLAN) is the switch’s
primary VLAN. The switch uses the primary VLAN for learning the default gateway address.
The switch can also learn other settings from a DHCP or Bootp server, such as (packet)
Time-To-Live (TTL), and Timep or SNMP settings. (Other VLANs can also use DHCP or BootP
to acquire IP addressing. However, the switch’s gateway, TTL, and TimeP or SNTP values,
which are applied globally, and not per-VLAN, will be acquired through the primary VLAN
only, unless manually set by using the CLI, Menu, or WebAgent. (If these parameters are
manually set, they will not be overwritten by alternate values received from a DHCP or Bootp
server.) For more on VLANs, refer to the chapter titled “Static Virtual LANs” in the Advanced
Traffic Management Guide for your switch.
• The IP addressing used in the switch should be compatible with your network. That is, the IP
address must be unique and the subnet mask must be appropriate for your IP network.
• If you change the IP address through either Telnet access or the WebAgent, the connection
to the switch will be lost. You can reconnect by either restarting Telnet with the new IP address
or entering the new address as the URL in your web browser.
106 Configuring IP addressing