
DCFM Installation, Migration, and Transition Guide - Supporting DCFM 10.3.x (53-1001360-01, October 2009)

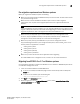

Table Of Contents
- Contents
- About This Document
- Installation
- In this chapter
- Headless installation information
- Professional, Professional Plus, and Enterprise edition feature support
- Requirements
- Professional edition installation
- Installing Professional edition on Windows systems
- Professional edition pre-installation requirements on UNIX systems
- Installing Professional edition on UNIX systems
- Professional edition pre-installation requirements on UNIX systems (headless)
- Installing Professional edition on UNIX systems (headless)
- Troubleshooting the Linux installation
- Professional Plus trial installation
- Professional Plus trial requirements
- Installing Professional Plus trial on Windows systems
- Professional Plus trial pre-installation requirements on UNIX systems
- Installing Professional Plus trial on UNIX systems
- Professional Plus trial pre-installation requirements on UNIX systems (headless)
- Installing Professional Plus trial on UNIX systems (headless)
- Professional Plus edition installation
- Installing Professional Plus edition on Windows systems
- Professional Plus edition pre-installation requirements on UNIX systems
- Installing Professional Plus edition on UNIX systems
- Professional Plus edition pre-installation requirements on UNIX systems (headless)
- Installing Professional Plus edition on UNIX systems (headless)
- Enterprise trial installation
- Enterprise trial requirements
- Installing Enterprise trial on Windows systems
- Enterprise trial pre-installation requirements on UNIX systems
- Installing Enterprise trial on UNIX systems
- Enterprise trial pre-installation requirements on UNIX systems (headless)
- Installing Enterprise trial on UNIX systems (headless)
- Enterprise edition installation
- Installing the ODBC driver
- Configuring an explicit server IP address
- Smart Card driver installation
- Uninstall
- Migration
- In this chapter
- Professional edition migration
- Professional edition pre-migration requirements on Windows systems
- Migrating from Professional edition 10.0.X to Professional edition 10.3.X on Windows systems
- Professional edition pre-migration requirements on UNIX systems
- Migrating from Professional edition 10.0.X to Professional edition 10.3.X on UNIX systems
- Migrating from Professional edition 10.1.X to Professional edition 10.3.X on Windows systems
- Migrating from Professional edition 10.1.X to Professional edition 10.3.X on UNIX systems
- Migrating from Professional edition 10.3.X to Professional Plus trial 10.3.X on Windows systems
- Migrating from Professional edition 10.3.X to Professional Plus trial 10.3.X on UNIX systems
- Migrating from Professional edition 10.3.X to Professional Plus edition 10.3.X on Windows systems
- Migrating from Professional edition 10.3.X to Professional Plus edition 10.3.X on UNIX systems
- Migrating from Professional edition 10.3.X to Enterprise trial 10.3.X on Windows systems
- Migrating from Professional edition 10.3.X to Enterprise trial 10.3.X on UNIX systems
- Migrating from Professional edition 10.3.X to Enterprise edition 10.3.X on Windows systems
- Migrating from Professional edition 10.3.X to Enterprise edition 10.3.X on UNIX systems
- Professional Plus trial migration
- Professional Plus trial requirements
- Upgrading Professional Plus trial to Professional Plus edition
- Professional Plus trial pre-migration requirements on Windows systems
- Migrating from Professional Plus trial to Professional Plus edition on Windows systems
- Professional Plus trial pre-migration requirements on UNIX systems
- Migrating from Professional Plus trial to Professional Plus edition on UNIX systems
- Migrating from Professional Plus trial to Enterprise trial on Windows systems
- Migrating from Professional Plus trial to Enterprise trial on UNIX systems
- Migrating from Professional Plus trial to Enterprise edition on Windows systems
- Migrating from Professional Plus trial to Enterprise edition on UNIX systems
- Professional Plus edition migration
- Upgrading Professional Plus edition to Enterprise edition
- Professional Plus edition pre-migration requirements on Windows systems
- Migrating from Professional Plus edition to Enterprise edition on Windows systems
- Professional Plus edition pre-migration requirements on UNIX systems
- Migrating from Professional Plus edition to Enterprise edition on UNIX systems
- Enterprise trial migration
- Enterprise trial requirements
- Upgrading Enterprise trial to Enterprise edition
- Enterprise pre-migration requirements on Windows systems
- Migrating from Enterprise trial to Enterprise trial on Windows systems
- Migrating from Enterprise trial to Enterprise edition on Windows systems
- Enterprise pre-migration requirements on UNIX systems
- Migrating from Enterprise trial to Enterprise trial on UNIX systems
- Migrating from Enterprise trial to Enterprise edition on UNIX systems
- Troubleshooting Linux installation
- Enterprise edition migration
- Enterprise edition pre-migration requirements on Windows systems
- Migrating from Enterprise edition 10.0.X on Windows systems
- Enterprise edition pre-migration requirements on UNIX systems
- Migrating from Enterprise edition 10.0.X on UNIX systems
- Migrating from Enterprise edition 10.1.X on Windows systems
- Migrating from Enterprise edition 10.1.X on UNIX systems
- EFCM migration
- Importing names
- Editing a user account
- Fabric Manager migration
- Transition
- Index
DCFM Installation, Migration, and Transition Guide 203
53-1001360-01
Pre-migration requirements on UNIX systems
2
20. Verify your configuration and license information on the Server License Summary screen and
click Next.
21. Click Start on the Apply User Settings screen.
User Settings migration may take up to 30 minutes.
22. Click Next on the Apply User Settings screen.
23. Select the Start Client check box, if necessary, on the Start Server screen and click Finish.
After all of the DCFM services are started, the Log In dialog box displays.
24. Enter your user name and password.
The defaults are Administrator and password, respectively. If you migrated from a previous
release, your username and password do not change.
25. Click Login.
26. Click OK on the Login Banner.
To import nicknames from EFCM, refer to “Importing names” on page 208.
Pre-migration requirements on UNIX systems
Before you migrate from EFCM, complete the following:
• Make sure that a version of EFCM is installed on your server that meets migration
requirements. For information about upgrading to a version of EFCM that meets migration
requirements, refer to the Upgrade Instructions for EFCM 9.6 or 9.7. You may also need to
upgrade E/OS versions on supported switches and directors.
- If you have EFCM 6.X, 7.0, or 7.1 software, you must upgrade to EFCM 7.2, then upgrade to
EFCM 9.1, then upgrade to EFCM 9.7 before you can migrate to DCFM Enterprise edition.
- If you have EFCM 8.0 through 8.6.1 software, you must upgrade to EFCM 9.1, then
upgrade to EFCM 9.7, before you can migrate to DCFM Enterprise edition.
- If you have EFCM 8.7 through 8.9.1 software, you must upgrade to EFCM 9.7, before you
can migrate to DCFM Enterprise edition.
- If you have EFCM 9.0 through 9.5 software, you must upgrade to EFCM 9.7, before you can
migrate to DCFM Enterprise edition.
• Make sure that you fully back up your current EFCM data on your management server.
To do this, copy the \EfcData directory to the Zip disk (notebook server) or CD-RW drive
management server) where backups occur. Overwrite the existing files.
• Make sure you fully back up your EFCM data on your current management servers.
Copy the following directories to your configured backup drive, where <Install_Home> is the
directory where the application is installed:
- <Install_Home>\Client
- <Install_Home>\Server
- <Install_Home>\Backup
- <Install_Home>\Call Home