
HP StoreEver 1/8 G2 Tape Autoloader User and Service Guide (AK377-96024, December 2012)


2. Verify the connection between the autoloader and the host:
• Install the HP Library & Tape Tools Diagnostic/Installation Check Utility onto the host
computer. This utility verifies that the unit is connected and communicating with the host
server. It also verifies that the device is functioning and provides diagnostic information.
Run the HP Library & Tape Tools Installation Check from the programs menu to verify your
connections. L&TT is available without cost at www.hp.com/support/TapeTools.
NOTE: L&TT 4.x versions may also be run from a CD, Compact Flash drive, or remote
directory after installation on another computer. See the HP Library and Tape Tool User
Guide for instructions for installing L&TT on a computer other than the server.
• Confirm that the host server's operating system recognized the device in Microsoft®
Windows® XP, Windows® Server 2003 or in Windows 2000® by going to: Settings
> Control Panel > System > Hardware > Device Manager > Tape Drive and/or Media
Changer.
For more information on verifying the connection of parallel SCSI devices, consult the operating
system documentation.
Labeling and loading the tape cartridges
Before using your new autoloader you must load tape cartridges into the magazines.
To prepare your tape cartridges and load them into the autoloader:
1. Obtain tape cartridges compatible with your autoloader. (See “Tape cartridges” (page 30).)
2. Label any unlabeled tape cartridges to improve inventory time. (See “Labeling tape
cartridges” (page 31).)
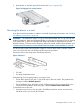
3. Remove one of the magazines from the autoloader with the RMI or OCP:
• RMI: see “Releasing and replacing the magazines” (page 60).
• OCP: see “Unlocking, removing, and replacing magazines (Operations > Unlock Left or
Right Magazine)” (page 79)
The autoloader will not perform any other action while a magazine is out of the device.
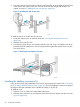
4. Insert the tape cartridges into the magazine. (See “Magazines” (page 34).)
5. Slide the magazine into the autoloader.
6. Remove the other magazine, insert the tape cartridges, and replace the magazine.
Verifying the installation
Verify that the device has the current firmware revision.
To see the firmware revision on the front panel:
1. From the Home screen, press Next until the display shows Status/Information. Press Enter.
2. Press Next until the display shows Autoloader Information. Press Enter.
3. Press Next until the display shows the Firmware Rev.
To find the current firmware revision, visit the HP Support website: www.hp.com/support.
If necessary, update the device firmware:
• From the RMI, see “Determining and updating firmware ” (page 62).
• From the OCP, see “Upgrading firmware (Support > Autoloader FW Upgrade, Support >
Drive FW Upgrade)” (page 84).
• Using HP Library and Tape Tools (L&TT), which can be downloaded free of charge from
www.hp.com/support/TapeTools.
After configuring the autoloader, you can save the configuration settings to a USB flash drive from
the OCP or to a file from the RMI Configuration: Save/Restore screen. Having a backup of the
28 Installing the autoloader