
HP StoreEver 1/8 G2 Tape Autoloader User and Service Guide (AK377-96024, December 2012)
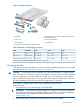


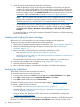


3. Store the lock on the back panel of the device (see Figure 14 (page 23)).
Figure 14 Shipping lock storage location
Mounting the device in a rack
If you plan to set the autoloader on a table or rack shelf, skip this step and continue with “Installing
the Tabletop Conversion Kit” (page 24).
WARNING! The autoloader weighs 11.5 kg (25.4 lb) without media and 13.1 kg (28.9 lb) with
media (8 cartridges). When moving the autoloader, to reduce the risk of personal injury or damage
to the autoloader: 1) observe local health and safety requirements and guidelines for manual
material handing, 2) always remove all tapes to reduce the overall weight of the autoloader, and
3) obtain adequate assistance to lift and stabilize the autoloader during installation or removal.
The device easily installs into the HP Rack System/E, or the HP Rack 5000 or HP Rack 10000
series. You need a #2 and a #3 Phillips screwdriver for this procedure.
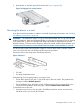
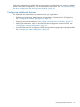
Unpack the rack kit and verify that it includes the following:
Figure 15 Rack kit
• Two rails
• Two bags of eight M6 screws.
Select the bag of screws appropriate for your type of rack.
• The HP Rack System/E rack has 7.1 mm round holes in the rack column. The packet for this
rack type is labeled HP Rack System/E.
• The HP Intelligent Series, HP 5000, and HP 10000 racks have 9.5 mm square holes in the
rack column. The packet for these rack types is labeled HP Rack 5000, 10000 Series.
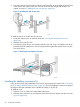
To install the rails into the rack:
1. Using the screws for your rack type and a #3 Phillips screwdriver, secure one rail to each
side of the rack in your chosen rack location.
Mounting the device in a rack 23