
HP StoreEver 1/8 G2 Tape Autoloader User and Service Guide (AK377-96024, December 2012)
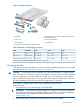

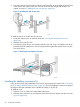


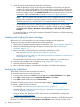


Figure 11 Product components
2. Parallel SCSI or SAS interface cable (parallel SCSI and
SAS autoloaders only)
1. Autoloader
4. Product documentation3. Power cord
6. Six support feet5. Ethernet cable
7. SCSI terminator (parallel SCSI autoloaders only)
Table 9 Maximum FC cable lengths (in meters)
8 Gb4 Gb2 GbCable typeDrive
NA0.5 - 150 m0.5 - 300 mOM2All
0.5 - 50 m0.5 - 150 m0.5 - 300 mOM3, OM4LTO-5 HH*
0.5 - 150 m0.5 - 380 m0.5 - 300 mOM3, OM4All except LTO-5 HH
* The LTO-5 Ultrium 3000 half-height drive is shown as LTO-5 HH.
Attaching the feet
If you plan to mount the autoloader in a rack or in the optional tabletop conversion cover, skip this
step and continue with “Removing the shipping lock” (page 22).
CAUTION: The autoloader must be supported only under both side edges to operate properly.
If the autoloader is not mounted in a rack or in the tabletop conversion kit, you must apply the feet.
Do not put anything on top of the autoloader. Weight on top of the autoloader can prevent the
robotic inside from moving properly. If you must place items on top of the autoloader, install it in
the optional tabletop conversion cover, which can support up to 15 kg (33 lb).
You need the six support feet from the accessory package for this procedure.
To attach the feet:
1. Verify that there are no tape cartridges in the autoloader.
IMPORTANT: The autoloader may be damaged if it is turned over with tape cartridges in
the magazines or robot. If the autoloader has been used before, use the manual magazine
release to remove the cartridges from the magazines (see “Using the manual
release” (page 132).
2. With another person, gently turn the autoloader over and set it on its back.
Attaching the feet 21