
HP StorageWorks 1/8 G2 Tape Autoloader getting started guide (AH163-96009, March 2007)
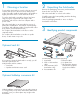
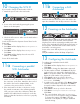


Skip this step if you are mounting the Autoloader in a
rack or installing the optional tabletop conversion cover.
Gently turn the Autoloader over and set it on its back.
Locate the six inscribed foot location lines.
Peel the backing paper off each foot and apply it within
a set of foot location lines.
Turn the Autoloader right side up.
Attaching the feet
4
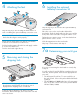
Locate the tape holding the lock at the top of the
Autoloader. Remove the tape, then remove the lock and
store it as shown.
Removing and storing the
shipping lock
5
IMPORTANT! The Autoloader must be supported under
both of its side edges to work properly.
IMPORTANT! The shipping lock must be removed for
the robotics to work properly. A robot move error is
displayed if the shipping lock is not removed.
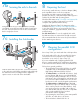
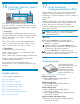
Skip this step if you do not have the optional tabletop
conversion kit.
Place the cover on the work surface behind the
Autoloader. Slide the Autoloader into the cover until the
front panel of the Autoloader is aligned with the cover.
Tighten the two captive screws on the Autoloader front
panel until the cover is secure.
Slide the magazines into the Autoloader.
Skip Step 7 and continue with Step 8.
Installing the optional
tabletop conversion kit
6
If you are not mounting the Autoloader in a rack, skip
to Step 8.
You will need a #2 and #3 Phillips screwdriver, the two
rack rails, and the packet of M6 screws appropriate for
your rack.
• The HP System/E rack has 7.1 mm round holes in
the rack column. Choose the packet labeled HP Rack
System/E.
• The HP 5000 and 10000 racks have 9.5 mm square
holes in the rack column. Choose the packet labeled
HP Rack 5000, 10000.
Determining your rack type
7a