
HP StorageWorks 1/8 G2 Tape Autoloader getting started guide (AH163-96009, March 2007)
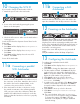


To mount the Autoloader in a rack, select an open rack
location with access to the host server and a power
outlet. If possible, install the Autoloader in the middle or
higher part of the rack to avoid dust from the floor.
To set the Autoloader on a table, select a level area
large enough to support both side edges of the
Autoloader, with access to the host computer and a
power outlet.
Place the Autoloader in an area with few sources of
particulate contamination. Avoid areas near frequently
used doors and walkways, stacks of supplies that collect
dust, printers, and smoke-filled rooms.
Do not place the Autoloader on the floor or other
carpeted surface.
Do not place the Autoloader on its sides or upside
down, or stack items on top of it.
Choosing a location
1
If you want to mount the Autoloader in a rack, you will
need the optional rack kit.
Verify that the rack kit contains:
• 2 rack rails
• 2 packets with 8 M6 screws each
Optional rack kit
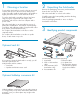
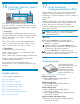
Confirm that you received the following:
1 Autoloader
2 SCSI or SAS interface
cable
3 SCSI terminator (SCSI
Autoloaders only)
4 Documentation kit
5 Ethernet cable
6 Six plastic feet
7 HP OpenView Storage
Data Protector Express
Single Server Edition
CD
1
2
5
3
6 7
4
Identifying product components
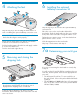
3
With the tabletop conversion kit you can place items up
to 15 kg (33 lb.) on top of the Autoloader. Without the
protective cover you cannot place any weight on the
Autoloader.
Optional tabletop converson kit
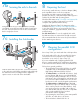
Remove the packaging, accessories, and Autoloader
from the box one layer at a time.
Place the Autoloader on a level work surface.
Carefully remove the foam padding and then the bag
from the Autoloader.
Save the packaging materials to move or ship the
Autoloader in the future.
Unpacking the Autoloader
2