
Hitachi Dynamic Link Manager Software Users Guide for AIX (7.6)
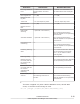
Table Of Contents
- User Guide for AIX®
- Contents
- Preface
- Overview of HDLM
- HDLM Functions
- Devices Managed by HDLM
- System Configuration
- LU Configuration
- Program Configuration
- Position of the HDLM Driver and hdisk
- Distributing a Load Using Load Balancing
- Performing Failovers and Failbacks Using Path Switching
- Monitoring intermittent errors (functionality when automatic failback is used)
- Detecting errors by using path health checking
- Distributing a Load by Using the Dynamic I/O Path Control Function
- Error management
- Collecting Audit Log Data
- Integrated HDLM management using Global Link Manager
- Cluster support
- Creating an HDLM Environment
- HDLM System Requirements
- Flow for Creating an HDLM Environment
- Types of HDLM Installation
- Notes on Creating an HDLM Environment
- Installing HDLM
- Available Installation Methods
- Preparations for a New Installation of HDLM
- Performing a New Installation of HDLM
- Preparations for an Upgrade Installation or Re-installation of HDLM
- Performing an Upgrade Installation or Re-installation of HDLM
- Migrating from HDLM Version 5.8.1 or Earlier to Version 5.9 or Later
- Installing HDLM in a PowerHA 6.1 Environment
- Installing HDLM in a PowerHA 7.1 Environment
- Performing an Unattended Installation of HDLM
- Checking the Path Configuration
- Setting up HDLM
- Setting up Integrated Traces
- Notes on Using the Hitachi Network Objectplaza Trace Library
- Displaying the Hitachi Network Objectplaza Trace Library setup menu
- Changing the Size of Integrated Trace Files
- Changing the Number of Integrated Trace Files
- Changing the Buffer Size Per Monitoring Interval Duration
- Adjusting the Number of Messages to be Output Per Monitoring Interval
- Finishing the Hitachi Network Objectplaza Trace Library Settings
- Applying the Hitachi Network Objectplaza Trace Library Settings
- About the Reservation Policy
- Settings for Using PowerHA
- Settings for Using GPFS
- Settings for Using Oracle RAC 10g or Oracle RAC 11g
- Settings for Using VCS
- Removing HDLM
- HDLM Operation
- Notes on Using HDLM
- Displaying Path Information
- When a Path Error Is Detected
- Storage System
- Notes on Shutting Down a Host
- Notes on Errors in a Host
- Notes on Enabling Both Primary and Secondary Volumes to Be Viewed From the Same Server
- Notes on an LVM Mirror Configuration
- Notes on When the OS Functionality in Not Available in a Boot Disk Environment
- Notes on Replicating a System
- HDLM Operations Using Commands
- Notes on Using Commands
- Viewing Path Information
- Changing the Status of Paths
- Viewing LU Information
- Displaying the Correspondences Between hdisks, OS Management Path IDs, and LDEVs
- Initializing Statistical Information for Paths
- Viewing and Setting Up the Operating Environment
- Viewing License Information
- Updating the License
- Viewing HDLM Version Information
- Viewing HDLM Component Information
- Starting and Stopping the HDLM Manager
- HDLM Resident Processes
- Changing the Configuration of the HDLM Operating Environment
- Notes on Using HDLM
- Troubleshooting
- Command Reference
- Overview of the HDLM Command dlnkmgr
- clear (Returns the Path Statistics to the Initial Value)
- help (Displays the Operation Format)
- offline (Places Paths Offline)
- online (Places Paths Online)
- set (Sets Up the Operating Environment)
- view (Displays Information)
- add (Adds a Path Dynamically)
- delete (Deletes a Path Dynamically)
- Utility Reference
- Overview of the Utilities
- DLMgetras Utility for Collecting HDLM Error Information
- dlmchpdattr Utility for Changing HDLM Default Settings
- dlmgetrasinst Utility for Collecting HDLM Installation Error Information
- dlminstcomp Utility for HDLM Component Installation
- dlmmigsts Utility for Assisting HDLM Migration
- dlmodmset Utility for Setting the HDLM Execution Environment ODM
- dlmpostrestore Utility for HDLM Restoration Support
- dlmpr Utility for Clearing HDLM Persistent Reservation
- dlmpremkcd Utility for Preparing for a System Backup
- dlmpreremove Utility for Executed Before Removing HDLM
- dlmrmdev Utility for Deleting HDLM Drivers
- dlmrmprshkey Utility for Clearing HDLM Persistent Reservation (Shared-Host Methodology)
- installhdlm Utility for Installing HDLM
- installux.sh Utility for HDLM Common Installer
- Messages
- Before Viewing the List of Messages
- KAPL01001 to KAPL02000
- KAPL03001 to KAPL04000
- KAPL04001 to KAPL05000
- KAPL05001 to KAPL06000
- KAPL06001 to KAPL07000
- KAPL07001 to KAPL08000
- KAPL08001 to KAPL09000
- KAPL09001 to KAPL10000
- KAPL10001 to KAPL11000
- KAPL11001 to KAPL12000
- KAPL13001 to KAPL14000
- KAPL15001 to KAPL16000
- Return Codes for Hitachi Command Suite Common Agent Component
- Functional Differences Between Versions of HDLM
- Differences Between HDLM Version 5.9 or Later and Version 5.8.1 or Earlier
- Add-in HDLM Driver Module
- Simplifying the HDLM Environment Configuration and Operation Procedures by Changes to the Logical Device Files
- Changing the HDLM Environment Configuration and Operation Procedures by Changes to the Logical Device Files
- Migrating Reservation Control Settings
- Support for a Boot Disk Environment
- About Settings when Upgrading the OS
- Changing a Virtual I/O Server's Method of Recognizing Virtual SCSI Disks
- Acronyms and abbreviations
- Glossary
- Index

If intermittent error monitoring is on and the number of times that the
error is to occur is set to a value of 2 or more, the following condition
must be satisfied:
error-monitoring-interval >= checking-interval-for-automatic-
failback × number-of-times-error-is-to-occur-during-
intermittent-error-monitoring
If this condition is not satisfied, the KAPL01080-W message will be
output and an error will occur. If this happens, change any of the
following settings: the checking interval for automatic failbacks,
intermittent error-monitoring interval, or the number of times that the
error is to occur.
When you set the number of times that the error is to occur to 1, the
above condition does not need to be satisfied.
When you changed the error monitor interval while intermittent error
monitoring is running, the new settings will take effect immediately.
When the checking interval is shortened and the checking interval
time after the change has already elapsed during the current checking
interval, the path status check will start over.
This setting remains stored in the system, even if you disable the
function by changing the setting of automatic failbacks to off.
Therefore, if you re-enable automatic failbacks and do not change the
interval, path status checks will be executed at the interval already
stored in the system.
-iem { on [-intvl
error-monitoring-interval] [-iemnum number-of-times-
error-is-to-occur] | off }
Enables or disables intermittent error monitoring.
on: Enabled
off: Disabled
Intermittent error monitoring can be enabled only when automatic
failback is set to on.
When you use automatic failback, we recommend that you set
intermittent error monitoring to on to prevent an intermittent error from
reducing I/O performance.
If on is specified, be sure to also specify the intermittent error monitoring
interval and the number of times that the error is to occur. The system
assumes that an intermittent error is occurring if the specified number of
times that the error is to occur is reached during the monitoring interval.
A path that is assumed to have an intermittent error is excluded from
automatic failbacks. Intermittent error monitoring is performed on each
path. Intermittent error monitoring starts when a path is recovered from
an error by performing an automatic failback.
If you omit the intermittent error monitoring interval or the number of
times that the error is to occur, each setting is specified as follows:
¢
When the intermittent error monitoring interval or the number of
times that the error is to occur has not been specified before:
The intermittent error monitoring interval is set to 210 minutes, and
the number of times that the error is to occur is set to 3.
6-24
Command Reference
Hitachi Dynamic Link Manager User Guide for AIX
®