
Hitachi Dynamic Link Manager Software Users Guide for Solaris (7.6)


• Slice 0: / (root) file system
• Slice 1: Swap device and dump device
• Slice 6: /usr file system
• Slice 7: SVM state database
1. Prepare another LU with the same capacity as that of the created boot
disk, and make the configuration and capacity of slices the same.
2. Create the SVM state database.
# matadb -a -f c8t50060E08000436D1d4s7
# metadb -a c8t50060E08000436D1d5s7
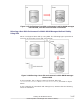
3. Decide the metadevice names.
In this procedure, specify the settings as follows:
¢
/ (root) file system
d10(mirror) ---- d11(submirror),d12(submirror)
¢
swap
d20(mirror) ---- d21(submirror),d22(submirror)
¢
/usr
d30(mirror) ---- d31(submirror),d32(submirror)
4. Create metadevices for / (root), swap, and /usr, and then mirror each of
them (single mirror).
# metainit -f d11 1 1 c8t50060E08000436D1d4s0
# metainit d10 -m d11
# metainit -f d21 1 1 c8t50060E08000436D1d4s1
# metainit d20 -m d21
# metainit -f d31 1 1 c8t50060E08000436D1d4s6
# metainit d30 -m d31
5. Edit the file /etc/vfstab to change the swap definition to the
metadevice /dev/md/dsk/d20, and the /usr definition to the
metadevice /dev/md/dsk/d30.
Before change:
/dev/dsk/c8t50060E08000436D1d4s1 - swap - no
-
/dev/dsk/c8t50060E08000436D1d4s6 /dev/rdsk/
c8t50060E08000436D1d4s6 /usr ufs 1 no -
After change:
/dev/md/dsk/d20 - swap - no -
/dev/md/dsk/d30 /dev/md/rdsk/d30 /usr ufs 1 no -
6. Set the dump device.
# dumpadm -d /dev/md/dsk/d20
3-118
Creating an HDLM Environment
Hitachi Dynamic Link Manager User Guide for Solaris
®