HP Handheld sp400 Series All-in-One Scanner Printer System Administrator Guide
Copyright information Trademark credits (c) Copyright 2008 Hewlett-Packard Development Company, L.P. Microsoft and Windows are U.S. registered trademarks of Microsoft Corporation. The information contained herein is subject to change without notice. The only warranties for HP products and services are set forth in the express warranty statements accompanying such products and services. Nothing herein should be construed as constituting an additional warranty.
Contents Contents 1 Introduction About this guide.................................................................................................................................................... 6 The All-in-One briefly explained ........................................................................................................................... 6 Configuration and wireless options ....................................................................................................................
Contents 6 Maximize print quality Materials and technique ..................................................................................................................................... 32 7 Ensure Optimal Comfort Ergonomic recommendations – General............................................................................................................ 33 Ergonomic recommendations – Hand mount specific ........................................................................................
Contents Environmental specifications.............................................................................................................................. 60 Wireless specifications ....................................................................................................................................... 61 Range of wireless module............................................................................................................................. 61 Other specifications.........
Introduction 1 Introduction About this guide This guide provides information that users and system administrators need to set up and maintain the HP Handheld All-in-One. The All-in-One briefly explained The HP Handheld All-in-One lets you scan and print in almost any location in your environment. The entire unit, including power source, attaches comfortably to your hand and arm so you can move around while working.
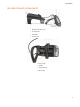
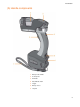
Introduction (a) Hand mount components 1 Battery inside wrist case 2 Control panel 3 All-in-One 4 Hand mount 1 Finger strap 2 Rudder 3 Strap fasteners 4 Wrist strap 7
Introduction (b) Handle components 1 Battery inside handle 2 Control panel 3 All-in-One 4 Auto/Manual switch 5 Trigger 6 Battery release 7 Lanyard 8
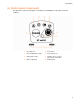
Introduction (c) Control panel components The All-in-One control panel displays several buttons and LED lights for operation and visual feedback.
Safety information 2 Safety information General safety CAUTION: • The HP Handheld All-in-One is meant for hand-held, hand-mounted or handle-mounted use only. It is not intended or authorized for operation within 20 centimeters (8 inches) of the head or torso. • Do not submerge this device in water. • If you experience discomfort, discontinue use of the All-in-One and notify your supervisor immediately.
Set up the All-in-One 3 Set up the All-in-One Install the battery cable – Hand mount only Insert the battery cable into the bottom of the hand mount, as shown. NOTE: The Handle battery cable is permanently wired. Assemble the hand mount or handle accessory Hand mount: 1. Align the hand mount with the All-in-One as shown. 2. Slide the hand mount until it clicks into place.
Set up the All-in-One Handle: 1. Align the handle with the All-in-One as shown. 2. Slide the All-in-One until it clicks into place.
Set up the All-in-One Install the print cartridge 1. Turn off the All-in-One by pressing and holding the green Power button for three seconds if it is not already off. IMPORTANT: Always turn off the All-in-One before installing a print cartridge. 2. Remove the protective tape from the print cartridge by pulling it straight out. 1 Metal contacts 2 Ink nozzles IMPORTANT: Hold the print cartridge by its sides, as shown above. Do not touch the metal contacts or the ink nozzles. 3.
Set up the All-in-One 4. Align the print cartridge with the drawing on the door, and then carefully seat the cartridge in the door. The label on the print cartridge should face away from the door. The metal contacts should face the All-in-One. 1 Metal contacts 2 Label 3 Door 4 Drawing 5. Close the door, ensuring it latches securely.
Set up the All-in-One Install the battery and fit the wrist case – Hand mount configuration IMPORTANT: Remove all jewelry from your wrist and hand before fitting the All-in-One. 1. Insert a fresh battery as shown in the 3 figures below.
Set up the All-in-One 2. Secure the flap to retain the battery. 3. Position the front strap behind your wrist. 4. Secure the arm straps. 1 Battery gauge NOTE: The battery gauge should face upward and be visible through the cutout on top of the battery wrist case. CAUTION: Do not over-tighten the straps. Over-tightening can cause discomfort.
Set up the All-in-One Fitting the hand mount IMPORTANT: Remove all jewelry from your wrist and hand before fitting the All-in-One. 1. Loosen the finger strap by detaching the fastener ends and then rotating the buckles outward so that the strap can slip freely through the buckles. 2. Center the rubberized portion of the finger strap between the buckles. 3. Loosen the wrist strap by releasing the fastener ends and pulling the straps through the buckles. 4.
Set up the All-in-One 7. Tighten the finger strap by pulling straight up from the buckle until there is no movement between the hand and the All-in-One and then secure the fastener ends to lock the finger strap in place. IMPORTANT: The finger strap must be tight enough to prevent motion between the fingers and the All-in-One because under-tightening may lead to irritation. Do not over-tighten to the point that numbness or discomfort results.
Set up the All-in-One Connect the battery cable IMPORTANT: Use only the following HP batteries: product number CE199A or CE201A. 1. Align the arrow on the battery cable connector with the top of the battery case. 2. Push in to connect the battery cable to the battery. Handle setup Install battery in handle accessory – Handle configuration 1. Insert a fresh battery as shown.
Set up the All-in-One 2. Ensure battery clicks in securely. Handheld use 1. Place hand through Lanyard and tighten slide on strap so secure and comfortable 2.
Set up the All-in-One Hanging use 1. Connect handle to overhead mechanism by lanyard inserted at top of handle Storage option 1.
Configure the All-in-One 4 Configure the All-in-One Overview The All-in-One is designed for use with a server-based application that sends print data in response to scan data received from the All-in-One. The general process is as follows: 1. When turned on, the All-in-One attempts to register with the server using network and server configuration parameters that are stored in the All-in-One. 2. The All-in-One queries the server for any updates (firmware or configuration, for example). 3.
Configure the All-in-One Configure the All-in-One HP sp400 Series Configuration Software is available for download at the All-in-One website (www.hp.com/support/handheldsp400aio). This Windows®-based software is used to configure the necessary device settings so that the All-in-One can communicate with the server application.
Operate the All-in-One 5 Operate the All-in-One Turn on the All-in-One Press the green Power button and hold for one second. • All lights on the control panel and the tail lights will blink once, and the All-in-One will emit a tone. • The green Power light will continue to blink until the All-in-One completes its initialization phase. • The blue Wireless light will blink until the All-in-One establishes wireless connectivity. When connected, the All-in-One will emit a Lo-Hi tone.
Operate the All-in-One Scan Scan instructions – Hand mount configuration The All-in-One can scan most one-dimensional and two-dimensional bar code symbologies. See “All-in-One Specifications” for a complete list. 1. Aim the green light bar at the bar code. 2. Hold the All-in-One 6 - 9 inches from the bar code. 3. Hold the All-in-One at a slight angle (approximately 5 degrees) to the scan surface. NOTE: Hold steady for best results.
Operate the All-in-One NOTE: There are two ways to clear the bar code or symbol and prepare the All-in-One to scan again: • Press the yellow CLEAR button. The red tail lights will flash once and the All-in-One will emit a tone. • Wait for the All-in-One to time out and erase the scan from the memory. The All-in-One will emit a Hi-Lo tone and the red tail lights will flash once.
Operate the All-in-One When the scan is complete, the imager light will turn off, and the All-in-One will emit a Hi tone. When the All-in-One is ready to print, it will display green tail lights and emit a Hi tone. NOTE: There are two ways to clear the bar code or symbol and prepare the All-in-One to scan again: • Press the yellow CLEAR button. The red tail lights will flash once and the All-inOne will emit a tone. • Wait for the All-in-One to time out and erase the scan from the memory.
Operate the All-in-One Print Print instructions 1. Locate a clean, flat surface near the bar code for printing. 2. Place the nose of the All-in-One against the surface. The All-in-One should rest at an angle of about 7 degrees from vertical. 3. Move the All-in-One straight across the surface. 4. When the print is finished, the green light will turn off and the All-in-One will emit a Hi tone. CAUTION: Maintain a relaxed wrist and hand posture and use low force when printing.
Operate the All-in-One • If you perform a partial or incomplete print, the All-in-One will time out, emit a Hi-Lo tone, and the red tail lights will flash once. Clear print data If you find that you have an incomplete print or do not wish to print, two options are available: • Press the yellow CLEAR button on the control panel, then scan and print again. The All-in-One will emit a single mid-tone note and the green tail lights will turn off after the CLEAR button is pressed.
Operate the All-in-One Turn off the All-in-One To turn off the All-in-One, press and hold the green Power button for three seconds. IMPORTANT: Turn off the All-in-One before disconnecting the battery cable. Remove the All-in-One and wrist case – Hand mount configuration 1. After turning off the All-in-One, grasp the battery cable connector and pull straight out. IMPORTANT: Do not pull on the battery cable; pull on the battery cable connector that is plugged into the battery. 2.
Operate the All-in-One Remove the battery – Handle configuration NOTE: Normally, there is no need to remove the All-in-One from the handle 1. After turning off the All-in-One, press up on the release on the back of the handle and grasp the battery 2. Remove battery by pulling straight out . 3. See Remove the All-in-One from handle accessory if you need to take the unit out.
Maximize print quality 6 Maximize print quality For information about solving print problems, see "Problems printing." CAUTION: HP ink is not certified for application to people or animals. Do not intentionally print on any part of a person or animal. CAUTION: Do not print on food. The ink used in the All-in-One is not approved for consumption. HP recommends testing the printed images for readability in your environment and on your material.
Ensure Optimal Comfort 7 Ensure Optimal Comfort Ergonomic recommendations – General For optimal results and comfort, follow these ergonomic recommendations: • If you experience discomfort, discontinue use of the All-in-One and notify your supervisor immediately. If you experience persistent or recurring pain or discomfort that you think may be related to using the All-in-One, you should promptly consult a qualified physician and, if available, your company’s health and safety department.
Ensure Optimal Comfort • The All-in-One can be worn on the right or left hand and arm. You may alternate wearing the All-in-One on the right and left hand and arm. • If gloves are worn while using the All-in-one, ensure they fit properly. The gloves should conform to your fingers and not significantly bunch under the finger strap. The finger length of the gloves should be as long as your fingers so the glove webspace does not force the All-inone forward.
Maintain the All-in-One 8 Maintain the All-in-One Order supplies and accessories Use the information in this section to order replacement print cartridges and other supplies. The Allin-One is designed to enable easy, in-the-field replacement of heavily-used components.
Maintain the All-in-One Clean the All-in-One CAUTION: Unplug the battery from the All-in-One before doing any cleaning procedure. CAUTION: Never spray or douse the All-in-One with any liquid. Use only dampened wipes, cloths, or swabs to clean the All-in-One. IMPORTANT: Use only materials from the list below to clean the All-in-One (see "Cleaning materials," below). Other solvents or cleaners may damage the plastic, paint, or the adhesives used in the All-in-One.
Maintain the All-in-One Clean the wrist case and hand mount Use a baby wipe or a cotton cloth dampened with deionized water to scrub all areas of the hand mount, straps, and wrist case that have come into direct contact with the skin. Clean the door To clean the opening in the door, do the following: IMPORTANT: Do not touch the metal contacts or the ink nozzles. 1. Remove the print cartridge from the door. 2. Use a dry cotton cloth to remove the ink-soaked fibers from the opening in the door. 3.
Maintain the All-in-One Remove the All-in-One from handle accessory 1 2 1. Squeeze both of the release buttons on the back of the handle. 2. Slide the All-in-One forward out of the handle. NOTE: It may help to press the All-in-One from the back and then pull the unit the rest of the way from the front. NOTE: Pushing the All-In-One out too forcefully can cause it to fall out of the handle and possibly becoming damaged.
Maintain the All-in-One Replace the battery cable – Hand mount configuration 1. Remove the hand mount from the All-in-One. See "Remove the All-in-One from hand mount accessory,” above. 2. Remove the battery cable by lifting up. 3. Insert a new battery cable. 4. Reinstall the hand mount. Replace the finger strap – Hand mount configuration 1. Remove the hand mount. See "Remove the All-in-One from hand mount accessory." 2. Remove the finger strap by lifting the old buckles out of the notches.
Maintain the All-in-One Replace the wrist strap – Hand mount configuration NOTE: This procedure can be done without removing the hand mount. 1. Release the wrist strap fastener ends. 2. Pull the old wrist strap through the buckle. 3. Insert the new wrist strap. 3 Wrist strap 4 Buckle IMPORTANT: Make sure the fastener strap is on the outside of the wrist strap, away from the skin.
Maintain the All-in-One Replace the rear buckle – Hand mount configuration NOTE: This procedure can be done without removing the hand mount. 1. Grasp the buckle firmly and push it toward the gel pad until it releases. 2. Position the new buckle so it is angled as illustrated and press it into place. 1 2 NOTE: The circled illustration, below, shows the buckle installed incorrectly. Note the angle of the buckle to the All-in-One.
Maintain the All-in-One Replace the door 1. Remove the old door by opening the door 90 degrees and then pulling away to disengage the hinge. 2. Replace with a new door by aligning the hinge and pressing the hinge onto the metal pin. Recycle HP encourages customers to recycle used electronic hardware, HP original cartridges, and rechargeable batteries. For more information about HP recycling programs, go to www.hp.com/recycle.
Troubleshoot Problems and Get Support 9 Troubleshoot Problems and Get Support Problems powering on the All-in-One Figure 9-1 Problems powering on the AiO Problem Indicator Cause Solution The All-in-One will not power on The green power button was not pushed. Press the green power button. The battery is depleted. Recharge the battery. Green power light doesn’t stay on Replace the battery. The battery is not plugged in correctly.
Troubleshoot Problems and Get Support Figure 9-2 Problems connecting the AiO to a wireless network Problem Indicator The All-in-One is not communicating with the application server Cause Solution a weak signal between the AiO and the access point. Access points may need to be relocated or added. The network is overloaded Reduce number of AiOs or other traffic on the network or expand the network’s capabilities. The network settings may not be compatible with the AiO.
Troubleshoot Problems and Get Support Figure 9-3 Problems scanning Problem Cause Solution The red imager light illuminates but the AiO takes more than a few seconds to scan. The AiO may be positioned too far from target. Ensure that the AiO is aimed directly at the target. Scans are not successful. Invalid target or barcode Red scanning light will not turn off immediately after scan Ensure that the AiO is 2-12” away from the target.
Troubleshoot Problems and Get Support Figure 9-4 Problems printing Problem Cause Solution Red tail lights flash once and the AiO Reconfigure the time out to provide more time for printing emits a hi-low tone The printer wheel on the AiO was not Ensure that the wheel is in contact with the print surface in contact with the print surface for and rolls for the duration of print. the duration of the print.
Troubleshoot Problems and Get Support Figure 9-5 Problems printing correctly Problem Cause Solution The print smears after printing. The ink is not dry. • Allow more time for the ink to dry. • Try to avoid printing on surfaces that take longer to dry, such as plastic sleeves, tape, etc. • • • • • Print rubs off Increase air flow in the area. Make sure the printed surface is dry. Increase the temperature in the area. Lower the humidity of the area. Change to Fast Dry template.
Troubleshoot Problems and Get Support Errors and warning conditions General errors and warning conditions Table 9-2 Critical error Visual feedback Solid, red Error light Audio Cause Solution Hi tone, 3x Critical error All-in-One needs to be serviced. Solid, red tail lights Note: Other lights may be on (blinking or solid) also.
Troubleshoot Problems and Get Support Battery errors and warning conditions Table 9-4 Battery: Low Visual feedback Slow blinking, orange Battery light Audio Cause Solution None Battery low (configurable %) Warning only. CAUTION: As the battery approaches very low, the light will blink faster and the Hi tone will sound every minute. Table 9-5 Battery: Very low Visual feedback Fast blinking, orange Battery light Audio Cause Solution Hi tone Battery very low (configurable %) Replace battery soon.
Troubleshoot Problems and Get Support Print cartridge errors and warning conditions Table 9-8 Print Cartridge: Bad installation Visual feedback Fast blinking, red Error light Audio Cause Solution Hi-Lo tone, 2x Print cartridge error: • bad installation • missing cartridge • bad cartridge Ensure that the print cartridge is seated correctly. Ensure that the door is closed. If problem persists, replace the print cartridge.
Troubleshoot Problems and Get Support Table 9-12 Print Cartridge: Ink low Visual feedback Slow blinking, orange Print Cartridge light Audio Cause Solution None Ink low (configurable %) Warning only. Table 9-13 Print Cartridge: Ink very low Visual feedback Fast blinking, orange Print Cartridge light Audio Cause Solution Hi tone Ink very low (configurable %) Replace print cartridge soon. NOTE: As long as printing continues, the audio tone will be heard at approximately 1 minute or intervals.
Troubleshoot Problems and Get Support Table 9-16 Scanning/Wireless: Application server unavailable Visual feedback Slow blinking, blue Wireless light Audio Cause Solution Hi-Lo tone The All-in-One is configured incorrectly. Verify that your network has a DHCP server. If the network does not have a DHCP server, you must configure the All-in-One for static IP addressing (see “Set up the wireless network” in the “Advanced use” section).
Troubleshoot Problems and Get Support Support services If you have a problem, follow these steps: 1. Check the documentation that came with the product. 2. Visit the HP online support Web site at www.hp.com/support/handheldsp400aio. Online support is available to all HP customers.
Advanced Use 10 Advanced Use System requirements • • • All-in-One device and accessories Wireless network and server application Computer with the following installed on it: ○ ○ ○ ○ • Windows® XP and Service Pack 2 Microsoft® .NET Framework 2.
Advanced Use Set up the wireless network Bluetooth For instructions for using Bluetooth wireless, see the Bluetooth configuration instructions at www.hp.com/support/handheldsp400aio. 802.11b wireless 1. Connect either the handmount with battery or handle with installed battery to the All-in-One. 2. Connect the All-in-One to a computer with a USB cable. Figure 10-7 Connecting the All-in-One to a computer 3. Turn on the All-in-One. 4. Use the HP sp400 Series Configuration Software to configure the 802.
Advanced Use Design print templates Use the HP sp400 Series Template Design Software to design print templates for the All-in-One. 1. Download the HP sp400 Series Template Design Software at www.hp.com/support/handheldsp400aio. 2. Use the software to lay out dynamic data fields and static data and images for your template. IMPORTANT: The field name given to a dynamic text field and the field width must match the field name and width used by the server.
Advanced Use To move between these print templates on the All-in-One while in demonstration mode, press the CLEAR button. You will hear one Hi tone when the system information template is selected, two when the generic sp400 template is selected, and three when the nozzle health diagnostic template is selected, and so on. The All-in-One can save up to nine demonstration print templates if there is enough memory on the All-in-One.
Advanced Use Calibrate the scanner The bar code scanning device in the All-in-One is a model 5180 imager that was manufactured by Honeywell Imaging and Mobility. To understand the imager better or to modify settings, refer to the 5X80 Engine Series 5X10/5X80 User's Guide that can be downloaded at www.honeywell.com/aidc. The 5X10/5X80 User's Guide contains configuration bar codes that can be used to customize the desired allowable bar codes and to change options and settings on the imager.
Advanced Use ○ ○ ○ ○ Firmware: the main program running on the All-in-One FPGA: the processor configuration Imager: the program running on the bar code scanner module Communication: the program running on the wireless communication module 6. In the File boxes, enter the names of the update files. You can use the Browse button to navigate to the update files. NOTE: All of the update file names must have an “.hhp” extension. 7. Press the Write to Device button to begin the update process. 8.
All-in-One Specifications 11 All-in-One Specifications General device specifications The approximate dimensions at the widest part of the All-In-One and hand mount are as shown in Table 11-21. The approximate weight is also shown in this table. Table 11-21 General device specifications Component Width in. (mm) Height in. (mm) Length in. (mm) Weight in oz All-In-One only 2.6 (65) 1.9 (47) 5.4 (136) 9.49 Hand Mount* 2.6 (66) 1.2 (31) 5.0 (126) 3.31 All-in-One with hand mount 2.6 (66) 2.
All-in-One Specifications Wireless specifications Range of wireless module The typical wireless range is 100 feet (30.5 meters) or more within an office environment, and two to three times that distance in wide open spaces. The range depends greatly upon the design and use of the infrastructure.
All-in-One Specifications Other specifications Table 11-23 Other wireless specifications Feature Specification Technology IEEE 802.11b DSSS, wireless compliant Frequency 2.4 ~ 2.4835 GHz (US/Can/Japan/Europe) 2.471 ~ 2.497 GHz (Japan) Modulation DQPSK, DBPSK and CCK Channels 11 channels – USA/Canada 13 channels – Europe 14 channels – Japan 4 channels - France Data Rate 11, 5.
All-in-One Specifications Table 11-24 Symbology types Code39 (3of9) Code93 Data Matrix EAN-UCC Composite Codes EAN/JAN-13 EAN/JAN-8 IATA Code 2 of 5 Interleaved 2 of 5 Japanese Post Kix (Netherlands)Post Korea Post Matrix 2 of 5 MaxiCode MicroPDF417 MSI PDF417 Planet Code Plessey Code PosiCode A and B Postnet QR Code RSS Expanded RSS Limited RSS-14 4-CB / 4 State / Intelligent Mail Barcode 63
Warranty and regulatory information 12 Warranty and regulatory information Warranty If you have an existing service contract, see the contract for warranty information. If you do not have an existing service contract, see www.hp.com/support/handheldsp400aio for information about your warranty. Regulatory notices U.S.A. Federal Communications Commission notice Note: This equipment has been tested and found to comply with the limits for a Class A digital device, pursuant to part 15 of the FCC Rules.
Warranty and regulatory information Hewlett-Packard GmbH, HQ-TRE, Herrenberger Strasse 140, 71034 Boeblingen, Germany The following CE marking is valid for EU non-harmonized telecommunications products. *If applicable, a notified body number is used. Refer to the regulatory label provided on this product.
Warranty and regulatory information Declaration of conformity 66