
User's Manual


Using the HP sp400 Series Template Design Software
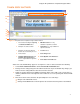
Create dynamic text fields
Dynamic text is text that is controlled by a server over the wireless network. To create a dynamic text
field, do the following:
1. Select
InsertÆDynamic Text Field or click the Insert Dynamic Text Field button.
2. Modify the text by double-clicking in the text field that you created and then selecting “Text” and
typing.
NOTE: The text that you enter is only an example of what might be printed in this field. The server
application will send the actual text string that will be printed in this field.
3. Change the font settings using the font toolbar located at the top of the window. Any changes you
make to the font settings will affect all of the text in the text field.
NOTE: A limited number of fonts are available for use in dynamic text fields.
4. To move the location of a text field on the print template, select the text field and then do one of the
following things:
○ Drag the text field with the mouse.
○ Change the Location values in the Properties list located in the lower portion of the window.
5. Enter a field name in the
Field Name box in the Properties list located in the lower portion of the
window. The field name is the name that the server will use to identify this field. It must be unique
and include no spaces.
IMPORTANT:
• The field name given to a dynamic text field must match the field name used by the server.
• The field name given to a dynamic text field must be unique and include no spaces.
6. Type a new value in the Max Characters box to specify the maximum number of characters that
can be printed in this field.
7. Select the type of characters that will be printed in this field by clicking the arrow next to the
Printable Alpha Characters and Printable Special Characters boxes.
NOTE:
• Numbers are always available for all text fields. Changing the settings in the Printable Alpha
Characters and the Printable Special Characters boxes only places limits on the alpha
characters (letters) and special characters.
• Reducing the variety of characters that are available for use in a dynamic text field reduces the
amount of memory the All-in-One requires to store fonts.
image or changing the Location values as you
4. e, select the image and change the Size settings in the Properties
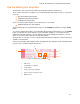
Add images
Add images if desired:
1. Select
InsertÆImage or click the Insert Image button.
2. Find and select the image you wish to add.
Change the location of the image by dragging the
3.
would do to move a text field.
To change the size of an imag
list or click and drag from the lower right-hand corner of the image.
8