Technical white paper Using System Center 2012 R2 Configuration Manager SP1 to Manage Windows-based HP Thin Clients Windows 10 IoT Enterprise Windows Embedded 8 Standard Windows Embedded Standard 7 Table of contents Overview .................................................................................................................................................................................3 Configuration Manager features ...........................................................................
Deploying the Configuration Manager client package to the Destination Point ................................................ 16 Syncing the User State Migration Tool package to the Distribution Point (optional) ........................................ 17 Creating a task sequence to deploy a Windows reference image ....................................................................... 17 Deploying a Windows reference image .....................................................................................
Overview This document describes how to use Microsoft® System Center 2012 R2 Configuration Manager Service Pack 1 (Configuration Manager) to manage HP thin clients running Windows® 10 IoT Enterprise, Windows Embedded 8 Standard, and Windows Embedded Standard 7 operating systems.
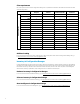
Client requirements Microsoft System Center 2012 R2 Configuration Manager SP1 is preinstalled on Windows-based HP thin clients as described in the following matrix.
Installing Configuration Manager The following methods can be used to install Configuration Manager: • Client push installation • Software update point installation • Group Policy installation • Logon script installation • Manual installation • Upgrade installation by using application management • Automatic client upgrade • Client imaging Be sure that the latest Configuration Manager (5.00.8239.1000) is installed before continuing. For more information, go to http://technet.microsoft.
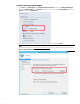
Creating a driver package for imaging 1. 2. Select Start, select All Programs, select Microsoft System Center 2012, and then select Configuration Manager. Navigate to Software Library. Select Overview from the left panel, and then select Operating Systems. Right-click Drivers, and then select Import Driver. 3. In the Import New Driver wizard, specify the source folder of the driver, and then select Next. Note You can download drivers from http://www.hp.
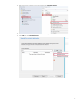
4. Select the driver to import, and then select Next. 5. On the Add Driver to Packages screen, select New Package.
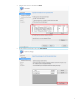
6. In the Create Driver Package dialog box, enter the package name and specify the network UNC path—use an empty folder. 7. Select OK to close the Create Driver Package dialog, and then select Next. 8. 9. 10. 11. On the Add Driver to Boot Images page, do not change the default options. Select Next. On the Summary page, select Next. After the wizard completes, select Close.
12. Right-click the driver package you imported, and then select Distribute Content. 13. In the Distribute Content wizard, select Next on the General page. 14. Select Add and select Distribution Point.
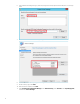
15. In the Add Distribution Points dialog box, select the available distribution points, and then select OK to close the dialog box. 16. Select Next until the wizard finishes, and then select Close. 17. Refresh the Driver Packages screen and make sure that the content status is Success before proceeding. 18. Select System Center Configuration Manager, select Software Library, select Overview, select Operating System, and then select Boot Images. 19.
20. In the Properties dialog box, select the Drivers tab and add the target driver. 21. Select Apply, and then Yes. 22. In the Update Distribution Points wizard, select Next, and then Close the finish the wizard. 23. Select OK to close the Properties tab. 24. Refresh the Boot Images screen and make sure that the content status is Success before proceeding.
2. Right-click Task Sequences in the left panel and choose Create Task Sequence Media. 3. In the Create Task Sequence Media wizard, select Capture Media, and then select Next.
4. Select the media type, and then specify either the Drive (if using Removable USB drive type) or the path/name of the Media file (if using the CD/DVD set type). 5. 6. Select Next. Select the appropriate Boot image and Distribution point, and then select Next. The boot image must include the NIC driver of the target thin client. 7. On the Summary screen, select Next. The wizard creates the capture media or ISO.
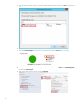
8. When the wizard has completed, select Close. 9. Burn the ISO on media. Capturing a Windows image from a reference system Local access to a client is required for the following procedure. 1. 2. Disconnect the reference system from the domain, if necessary. Do not change the Administrator account password from the default value (Administrator). 3. 4. 5. Disable the write filter, and then restart. Log on as Administrator.
6. On the General page, enter any necessary information and then select Next. 7. 8. On the Summary page, select Next. When the wizard completes, select Close.
Select System Center Configuration Manager, select Software Library, select Overview, select Operating Systems, and then select the newly added operating system image. 10. Right-click Distribute Content, and then select Next. 9. 11. 12. 13. 14. 15. Under Content Destination, add a Distribution Point. Select the available Destination Point, and then select Next. On the Summary page, select Next. When the wizard completes, select Close.
Syncing the User State Migration Tool package to the Distribution Point (optional) Make sure to use the User State Migration Tool (USMT) that corresponds to the image. The USMT from Windows 10 Assessment and Deployment Kit (ADK) is used for Windows10 IoT Enterprise imaging, and the USMT from Windows 8 ADK is used for Windows Embedded 8 Standard imaging. The USMT package is created by installing ADK. 2.
4. Enter the Task sequence name, select the appropriate boot image, and then select Next. 5. On the Install the Windows operating system page, browse to the previously created Windows image package.
8. Before installing the operating system, select Partition and format the target computer before installing the operating system. Clear Configure task sequence for use with BitLocker, unless your target device has a wellconfigured TPM module. Do not specify the Product key. Select Enable the account and specify the local administrator password, and then enter and confirm the password. See Appendix E—Known issues and solutions before continuing. Select Next. 9.
10. On the Install the Configuration Manager Client page, select Browse and then select Configuration Manager Client Package. 11. Select Next. 12. On the Configure State Migration page, select the preferred settings and select Next. For the task sequence to include User State Migration, make sure that the RAM disk on the source/destination image is configured so that there is at least 250 MB of space to support USMT operations.
19. Select the Properties tab, and then double-click Windows (Primary) to edit its properties. 20. In the Partition Properties dialog, under Use a percentage of remaining free space, enter 95. Note: The deployment fails if this value is left at 100, because Windows cannot create the write filter partition. 21. Under Formatting options, select Quick format. Select OK to close the window. 22. Reopen the Task Sequence Editor.
23. In the Task Sequence Editor, select Partition Disk 0 - UEFI. Select the Options tab to verify the running condition. 24. Double-click Windows (Primary) to edit its properties. 25. In the Partition Properties dialog, under Use a percentage of remaining free space, enter 95. Note: The deployment fails if this value is left at 100, because Windows cannot create the write filter partition.
26. Under Formatting options, select Quick format. Select OK to close the window. 27. Reopen the Task Sequence Editor. 28. In the group Restore User Files and Settings, select Request User State Storage, and then select the If computer account fails to connect to state store, use the Network Access account option.
29. In the group Restore User Files and Settings, select Restore User Files and Settings, and then select the Restore local computer user profiles option, and then input and confirm then password. 30. Select Apply and then OK to close the Task Sequence Editor.
3. 4. For the Purpose item, select Required. Verify that the correct collection was specified in step 2. Select the option to make this task sequence available to Configuration Manager Clients, media and PXE. 5. 6. Select Next. Specify the preferred schedule for the deployment, and then select Next. For a PXE-initiated deployment, a mandatory assignment schedule must be created.
7. 8. 9. On the User Experience page, do not change the default options. Select Next. On the Alert page, do not change the default options. Select Next. On the Distribution Points page, select the Download content locally when needed by running task sequence deployment option, and then select the When no local distribution point is available, use a remote distribution point option. 10. Select Next. 11. On the Summary page, select Next. 12. Select Close.
Note: After the task sequence finishes successfully, the write filter status is disabled by default. Post-deployment tasks The deployed image might require more customization. For example, the previous procedures do not configure the write filter status, domain membership, and Auto Logon options. It is recommended to customize these options by running command lines or scripts at first boot.
Creating a driver package for an operating system deployment task 28 1. 2. Create a shared folder on the Configuration Manager server to store the drivers. Copy the folder created in Downloading and extracting the manageability driver pack to this shared folder. 3. Select System Center Configuration Manager, select Software Library, right-click Drivers, and then select Import Driver. 4. Select Import all drivers in the following network path (UNC), select Browse, and then select the shared folder.
5. Select Create to create an administrative category for the driver package, and then select that category to assign it to the driver package. Select OK. 6. On the Add Driver to Packages page, select New Package.
7. Enter a Name for the package and select Browse to specify the location to store the driver package to. Select OK. Note: Do not save these drivers to boot images. HP recommends that you leverage the appropriate WinPE driver pack from this location: http://ftp.hp.com/pub/caps-softpaq/cmit/HP_WinPE_DriverPack.html. 8. Distribute the driver package to the distribution points. Creating a driver package for HP thin client software configuration 1. 30 2.
4. Delete the Install.exe and Second.exe files from the root folder of the package. 5. Select System Center Configuration Manager, select Software Library, right-click Packages, and then select Create Package. 6. Specify any necessary information, select This package contains source files, select Browse, and then select the shared folder created in step 1.
7. On the Program Type page, select Standard program. 8. Specify the Name, select the SCCM_Install.exe as the Command line, and then select Whether or not a user is logged on under Program can run. 9. On the Requirements page, do not change the default settings.
10. Right-click the new package, and then select Create Program. 11. Repeat steps 7 and 8, but specify SCCM_Second.exe as the Command line. 12. Distribute the package to the appropriate distribution points.
Modifying an existing Windows 10 operating system deployment task to support an HP thin client 1. Configure the task sequence to add partitioning steps to leave space to use for the write filter. You must configure Windows (Primary) on both Partition Disk 0 – BIOS and Partition Disk 0 – UEFI. 2. In the Options tab of each “Thin Client” partition step, select Add Condition to add a WMI Query condition to make sure this step runs only on the HP thin client models that you use.
3. In the Options tab of the default (non–thin client) partition steps, select Add Condition to add a WMI Query condition to make sure that these steps do not run on the HP thin client models that you use.
4. To the driver injection steps of the task sequence, add an Apply Driver Package step using the driver package created earlier. 5. Add a WMI Query to this driver package step to make sure it runs only on the HP thin client models that you use.
6. At the end of the task sequence, add a new group to contain the thin client software installation steps. 7. In this group, add an Install Package step. Select the driver package created earlier, and then select SCCM Install #1 as the Program. 8. Select Add Condition to add a WMI condition to make sure this step runs only on the HP thin client models that you use.
9. Add a Restart Computer step that boots to the currently installed default operating system. 10. In this group, add an Install Package step. Select the driver package created earlier, and then select SCCM Install #2 as the Program.
11. Select Add Condition to add a WMI condition to make sure this step runs only on the HP thin client models that you use. 12. HP recommends adding a final restart to the task sequence.
Appendix A—Preparing a task sequence to include User State Migration The source computer needs at least 250 MB of hard disk space to support USMT operations. For more information, go to http://technet.microsoft.com/en-us/library/dd560770%28v=ws.10%29.aspx#BKMK_SpaceReqs. For a Windows image on an HP thin client, USMT uses RAM disk Z: by default. Extend the disk size before capturing and deploying an image using the following procedure. To extend a RAM disk: 1.
false 4 shutdown -r -t 90 Restarts after 90 seconds false Appendix C—Preparing a boot image and adding the correspondent drivers By default, Configuration Manager 2012 R2 SP1 uses Windows PE 5.0 as the boot image.
Creating a customized answer file 42 1. 2. Open Window System Image Manager. Right-click Select a Windows Image or catalog file, and then select Select Windows Image. 3. 4. Broswe to the location of the install.wim file, and then select the file to import it. Select YES when prompted. Right-click Create or open an answer file, and then select New Answer File. 5. Expand Components.
Note: Select the component based on the architecture of the operating system that the answer file is being applied to. 6. Confirm that amd64_Microsoft-Windows-International-Core_neutral is selected under oobeSystem, and then specify the language codes in each of the following fields: • InputLocale • SystemLocale • UILanguage • UILanguageFallback • UserLocale For the latest language codes, go to https://msdn.microsoft.com/en-us/library/cc233965.aspx. 7. Select Tools, and then select Validate Answer File.
Deploying the customized answer file with Configuration Manager 44 1. Create a new package in Configuration Manager. Select This package contains source files, and then specify the saved unattend.xml file as the Source folder. 2. 3. Edit the task sequence used to deploy the Windows operating system. Select the Apply Operating System step, and then select Use an unattended or Sysprep answer file for a custom installation. 4. Select Browse, select the package created in step 1, and then enter unattend.
Appendix E—Known issues and solutions Issue: After capturing a Windows 10 IoT Enterprise image with Configuration Manager 2012 R2 SP1, the Start menu of the user account does not work. Solution: Remove ActivationStore.dat after running sysprep. To do this, create a .cmd file with a script like in the following example: c: cd c:\Users del /s /f /q ActivationStore.dat Copy the .cmd file to the USB device that is going to be used to capture the image, and execute the .cmd file before capturing the image.
For more information For more information about HP thin clients, go to the following websites: • http://www.hp.com/support (Search for your thin client model. For documentation, select Manuals.) • http://www.hp.com/go/thinclient Sign up for updates hp.com/go/getupdated © Copyright 2013, 2015–2017 HP Development Company, L.P. Intel is a trademark of Intel Corporation in the U.S. and other countries.