
HP StorageWorks 9100c Extreme Data Storage System user guide (496784-001, November 2008)
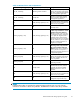


• The amount of I/O activity during the rebuild operation
• The rotational speed of the hard drives
• The availability of drive cache
• The brand, model, and age of the drives
• Theamountofunusedcapacityonthe drives
• Thenumberofdrives in thearray
Allow approximately 5 minutes per gigabyte without any I/O activity during the rebuild process. This
figure is conservative, and newer drive models usually require less time to rebuild.
System performance is affected during the rebuild, and the system is unprotected against further drive
failure until the rebuild has finished. Therefore, replace drives during periods of low activity when possible.
CAUTION:
If the Online LED of the replacement drive stops blinking and the amber fault LED glows, or if other drive
LEDs in the array go out, the replacement drive has failed and is producing unrecoverable disk errors.
Remove and replace the failed replacement drive.
When automatic data recovery has finished, the online LED of the replacement drive stops blinking
and begins to glow steadily.
Failure of another drive during rebuild
If a non-correctable read error occurs on another physical drive in the array during the rebuild process,
theOnlineLED of thereplacement drivestops blinking andthe rebuildabnormallyterminates. If this
situation occurs, restart the server. The system may temporarily become operational long enough to allow
recovery of unsaved data. In any case, locate the faulty drive, replace it, and restore data from backup.
Handling hard drive failures
IMPORTANT:
Becausethisdeviceispart ofthe ExDS 9100 solution,see theExDS9100administrationguide for
detailed instructions.
If the co
ntroller was confi gured with hardware fault tolerance, complete the following steps after a
hard dri
ve failure:
1. Determine which physical drive failed. On hot-plug drives, an amber drive failure LED illuminates.
2. If the unit containing the failed drive does not support hot-plug drives, perform a normal shutdown.
3. Remove the failed drive and replace it with a drive that is of the same capacity. For hot-plug drives,
after you secure the drive in the bay, the LEDs on the drive each flashonceinanalternating pattern
to indicate a successful connection. The online LED flashes, indicating that the controller recognized
the drive replacement and began the recovery process.
4. Power on the server, if applicable.
5. The c
ontroller reconstructs the information on the new drive, based on information from the remaining
physical drives in the logical drive. While reconstructing the data on hot-plug drives, the online LED
flashes. When the drive rebuild is complete, the online LED is illuminated.
30
Troubleshooting