
HP StorageWorks 9100 Extreme Data Storage System Storage block (HP ExDS9100c and HP ExDS9100cx) installation instructions v1.0.2 (AN543-96004, April 2009)


Procedure
You can add additional storage blocks to an existing HP ExDS9100
Storage System while the system is still running. Add each storage block
one at a time, up to the point where the system has the maximum number
of storage blocks. The factory pre-provisions the additional storage blocks
with the standard LUN layout and storage block settings (for example,
rebuild priority). Parity is initialized on all LUNs. The LUNs arrive blank
and are not formatted as PSFS filesystems.
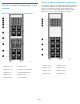
Step 1 — Install HP ExDS9100c into the rack
1. Secure the front end of the rails to the rack in the correct location.
NOTE:
Identify the left (L) and right (R) rack rails by
markings stamped into the sheet metal.
2. Secure the back end of the rails to the rack.
3. Insert the HP ExDS9100c into the rack.
4. Use the thumbscrews on the front of the chassis to secure it to the
rack.
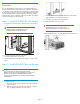
Step 2 — Install HP ExDS9100cx into the rack
WARNING!
Do not remove the disk drives before inserting the HP
ExDS9100cx into the rack. The HP ExDS9100cx is very heavy;
therefore, observe local occupational health and safety
requirements and guidelines, such as using a lift, for handling
this component.
1. Install the rack rails:
a. Begin with the left rack rail. Align the end of the rail with the
rear rack column.
b. Slide the rack rail closed until the end of the rail is locked in
place, wrapping behind the rear rack column.
c. Slide the front end of the rail to the rack front column. When
fully seated, the rack rail will lock into place.
d. Repeat the procedure for the right rack rail.
2. Insert the HP ExDS9100cx into the rack.
WARNING!
The HP ExDS9100cx is very heavy. Use an
appropriate lifting device to insert it into the rack.
3. Tighten the thumbscrews to secure the HP ExDS9100cx to the rack.
Page 3