
Specifications


your hard drive, but transferring music from analog
cassettes and LPs to your PC is a slightly trickier (you
can’t exactly create an LP drive you can cram into
your PC) task. So, you’ll have to make an additional
purchase to build a pipeline from your stereo to
your PC, but all you need is an inexpensive cable or
adapter, about 10 minutes to set up a connection, and a
little time to download and install recording software.
Mind Your Y’s
Assuming your PC has three audio portsLine In, Line
Out, and Mic Inbuying a Y-adapter is probably the
cheapest and easiest way to link your PC to a stereo or
an audio component such as a turntable or a cassette
deck. When connecting most audio components
together, the inputs and outputs remain identical. For
example, if you wanted to add a CD carousel to your
stereo receiver, you would probably connect them
with RCA, or composite, audio cables. Typically, these
cables will have left and right plugs for two separate
channels. Because receivers have composite inputs,
connecting audio equipment is exceedingly easy. If
all sound cards for PCs had composite audio inputs,
connecting stereo equipment to your PC would be just
as simple. No such luck. The Line In, Line Out, and
Mic In ports use a single 3.5mm plug instead of RCA
plugs. To make a connection from an audio device, we
bought a Y-adapter audio cable, which has RCA plugs
for RCA outputs on an audio component and a 1/8-
inch plug for a PC’s audio port.
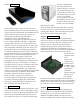
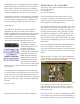
We connected a record player that uses RCA
outputs to our PC. (The same
process applies to any audio
component with RCA outputs.)
First, though, we connected
our adapter to our PC’s Line
In port. The Line In port is
usually blue, but you should
check your PC’s manual. Don’t
confuse this port with the Line
Out (typically green) port
that’s often used to connect PC
speakers to a PC; the Line Out
port will sit on the sidelines for
most of this project.
Next, we attached our adapter cable to the record
player. We connected the adapter’s red male RCA plug
to the player’s red female output and did the same
with the white male plug and female output. Once we
nished connecting our record player to our PC, we
needed software to harvest our tunes.
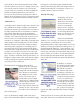
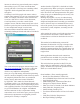
Send In The Songs
Technically, you can use
Windows XP’s Sound
Recorder to record music
to your hard drive, but
we don’t recommend it
because it isn’t designed
for serious recording needs
or converting album after
album to a format you can
easily store on your PC.
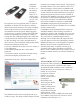
Instead, we downloaded
Audacity 1.2.3. Not only is it free, but it’s also open-
source software, so advanced users can use their
programming skills to make improvements to it. From
Audacity’s home page (audacity.sourceforge.net/), we
clicked Download Audacity 1.2.3 and Audacity 1.2.3
Installer. When we reached the Web page with a table
of host sites (sites with servers that store data you can
retrieve online), we found a U.S. host and clicked the
le icon under the Download column. We waited a
few seconds and clicked Run from the File Download
dialog box.
After we downloaded the installer, we clicked
Next and the I Accept The Agreement radio button.
Following the wizard’s steps, we clicked Next, Next,
Next, Next, Install, and Finish. When we opened
Audacity, we selected English from the drop-down
menu and clicked OK. From Audacity’s interface, we
opened the File menu and clicked Preferences. In the
dialog box, we clicked the Channels drop-down menu,
selected 2, and clicked OK. Next, we selected Line
In from the drop-down menu in the Audacity toolbar.
When we started playing a record/tape on our player,
we clicked the Record button on Audacity’s interface.
When it nished, we clicked Stop. Because MP3 les
are compressed to save space, we chose to export the
project as an MP3 and clicked File, Export As MP3,
and Save.
Audacity also let us record an entire album and break
each track down into its own MP3 le. We clicked