HP ENVY 120 e-All-in-One series
1 HP ENVY 120 e-All-in-One series Help.............................................................................................................................3 2 Get to know the HP ENVY 120 series Printer parts..........................................................................................................................................................................5 Control panel features....................................................................................................
HP support..........................................................................................................................................................................42 Contents 10 Technical information Notice.................................................................................................................................................................................45 Specifications.............................................................................................
HP ENVY 120 e-All-in-One series Help For information about the HP ENVY 120 series, see: • • • • • • • • • • Get to know the HP ENVY 120 series on page 5 How do I? on page 9 Print on page 11 Copy and scan on page 19 Use Web Services on page 23 Work with cartridges on page 25 Connectivity on page 31 Solve a problem on page 37 Technical information on page 45 HP support on page 42 HP ENVY 120 e-All-in-One series Help 1 HP ENVY 120 e-All-in-One series Help 3
Chapter 1 HP ENVY 120 e-All-in-One series Help 4 HP ENVY 120 e-All-in-One series Help
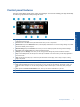
2 Get to know the HP ENVY 120 series • • Printer parts Control panel features Printer parts Get to know the HP ENVY 120 series Front view of the printer Get to know the HP ENVY 120 series 5
Chapter 2 Get to know the HP ENVY 120 series 1 Transparent Lid 2 Scanner glass 3 Scanning surface 4 Access door (closed) 5 USB flash drive slot 6 Memory card slots 7 Camera icon. Indicates the location of the photo and memory device slots 8 Paper path cover 9 Print cartridge carriage 10 Print cartridges (installed) 11 Output tray extender. Comes out automatically when printing or copying, then stows automatically. 12 On button. Touch once to turn on or turn off your printer.
Control panel features 1 Display: The touch screen display shows menus, photos, and messages. You can flick horizontally through photos and vertically through list menus. 2 Home: Returns to the Home screen (the default screen when you turn on the product. 3 Web Services: Opens the Web Services menu, which displays status details. You can also change settings and, if Web Services is enabled, print out a report..
Chapter 2 Get to know the HP ENVY 120 series 8 Get to know the HP ENVY 120 series
How do I? This section contains links to commonly performed tasks, such as printing photos, scanning, and making copies.
Chapter 3 How do I? 10 How do I?
4 Print Print documents on page 12 Print photos on page 11 Print labels and envelopes on page 13 Print with HP ePrint on page 23 Related topics • Load media on page 15 Tips for print success on page 17 Print photos • • Print photos from a memory card Print photos saved on your computer Print photos from a memory card Print Print photos from a memory card 1. Load photo paper into the paper tray. 2. Insert a memory card into the slot. 3. On the Home screen, touch Photo to display the Photo Menu. 4.
Chapter 4 8. Touch Print to preview the selected photos for printing. Touch Settings to adjust layout, paper type, red eye removal, auto align, or date stamp. You can save any new settings as defaults. Touch Settings again to close menus without making any selections. 9. Touch Print to begin printing. The control panel will rise and the output tray extender will automatically come out. After you remove your prints, the extender will automatically stow out of view.
To print from a software application 1. Make sure the output tray is open. 2. Make sure you have paper loaded in the input tray. See Load media on page 15 for more information. 3. From your software application, click the Print button. 4. Make sure the product is the selected printer. 5. Click the button that opens the Properties dialog box. Depending on your software application, this button might be called Properties, Options, Printer Setup, Printer, or Preferences. 6. Select the appropriate options.
Chapter 4 Select Print Media The HP ENVY 120 series printer is designed to work well with most types of office media. Use HP media for optimum print quality. Visit the HP Web site at www.hp.com for more information about HP media. HP recommends plain papers with the ColorLok logo for printing and copying of everyday documents.
Recommended papers for printing and copying Depending on your country/region, some of these papers might not be available. Description HP Brochure Paper and HP Professional Paper 180gsm These papers are glossy-coated or matte-coated on both sides for two-sided use. They are the best choice for producing professional-quality marketing materials such as brochures and mailers as well as business graphics for report covers and calendars.
Chapter 4 ❑ Slide paper-width guides inward until they stop at edge of paper. ❑ Close paper tray. ▲ Load 10 x 15 cm (4 x 6 inch) paper ❑ Pull out paper tray. ❑ Slide paper-width guides outward. Remove any other media previously loaded. ❑ Insert stack of paper into center of paper tray with short edge forward and print side down. Push stack forward inside tray until it stops. ❑ Slide paper-width guides inward until they stop at edge of paper. ❑ Close paper tray. ▲ Load envelopes ❑ Pull out paper tray.
Tips for print success Use the following tips to print successfully. • • • • • • • • • • • • Use genuine HP cartridges. Genuine HP cartridges are designed for and tested with HP printers to help you produce great results, time after time. Make sure the cartridges have sufficient ink. To check the estimated ink levels, touch the Ink Levels icon on the printer display. Load a stack of paper, not just one page. Use clean and flat paper of the same size. Make sure only one type of paper is loaded at a time.
Chapter 4 Print 18 Print
Copy and scan • • • Copy text or mixed documents Scan to a computer, memory device, or email Tips for copy and scan success Copy and scan 5 Copy text or mixed documents ▲ Do one of the following: 1-sided copy a. Load paper. ❑ Load full-size paper in the paper tray. b. Load the original. ❑ Lift the lid on the product. ❑ Load the original print side up on the left front corner of the glass. ❑ Close the lid.
Chapter 5 Copy and scan c. Specify the number of copies and other settings. ❑ Touch Copy on Home screen. The Copy preview appears. ❑ Touch the screen to set the number of copies. d. Start the copy. ❑ Touch B&W or Color. 2-sided copy a. Load paper. ❑ Load full-size paper in the main input tray. b. Load the original. ❑ Lift lid on product. ❑ Load the original print side up on the left front corner of the glass. ❑ Close lid.
Copy and scan c. Specify 2-sided option. ❑ Touch Copy on Home screen. The Copy preview appears. ❑ Touch Settings. The Copy Settings menu appears. ❑ Touch 2-Sided. ❑ Touch the 2-sided radio button to turn it on. ❑ Touch Settings to close the menu. d. Specify number of copies. ❑ Use the touch screen to set the number of copies. e. Start the copy. ❑ Touch B&W or Color. f. Copy the second original. ❑ Load the second page print side up on the glass and touch OK.
Chapter 5 Copy and scan c. Close the lid. 2. Start scan. a. On the Home screen, touch Scan. b. Select the destination by touching either Computer, USB Flash Drive, Memory Card or E-mail. If you are scanning to a computer and the printer is network-connected, a list of available computers appears. Select the computer on which you want the scan saved. For scanning to a USB Flash Drive, insert a USB Flash Drive in the slot. For scanning to a Memory Card, insert a Memory Card in the slot.
6 Use Web Services • • • • Print with HP ePrint Use HP Print Apps Visit the HP ePrintCenter website Tips for using Web Services HP’s free ePrint service provides an easy way to print from email. Just email a document or photo to the email address assigned to your printer when you enable Web Services, and both the email message and recognized attachments will print. • • • Your printer needs to have a wireless network connection to the Internet.
Chapter 6 Touch the Get More icon on the Apps screen to connect to the Internet and add more apps. You need to have Web Services enabled in order to use apps. Go to the HP ePrintCenter website for more information and specific terms and conditions: www.hp.com/go/ ePrintCenter. Visit the HP ePrintCenter website Use HP’s free ePrintCenter website to set up increased security for ePrint and specify the email addresses that are allowed to send email to your printer.
7 Work with cartridges • • • • • • • • • • Check the estimated ink levels Replace the cartridges Order ink supplies Clean cartridges Align printer Use single-cartridge mode Clean back of page ink smearing Clean paper feed Cartridge warranty information Tips for working with ink Check the estimated ink levels NOTE: 1 If you have installed a refilled or remanufactured cartridge, or a cartridge that has been used in another printer, the ink level indicator might be inaccurate or unavailable.
Chapter 7 3. Insert new cartridge. a. Remove cartridge from packaging. Work with cartridges b. Place new cartridge in slot at an angle under the opened lid. c. Squeeze the lid closed as the cartridge slides into place. d. Close access door.
Related topics • Order ink supplies on page 27 Tips for working with ink on page 29 Order ink supplies To find out the correct number for replacement cartridges, open the printer access door and check the label. Cartridge information and links to online shopping appear on ink alert messages. In addition, you can find cartridge information and order online by visiting www.hp.com/buy/supplies. NOTE: Ordering cartridges online is not supported in all countries/regions.
Chapter 7 Related topics • Order ink supplies on page 27 Tips for working with ink on page 29 Use single-cartridge mode Use the single-cartridge mode to operate the HP ENVY 120 series with only one print cartridge. The singlecartridge mode is initiated when a print cartridge is removed from the print cartridge carriage. During singlecartridge mode, the product can copy documents, copy photos, and print jobs from the computer.
Cartridge warranty information The HP cartridge warranty is applicable when the product is used in its designated HP printing device. This warranty does not cover HP ink products that have been refilled, remanufactured, refurbished, misused, or tampered with. During the warranty period the product is covered as long as the HP ink is not depleted and the end of warranty date has not been reached.
Chapter 7 Work with cartridges 30 Work with cartridges
8 Connectivity • • • • • • Add the HP ENVY 120 series to a network Change from a USB connection to a wireless network Connect a new printer Change network settings Wireless Direct Tips for setting up and using a networked printer Add the HP ENVY 120 series to a network • • • WiFi Protected Setup (WPS) Wireless with a router (infrastructure network) Install the software for a network connection WiFi Protected Setup (WPS) To connect the HP ENVY 120 series to a wireless network using WiFi Protected Setup
Chapter 8 ❑ Touch WiFi Protected Setup. ❑ Touch PIN. b. Set up wireless connection. ❑ Touch Start. The device displays a PIN. ❑ Enter PIN on WPS-enabled router or other networking device. NOTE: The product begins a timer for approximately two minutes in which the PIN needs to be entered on the networking device. ❑ Touch OK. c. Install software. Wireless with a router (infrastructure network) To connect the HP ENVY 120 series to an integrated wireless WLAN 802.
To install the Windows HP ENVY Software on a networked computer 1. Quit all applications running on your computer. 2. Insert the installation CD that came with the product into the CD-ROM drive on your computer and follow the onscreen instructions. NOTE: If the HP ENVY 120 series is not connected to a network, run the Wireless Setup Wizard from the Wireless menu on the HP ENVY 120 series. 3. If a dialog box about firewalls appears, follow the instructions.
Chapter 8 Connect a new printer To connect a new printer from the printer software If you have not finished connecting the printer to your computer using WPS, you need to connect it from the printer software. If you want to connect another new printer of the same model to your computer, you don't need to install the printer software once again. Do one of following according to your operating system: 1. On Windows: a. From the Start menu on your computer, click All Programs, and then click HP. b.
Tips for setting up and using a networked printer Use the following tips to set up and use a networked printer: • • • • • • When setting up the wireless networked printer, make sure your wireless router or access point is powered on. When the Wireless Setup Wizard is used to set up a networked printer, the printer searches for wireless routers and lists the detected network names on the display. To verify the wireless connection, check the Wireless LED on the front panel.
Chapter 8 Connectivity 36 Connectivity
9 Solve a problem This section contains the following topics: • • • • • • • • • Get more help Unable to print Resolve print quality issues Resolve copy and scan issues Solve networking problem Clear a paper jam Check cartridge access door Troubleshooting print carriage jams HP support Get more help You can find more information and help about your HP ENVY 120 series by entering a keyword in the Search field in the top left of the help viewer.
Chapter 9 4. Verify that the product is set as the default printer. To verify that the product is set as the default printer NOTE: HP provides a Printer Diagnostic Utility that can automatically fix this issue. Click here to go online for more information. Otherwise, follow the steps below. a. Depending upon your operating system, do one of the following: • Windows 7: From the Windows Start menu, click Devices and Printers.
c. If the wrong product is set as the default printer, right-click the correct product and select Set as Default Printer. d. Try using your product again. 6. Restart the computer. 7. Clear the print queue. To clear the print queue NOTE: HP provides a Printer Diagnostic Utility that can automatically fix this issue. Click here to go online for more information. Otherwise, follow the steps below. a.
Chapter 9 • • Learn about the Network Diagnostic Utility (Windows only) and other troubleshooting tips. Click here to go online for more information. Learn how to work with your firewall and anti-virus programs during printer setup. Click here to go online for more information. Clear a paper jam Clear a paper jam. To clear a paper jam 1. Press the Cancel button on the control panel to try to clear the jam automatically. If this does not work, clear the paper jam manually. 2.
3. Press OK on the control panel to continue the current job. If the above solutions do not resolve the problem, click here for more online troubleshooting. Check cartridge access door The cartridge access door should be closed for printing. Click here to go online for more information. Troubleshooting print carriage jams The cartridge access door must be closed to begin printing. Check the printer and try printing again.
Chapter 9 5. Remove any paper or object that might be restricting the print carriage. If the printer is new, remove any packing material. 6. Reconnect only the power cord. If the printer does not turn on automatically, press the Power button. NOTE: The printer might need to warm up for two minutes or less. Lights might flash, and the print carriage might move during this time. 7. Use your hand to gently move the carriage all the way to the left and right to ensure the carriage moves freely.
Phone support period One year of phone support is available in North America, Asia Pacific, and Latin America (including Mexico). To determine the duration of phone support in Europe, the Middle East, and Africa, go to www.hp.com/support. Standard phone company charges apply. Placing a call Call HP support while you are in front of the computer and the product.
Chapter 9 Solve a problem 44 Solve a problem
The technical specifications and international regulatory information for the HP ENVY 120 series are provided in this section. For additional specifications, see the printed documentation that came with the HP ENVY 120 series. This section contains the following topics: • • • • • Notice Specifications Environmental product stewardship program Regulatory notices Regulatory wireless statements Notice Specifications Technical specifications for the HP ENVY 120 series are provided in this section.
Chapter 10 Normal mode • Color Input/Black Render: 600x300dpi • Output (Black/Color): Automatic Technical information Plain-Best mode • Color Input/Black Render: 600x600dpi • Output: 600x1200dpi (Black), Automatic (Color) Photo-Best mode • Color Input/Black Render: 600x600dpi • Output (Black/Color): Automatic Max DPI mode (with supported types of HP photo paper) • Color Input/Black Render: 1200x1200dpi • Output: Automatic (Black), 4800x1200 optimized dpi (Color) To learn more about the printer resolution,
Alignment skew • .006 in/in on plain paper (2nd side) Technical information NOTE: Media type availability varies by country/region.
Chapter 10 • EU battery directive Eco-Tips Technical information HP is committed to helping customers reduce their environmental footprint. HP has provided the Eco-Tips below to help you focus on ways to assess and reduce the impact of your printing choices. In addition to specific features in this product, please visit the HP Eco Solutions web site for more information on HP’s environmental initiatives. www.hp.
Additional ENERGY STAR qualified imaging product model information is listed at: www.hp.com/go/energystar Auto Power-Off is automatically enabled by default when you turn on the printer. When Auto Power-Off is enabled, the printer will automatically turn off after two hours of inactivity to help reduce energy use. Auto PowerOff is automatically disabled when the printer establishes a wireless connection with a network router or when you enable alarms or calendar reminders.
Chapter 10 Disposal of waste equipment by users in private households in the European Union Technical information Chemical Substances HP is committed to providing our customers with information about the chemical substances in our products as needed to comply with legal requirements such as REACH (Regulation EC No 1907/2006 of the European Parliament and the Council). A chemical information report for this product can be found at: www.hp.com/go/ reach.
Technical information Restriction of hazardous substance (Ukraine) Toxic and hazardous substance table (China) Battery disposal in the Netherlands Battery disposal in Taiwan California Perchlorate Material Notice Environmental product stewardship program 51
Chapter 10 EU battery directive Technical information Regulatory notices The HP ENVY 120 series meets product requirements from regulatory agencies in your country/region.
Regulatory model identification number Technical information For regulatory identification purposes, your product is assigned a Regulatory Model Number. The Regulatory Model Number for your product is SDGOB-1201. This regulatory number should not be confused with the marketing name (HP ENVY 120 e-All-in-One series, etc.) or product numbers (CZ022A, etc.).
Chapter 10 Notice to users in Korea Technical information Notice to users in Germany Noise emission statement for Germany European Union Regulatory Notice Products bearing the CE marking comply with the following EU Directives: • • • Low Voltage Directive 2006/95/EC EMC Directive 2004/108/EC Ecodesign Directive 2009/125/EC, where applicable CE compliance of this product is valid only if powered with the correct CE-marked AC adapter provided by HP.
(continued) Technical information For EU non-harmonized telecommunications products (If applicable, a 4-digit notified body number is inserted between CE and !). Please refer to the regulatory label provided on the product.
Chapter 10 Notice to users in Brazil Technical information Notice to users in Canada Notice to users in Mexico 56 Technical information
Technical information Notice to users in Taiwan Regulatory wireless statements 57
Chapter 10 Technical information 58 Technical information
Index 10 x 15 cm photo paper specifications 46 A after the support period 43 B buttons, control panel 7 C control panel buttons 7 features 7 copy specifications 47 customer support warranty 43 E envelopes specifications 46 environment Environmental product stewardship program 47 environmental specifications 45 ink cartridges 48 regulatory notices regulatory model identification number 53 wireless statements 55 S scan scan specifications 47 security network, WEP key 32 system requirements 45 Index Sym
Index 60