
Manual


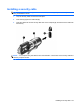
Table Of Contents
- Features
- Networking (select models only)
- Pointing devices and keyboard
- Multimedia
- Power management
- Setting power options
- Using external AC power
- Using battery power
- Displaying the remaining battery charge
- Inserting or removing the battery
- Charging a battery
- Maximizing battery discharge time
- Managing low battery levels
- Calibrating a battery
- Conserving battery power
- Storing a battery
- Disposing of a used battery
- Replacing the battery
- Testing an AC adapter
- Shutting down the computer
- Drives
- External devices
- External media cards
- Memory modules
- Security
- Protecting the computer
- Using passwords
- Using Computer Setup security features
- Using antivirus software
- Using firewall software
- Installing critical security updates
- Using HP ProtectTools Security Manager (select models only)
- Installing a security cable
- Software updates
- MultiBoot
- Management
- Computer Setup
- Backing up and recovering
- Index
Removing Automatic DriveLock protection
To remove DriveLock protection in Computer Setup, follow these steps:
1. Turn on or restart the computer, and then press esc while the “Press the ESC key for Startup Menu”
message is displayed at the bottom of the screen.
2. Press f10 to enter Computer Setup.
3. Use a pointing device or the arrow keys to select Security > Automatic DriveLock, and then press
enter.
4. Use a pointing device or the arrow keys to select an internal hard drive, and then press enter.
5. Use a pointing device or the arrow keys to select Disable protection.
6. To save your changes and exit Computer Setup, click Save, and then follow the on-screen
instructions.
– or –
Use the arrow keys to select File > Save Changes and Exit, and then press enter.
120 Chapter 10 Security