
Reference Guide
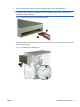
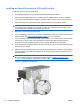
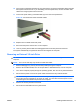
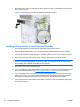
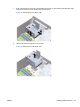
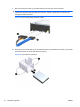
Table Of Contents
- Hardware Upgrades
- Warnings and Cautions
- Additional Information
- Removing the Computer Access Panel
- Replacing the Computer Access Panel
- Removing the Front Bezel
- Removing Bezel Blanks
- Replacing the Front Bezel
- Installing Additional Memory
- Removing or Installing an Expansion Card
- Drive Positions
- Installing Additional Drives
- Battery Replacement
- Installing a Security Lock
- Electrostatic Discharge
- Computer Operating Guidelines, Routine Care and Shipping Preparation
- Index

7. Push down the latch on the side of the hard disk drive cage (1), then slide the hard disk drive cage
away from the bottom of the chassis (2) as shown below.
Figure 22 Releasing the Hard Drive Cage
8. Lift the hard disk drive cage out of the chassis.
Figure 23 Removing the Hard Drive Cage
ENWW Installing Additional Drives 23