
HP LaserJet Enterprise M604, M605, M606 - User Guide


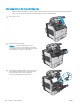

Jam locations
3
3
2
1
7
8
3
4
5
6
1 Output bin See Clear paper jams in the output bin on page 109.
2 Toner-cartridge area See Clear paper jams in the toner-cartridge area
on page 100.
3 Tray 1 See Clear paper jams in Tray 1 on page 95.
4 Tray 2 See Clear paper jams in Tray 2 and the 500-sheet trays
on page 96.
5 Optional 500-sheet paper feeder See Clear paper jams in Tray 2 and the 500-sheet trays
on page 96.
6 Optional 1,500-sheet high-capacity tray See Clear paper jams in the optional 1,500-sheet high-
capacity tray on page 98.
7 Rear output bin and fuser area See Clear paper jams in the rear output bin on page 103 and
Clear paper jams in the fuser area on page 104.
8 Optional duplexer See Clear paper jams in the duplexer on page 110.
Envelope feeder (not shown) See Clear paper jams in the envelope feeder on page 112.
5-bin mailbox (not shown) See Clear paper jams in the 5-bin mailbox on page 114.
Stacker or stapler/stacker (not shown) See Clear jams in the stacker or stapler/stacker on page 116.
Auto-navigation for clearing jams
The auto-navigation feature assists you in clearing jams by providing step-by-step instructions on the control
panel. When you complete a step, the product displays instructions for the next step until you have completed all
steps in the procedure.
Experiencing frequent or recurring paper jams?
To reduce the number of paper jams, try these solutions.
ENWW Clear paper jams 93