
Administrator's Guide


6 Activating the inactive system image
This chapter describes how to set the inactive system image so it will become the active system
image the next time the system boots.
For details of the drd activate command, including available options and extended options,
see The drd activate command.
NOTE: You must be logged in as root to run any DRD command.
To make the inactive system image the active system image, run the following command:
# /opt/drd/bin/drd activate -x reboot=true
This command:
1. Modifies stable storage to indicate that the inactive system image should become the active
system image when the system boots.
2. It then reboots the system.
3. After the reboot, the formerly inactive system image is the active system image, and the formerly
active system image is the inactive system image.
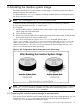
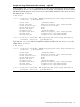
Figure 5-1 shows an example of using the drd activate command with the option -x
reboot=true. Initially, /dev/dsk/c2t3d0 was the active system disk and drd clone was
used to create an inactive system disk on /dev/dsk/c1t2d0. By using the drd activate
command noted above, /dev/dsk/c2t3d0 has become the inactive system disk and /dev/
dsk/c1t2d0 has become the active system disk.
Figure 6-1 Disk Configurations After Activating the Inactive System Image
NOTE: The alternate boot path and the High Availability (HA) alternate boot path are not affected
by the drd activate command. In addition, the value of the autoboot flag (set by setboot
–b ) is not affected by the drd activate command.
6.1 Preparing the inactive system image to activate later
If you do not want to make the inactive system image the active system image right away, you can
configure the drd activate command so that it does not reboot the system. Because -x
reboot=false is the default, the command is simply:
6.1 Preparing the inactive system image to activate later 33