
Administrator's Guide

Use the following command to clone the system image, substituting your target disk identifier for
the one shown in the command:
# /opt/drd/bin/drd clone -v -x overwrite=true -t /dev/dsk/c1t2d0
On HP-UX 11i v3 systems, you can also use the agile device file to the target disk, substituting
your target disk identifier for the one shown in the following command:
# /opt/drd/bin/drd clone -v -x overwrite=true -t /dev/disk/disk10
NOTE: For descriptions of the drd clone command, see The drd clone command.
The -x option lets you choose whether to overwrite data on the target disk. The -x
overwrite=true option tells the command to overwrite any data on the disk. The -x
overwrite=false option tells the command not to write the cloned image if the disk appears
to contain LVM, VxVM, or boot records. The default value is false.
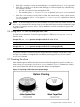
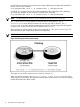
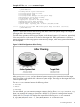
Cloning creates an inactive system image on the target disk at /dev/dsk/c1t2d0. Figure 2-2
shows the active system image being cloned to the target disk.
NOTE: The drd clone command does not write over a disk that is part of the root volume.
Figure 2-2 Cloning the Active System Image
The output you see as this command runs is similar to Example 2-7.
When you see the message, Copying File Systems to New System Image, the active
system image is being cloned. This operation can take quite a while, and you see no more messages
until the file systems have been copied.
14 Cloning the active system image