
Installation Guide


Upgrade Existing dVRS Installation on XenServer 57
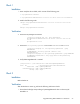
Block 1
Installation
1. Have ready the HP xen dVRS, which consists of the following rpms:
• hp-openvswitch-<version>
• hp-openvswitch-modules-xen-2.6.32.43-0.4.1.xs1.8.0.835.170778-<version>
2. Install in the following order:
a. rpm -U hp-openvswitch-modules-xen-2.6.32.43-0.4.1.xs1.8.0.835.170778-
<version>
b. rpm -U hp-openvswitch-<version>
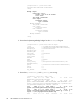
Verification
1. Ensurethatallpackage sareinstalled:
[root@ovs-2 images]# rpm -qa | grep openvswitch
hp-openvswitch-modules-xen-2.6.32.43-0.4.1.xs1.8.0.835.170778-
2.0-51
hp-openvswitch-2.0-51
2. Ensurethat/etc/sysconfig/openvswitchhascorrectPERSONALITYandPLATFORM:
[root@ovs-2 images]# cat /etc/sysconfig/openvswitch | grep
PERSONALITY
# PERSONALITY: vrs/vrs-g/cpe/none (default: vrs)
PERSONALITY=vrs
[root@ovs-2 images]# cat /etc/sysconfig/openvswitch | grep PLATFORM
# PLATFORM: kvm/xen/esx-i. Only apply when in VRS personality
PLATFORM=xen
3. Verify HPManagedNetwork is created:
[root@acs-ovs-3 ~]# xe network-list name-label=hpManagedNetwork
uuid ( RO) : 817ece89-4835-980c-a48f-0bf02bc4241a
name-label ( RW): hpManagedNetwork
name-description ( RW): hpManagedNetwork
bridge ( RO): xapi0
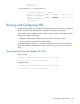
Block 2
Installation
Reboot XenServer.
Verification
After the XenServer comes up, perform the following verification checks:
1. Ensure that the bridge corresponding to hpManagedNetwork does not have any PIF
attached to it.