
Manual
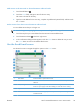

15 Add fax number button Touch this button to add the fax number in the Fax Number: field to the Fax
Recipients list.
16 Fax Number: field Touch this field and then type a fax number.
17 Delete character button Touch this button to backspace and delete numbers in the Fax Number: field.
Send a fax
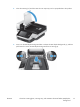
1. Place the document face up in the document feeder.
2. From the Home screen, touch the Fax button.
3. If prompted, type your user name and password.
4. Specify the fax numbers by using one or both of these methods:
Use the Fax Number:
field
Type the fax number.
(Optional) Type additional fax numbers separated by semi-colons.
Use a speed dial From the Send Fax screen, touch the code in the One Touch Speed Dials list.
5. (Optional) Touch the More Options button to change the settings for the document that you are
sending. For information about available features, see the built-in Help.
6. Touch the Start button to begin sending.
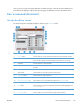
Save to a network folder or USB storage device
If the system administrator has made the feature available, the product can scan a file and save it to
either a USB storage device or a network folder. Supported operating systems for folder destinations
include Windows 2000, Windows XP, Windows Server 2003, and Windows Server 2008.
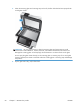
1. Place the document face up in the document feeder.
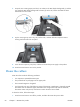
2. If you are saving to a USB storage device, insert it into the USB connector next to the control
panel.
3. On the Home screen, touch either the Save to Network Folder or the Save to USB button.
4. In the folders list, touch the folder in which you want to save the document.
5. Select a quick set or touch the File Name: field, and then type the name of the file.
6. Touch the More Options button to change the settings for the document you are sending.
7. Touch the Start button.
NOTE: The additional options are the same as the e-mail options.
56 Chapter 6 Scan and send documents ENWW