HP Deskjet 3070 B611 All-in-One series
1 How Do I?............................................................................................................................................................................3 2 Get to know the HP All-in-One Printer parts..........................................................................................................................................................................5 Control panel features.....................................................................................
Regulatory notices..............................................................................................................................................................53 Index........................................................................................................................................................................................
How Do I? Learn how to use your HP All-in-One • • • • Printer parts on page 5 Load media on page 18 Replace the cartridges on page 30 Clear a paper jam on page 38 How Do I? 1 How Do I? 3
Chapter 1 How Do I? 4 How Do I?
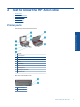
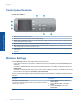
2 Get to know the HP All-in-One • • • • • Printer parts Control panel features Wireless Settings Status Lights Auto Power-Off Printer parts Front and top views of the HP All-in-One Get to know the HP All-in-One • • 1 Display 2 Control panel 3 Paper tray 4 Paper tray extender (also referred to as the tray extender) 5 Glass 6 Lid-backing 7 Lid 8 Cartridge door 9 Cartridge access area 10 Cleanout door Rear view of the HP All-in-One 11 Rear USB port 12 Power connection Get to kno
Chapter 2 Control panel features Control panel features Get to know the HP All-in-One 1 Back: Returns to the previous screen. 2 Cancel: Stops the current operation, restores default settings. 3 Setup: Opens the Setup menu where you can check ink levels, change Auto Power-Off setting, perform maintenance tasks, and set language and region settings. 4 Selection buttons: Use buttons to select menu items on the printer display.
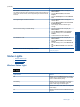
(continued) How do I? Instructions Print wireless network test report. 1. The wireless network test report will display the diagnostics results for the status of the wireless network, wireless signal strength, detected networks, and more. 2. View signal strength of wireless connection. 1. 2. 3. Restore network settings to default settings. 1. 2. 3. 4. Turn wireless on or off. 1. 2. 3. 4. Establish a Wi-Fi Protected Setup (WPS) connection. Press the Wireless button to display the Wireless Menu.
Chapter 2 ePrint Status Light Light behavior Solution Off ePrint is disabled. Press ePrint button to access ePrint menu on the printer display. On ePrint is on and connected. On Button Light Get to know the HP All-in-One Light behavior Solution Off The device is powered off. Pulsing Indicates the device is in sleep mode. The device automatically enters sleep mode after 5 minutes of inactivity. Fast blinking Error has occurred. Refer to messages on printer display.
3 Print Choose a print job to continue. Print photos on page 9 Print documents on page 10 Print envelopes on page 11 Print Quick Forms on page 10 See Tips for print success on page 11 for more information. Print photos To print a photo on photo paper 1. Pull out the paper tray. 2. Remove all paper from the paper tray, and then load the photo paper with side to be printed on facing down. Print NOTE: If the photo paper you are using has perforated tabs, load photo paper so that tabs face outward.
Chapter 3 NOTE: For maximum dpi resolution, go to the Paper/Quality tab and select Photo Paper, Best Quality from the Media drop-down list. Then go to the Advanced tab and select Yes from the Print in Max DPI drop-down list. If you want to print Max DPI in grayscale, select High Quality Grayscale from Print in Grayscale on the drop-down list, and then select Max DPI, after selecting Photo Paper, Best Quality. 7. Click OK to return to the Properties dialog box. 8.
Print Quick Forms 1. Select Quick Forms from the printer display menu. TIP: If the Quick Forms option does not appear on the printer display menu, press the Back button until the Quick Forms option appears. 2. Press the selction buttons to select Office Forms, Paper Type, or Games. Then select OK. 3. After you have selected the type of Selection that you want to print, select the number of copies, then press OK. Print envelopes You can load one or more envelopes into the input tray of the HP All-in-One.
Chapter 3 • • For more information, see Improve print quality on page 37. If you are seeing ink smears on the back of the pages that you printed, use the Tools menu to clean. ◦ From the home screen, which displays Copy, Scan, and Quick Forms, press the Setup button. NOTE: If you do not see the home screen, press the Back button until you can see it. ◦ ◦ Scroll through the Tools menu until you see Clean Ink Smear, then select OK. Follow the onscreen instructions.
Print using the maximum dpi Use maximum dots per inch (dpi) mode to print high-quality, sharp images on photo paper. See technical specifications for the print resolution of the maximum dpi mode. Printing in maximum dpi takes longer than printing with other settings and requires a large amount of disk space. To print in Maximum dpi mode 1. Make sure you have photo paper loaded in the input tray. 2. On the File menu in your software application, click Print. 3. Make sure the product is the selected printer.
Chapter 3 Print 14 Print
4 ePrint from anywhere The ePrint feature on your product provides convenience printing that allows you to print from anywhere. Once enabled, ePrint assigns an email address to your product. To print, simply send an email containing your document to that address. You can print images, Word, PowerPoint, and PDF documents. It's easy! • ePrint from anywhere ePrint from anywhere To ePrint a document from anywhere 1. Find your ePrint email address. a. Press the ePrint button on the control panel.
Chapter 4 ePrint from anywhere 16 ePrint from anywhere
Paper basics • • Recommended papers for printing Load media Recommended papers for printing If you want the best print quality, HP recommends using HP papers that are specifically designed for the type of project you are printing. Depending on your country/region, some of these papers might not be available. ColorLok • HP recommends plain papers with the ColorLok logo for printing and copying of everyday documents.
Chapter 5 HP Bright White Inkjet Paper • HP Bright White Inkjet Paper delivers high-contrast colors and sharp text. It is opaque enough for two-sided color usage with no show-through, which makes it ideal for newsletters, reports, and flyers. It features ColorLok Technology for less smearing, bolder blacks, and vivid colors. Paper basics HP Printing Paper • HP Printing Paper is a high-quality multifunction paper.
Paper basics c. Load paper. Insert stack of paper into paper tray with short edge forward and print side down. Slide stack of paper until it stops. Adjust paper-width guides so they fit against both sides of the stack of paper. Load small-size paper a. Slide the paper tray out. Slide the paper tray and pull out the tray extender. b. Slide paper-width guides outward. Slide paper-width guides outward.
Chapter 5 Paper basics c. Load paper. Insert stack of photo paper with short edge down and print side down. Slide stack of paper forward until it stops. NOTE: If the photo paper you are using has perforated tabs, load photo paper so that tabs face outward. Adjust paper-width guides so they fit against both sides of the stack of paper. Slide paper tray in. Load envelopes a. Lower the paper tray Lower the output tray and pull out the tray extender. b. Slide paper-width guides outward.
Load media 21 Paper basics Remove all paper from the main input tray. c. Load envelopes. Insert one or more envelopes in center of the input tray. The side to be printed on should face up. The flap should be on the left side and facing down. Slide stack of envelopes down until it stops. Slide paper-width guide to the right against stack of envelopes until it stops.
Chapter 5 Paper basics 22 Paper basics
6 Copy and scan • • • • Copy Scan to a computer Tips for copy success Tips for scan success ▲ The copy menu on the printer display allows you to easily select number of copies and color or black and white for copying on plain paper. For more advanced settings, such as changing the paper type and size, adjusting the darkness of the copy, and resizing the copy, select Settings from the Copy Menu. Click a copy type to continue. Easy Copy a. Load paper. Load full-size paper in the paper tray. b.
Chapter 6 Close lid. c. Select Copy from the printer display menu to access the copy menu. If you do not see Copy on the printer display, press the back button until you see Copy. From the Copy menu, press the button next to Copy. Press the button next to Copy Number to increase or decrease the number of copies. Press the button next to OK to confirm. Press the button next to Copy Black or Copy Color to copy onto A4 or 8.5” x 11” plain paper.
Copy and scan Close lid. b. Start scan. Scan from the printer control panel 1. Select Scan from the printer display menu. If you do not see Scan on the printer display press the Back button until you do. 2. Select the computer that you want to scan to from the printer display. If you do not see your computer listed on the printer display make sure that your computer is connected to the printer either wirelessly or through a USB cable.
Chapter 6 3. Select Save if you want to keep the application open for another scan, or select Done to exit the application. 4. After the scan is saved, a Windows Explorer window will open in the directory where the scan was saved. NOTE: There is a limited number of computers that can have the scan function activated at the same time. Press the Scan button on the printer and you will see the computers that are currently available for scanning.
• • • • Clean the scanner glass and make sure that there are no foreign materials adhering to it. If you have a wireless connection and you have confirmed that the connection is working, you will need to enable wireless scanning in the software to scan from the printer display. Open the Printer Software to select Scanner Actions and then select Manage Scan to Computer.
Chapter 6 Copy and scan 28 Copy and scan
7 Work with cartridges • • • • Check the estimated ink levels Order ink supplies Replace the cartridges Cartridge warranty information Check the estimated ink levels You can easily check the ink supply level to determine how soon you might need to replace a cartridge. The ink supply level shows an estimate of the amount of ink remaining in the cartridges. To check the ink levels from the control panel 1.
Chapter 7 Locate the cartridge number in the Printer Software 1. Click the HP All-in-One desktop icon to open the Printer Software. NOTE: You can also access the Printer Software by clicking Start > Programs > HP > HP Deskjet 3070 B611 series > HP Deskjet 3070 B611 series 2. In the Printer Software, click Shop For Supplies Online. The correct cartridge number will be automatically displayed when you use this link. To order genuine HP supplies for the HP All-in-One, go to www.hp.com/buy/supplies.
Work with cartridges 3. Insert new cartridge. a. Remove cartridge from packaging. b. Twist orange cap to snap it off. A forceful twist may be required to remove cap. c. Match color icons, then slide cartridge into slot until it clicks into place.
Chapter 7 d. Close cartridge door. Cartridge warranty information The HP cartridge warranty is applicable when the product is used in its designated HP printing device. This warranty does not cover HP ink products that have been refilled, remanufactured, refurbished, misused, or tampered with. During the warranty period the product is covered as long as the HP ink is not depleted and the end of warranty date has not been reached.
8 Connectivity • • • • • • • • WiFi Protected Setup (WPS – requires WPS router) Traditional wireless connection (requires router) USB Connection (non-network connection) Change from a USB connection to a wireless network Connect a new printer Change network settings Tips for setting up and using a networked printer Advanced printer management tools (for networked printers) WiFi Protected Setup (WPS – requires WPS router) These instructions are for customers who have already setup and installed the printe
Chapter 8 A wireless 802.11b/g/n network that includes a wireless router or access point. NOTE: 802.11n will only support 2.4Ghz A desktop computer or laptop with either wireless networking support, or a network interface card (NIC). The computer must be connected to the wireless network that you intend to install the HP All-in-One on. Network name (SSID). WEP key or WPA Passphrase (if needed). To connect the product 1. Insert the product Software CD in the computer CD-ROM drive. 2.
3. Select Printer Setup and Software Selection. 4. Select Connect a new printer. Follow the onscreen instructions. Change network settings Change network settings 1. From the computer’s start menu select All Programs or Programs, and then select HP. 2. Select HP Deskjet 3070 B611 All-in-One series 3. Select Printer Setup and Software Selection. 4. Select Connect a new printer. Follow the onscreen instructions.
Chapter 8 EWS, the pages are displayed in that language. Though some cookies are cleared at the end of each session (such as the cookie that stores the selected language), others (such as the cookie that stores customer-specific preferences) are stored on the computer until you clear them manually. You can configure your browser to accept all cookies, or you can configure it to alert you every time a cookie is offered, which allows you to decide which cookies to accept or refuse.
9 Solve a problem This section contains the following topics: • • • • • Improve print quality Clear a paper jam Unable to print Networking HP support Improve print quality 1. Make sure you are using genuine HP cartridges. 2. Check the print properties to make sure you have selected the appropriate paper type and print quality from the Media drop-down list. In the Printer Software, click Printer Actions and then click Set Preferences to access the print properties. 3.
Chapter 9 6. Clean the print cartridges automatically, if the diagnostic page shows steaks or missing portions of the color and black boxes. To clean the cartridges automatically a. Load letter or A4 unused plain white paper into the input tray. b. In the Printer Software, click Printer Actions and then click Maintenence Tasks to access the Printer Toolbox. c. Click Clean Ink Cartridges on the Device Services tab. Follow the onscreen instructions.
a. Open cleanout door. b. Remove jammed paper. c. Close the cleanout door. Gently push the door towards the printer until both latches snap into place. 3. If the paper cannot be reached by opening the cartridge access door, close the cartridge access door. a. Remove all paper or media from the paper tray. b. Rotate printer until it rests on its left side. c. Slide out the paper tray, then remove jammed paper from inside the printer. d. Slide paper tray back into place. e.
Chapter 9 3. Verify that the product is not paused or offline. To verify that the product is not paused or offline a. Depending upon your operating system, do one of the following: • Windows 7: From the Windows Start menu, click Devices and Printers. • Windows Vista: From the Windows Start menu, click Control Panel, and then click Printers. • Windows XP: From the Windows Start menu, click Control Panel, and then click Printers and Faxes. b.
• Double-click Services, and then select Print Spooler. • Right-click Print Spooler, and click Restart to restart the service. b. Make sure the correct product is set as the default printer. The default printer has a check mark in a black or green circle next to it. c. If the wrong product is set as the default printer, right-click the correct product and select Set as Default Printer. d. Try using your product again. 6. Restart the computer. 7. Clear the print queue. To clear the print queue a.
Chapter 9 Clean the cartridges automatically. 1. From the home screen, which displays Copy, Scan, and Quick Forms, press the Setup button. NOTE: If you do not see the home screen, press the Back button until you can see it. 2. Select Clean Printhead from the Tools menu. 3. Follow the onscreen instructions. To maintain the cartridges, use the printer's Auto Power-Off feature to manage the printer's power use. For more information, see Auto Power-Off on page 8 Printer failure Resolve printer failure.
4. Hold the ink cartridge by its sides with the bottom pointing up and locate the electrical contacts on the ink cartridge. The electrical contacts are four small rectangles of copper or gold-colored metal on the bottom of the ink cartridge. 5. Wipe only the contacts with a dry swab or lint-free cloth. CAUTION: Be careful to touch only the contacts, and do not smear any of the ink or other debris elsewhere on the cartridge. Solve a problem 6.
Chapter 9 and install the SETUP cartridges to complete printer setup. After printer setup is complete, the printer can use regular cartridges. WARNING! You must replace the orange caps on the regular cartridges you remove, or they will quickly dry out. Some ink will still evaporate, but less than if the cartridges are uncapped. You can use the orange caps from the SETUP cartridges if necessary. Please contact HP support for help .
Networking • • • • Learn how to find your network security settings. Click here to go online for more information. Learn about the Network Diagnostic Utility and other troubleshooting tips. Click here to go online for more information. Learn how to change from a USB to wireless connection. Click here to go online for more information. Learn how to work with your firewall and anti-virus programs during printer setup. Click here to go online for more information.
Chapter 9 Placing a call Call HP support while you are in front of the computer and the product.
Technical information 10 Technical information The technical specifications and international regulatory information for the HP All-in-One are provided in this section. For additional specifications, see the printed documentation that came with the HP All-in-One.
Chapter 10 To disable the usage information function 1. From the printer display home screen press the Setup button. Technical information NOTE: The home screen displays Copy, Scan, and Quick Forms. If you do not see these options press the Back button until you do. 2. From the Setup menu, select Tools. 3. From the Tools menu, select Cartridge Chip Info.
Technical information Print specifications • Print speeds vary according to the complexity of the document • Method: drop-on-demand thermal inkjet • Language: PCL3 GUI Copy specifications • Digital image processing • Copy speeds vary according to the complexity of the document and model • Resolution: up to 600 dpi Scan specifications • Optical Resolution: up to 1200 dpi • Hardware Resolution: up to 1200 x 2400 dpi • Enhanced Resolution: up to 2400 x 2400 dpi • Bitdepth: 24-bit color, 8-bit grayscale (256 l
Chapter 10 Environmental product stewardship program Technical information Hewlett-Packard is committed to providing quality products in an environmentally sound manner. Design for recycling has been incorporated into this product. The number of materials has been kept to a minimum while ensuring proper functionality and reliability. Dissimilar materials have been designed to separate easily. Fasteners and other connections are easy to locate, access, and remove using common tools.
www.hp.com/hpinfo/globalcitizenship/environment/recycle/ Hewlett-Packard printing and imaging equipment marked with the ENERGY STAR® logo is qualified to the U.S. Environmental Protection Agency’s ENERGY STAR specifications for imaging equipment. The following mark will appear on ENERGY STAR qualified imaging products: Additional ENERGY STAR qualified imaging product model information is listed at: www.hp.com/go/energystar Sleep mode • Power usage is reduced while in Sleep mode.
Chapter 10 Disposal of waste equipment by users in private households in the European Union Technical information 52 Technical information
Chemical Substances Technical information HP is committed to providing our customers with information about the chemical substances in our products as needed to comply with legal requirements such as REACH (Regulation EC No 1907/2006 of the European Parliament and the Council). A chemical information report for this product can be found at: www.hp.com/go/ reach. Regulatory notices The HP All-in-One meets product requirements from regulatory agencies in your country/region.
Chapter 10 Notice to users in Korea Technical information VCCI (Class B) compliance statement for users in Japan Notice to users in Japan about the power cord European Union Regulatory Notice Products bearing the CE marking comply with the following EU Directives: • • • Low Voltage Directive 2006/95/EC EMC Directive 2004/108/EC Ecodesign Directive 2009/125/EC, where applicable CE compliance of this product is valid only if powered with the correct CE-marked AC adapter provided by HP.
(continued) Technical information For EU non-harmonized telecommunications products (If applicable, a 4-digit notified body number is inserted between CE and !). Please refer to the regulatory label provided on the product.
Chapter 10 Notice to users in Canada Technical information Notice to users in Taiwan 56 Technical information
Index A scan specifications 49 system requirements 48 after the support period 46 W B warranty 46 buttons, control panel 6 C Index control panel buttons 6 features 6 copy specifications 49 customer support warranty 46 E environment Environmental product stewardship program 50 environmental specifications 48 I interface card 33, 34 N network interface card 33, 34 P paper recommended types 17 phone support 45 phone support period period for support 45 print specifications 49 R recycle ink cartri
Index 58