
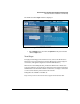
Getting Started Guide


2-6
Detailed Hardware Installation and Initial Setup Steps
Overview
Equipment
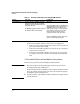
Cabinet Note
The 12-24 screws supplied with the DCM Controller are the correct threading
for standard EIA/TIA open 19-inch racks. If you are installing the DCM
Controller in an equipment cabinet such as a server cabinet, use the clips and
screws that came with the cabinet in place of the 12-24 screws that are
supplied with the controller. (Complete step 1 below, and plan which four
holes you will be using in the cabinet and install all four clips. Then proceed
to step 2.)
1. Use a #1 Phillips (cross-head) screwdriver and attach the mounting
brackets to the DCM Controller with the included 8-mm M4 screws.
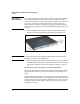
Figure 2-1. DCM Controller with Mounting Brackets
Note The mounting brackets have multiple mounting holes and can be rotated,
allowing for a variety of mounting options.
2. Hold the DCM Controller with attached brackets up to the rack and move
it vertically until rack holes line up with the bracket holes; then insert and
tighten the four number 12-24 screws holding the brackets to the rack.
Mounting the DCM Controller on a Horizontal Surface
Place the DCM Controller on a table or other horizontal surface. The controller
ships with rubber feet that you can use to help keep it from sliding on the
surface.
Attach the rubber feet to the four corners on the bottom of the DCM Controller
within the embossed angled lines. Use a sturdy surface in an uncluttered area.
You may want to secure the networking cables and switch power cord to the
table leg or other part of the surface structure to help prevent people from
tripping over the cords.