
Getting Started Guide


2-5
Detailed Hardware Installation and Initial Setup Steps
Overview
Cautions ■ Ensure that the power source circuits are properly grounded and use the
power cord supplied with the DCM Controller to connect it to the power
source.
■ If your installation requires a different power cord than the one supplied
with the unit, be sure to use a power cord displaying the mark of the safety
agency that defines the regulations for power cords in your country. The
mark is your assurance that the power cord can be used safely with the
unit.
■ When installing the unit, the AC outlet should be near the DCM Controller
and should be easily accessible in case it must be powered off.
■ Ensure that the DCM Controller does not overload the power circuits,
wiring, and overcurrent protection. To determine the possibility of over-
loading the supply circuits, add together the ampere ratings of all devices
installed on the same circuit as the DCM Controller and compare the total
with the rating limit for the circuit. The maximum ampere ratings are
usually printed on the devices near the AC power connectors.
■ Do not install the DCM Controller in an environment where the operating
ambient temperature might exceed 40°C (104°F).
■ Ensure that the air flow around the sides and back of the DCM Controller
is not restricted.
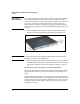
4. Mount the Unit
After determining the configuration and preparing the site, you are ready to
mount the DCM Controller in a stable location. You can mount the DCM
Controller in a rack or cabinet.
Warning For safe operation, please read “3. Read and Follow the Installation Precau-
tions” on page 2-4 before mounting the DCM Controller.
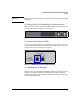
Mounting the DCM Controller in a Rack
The DCM Controller is designed to be mounted in any EIA-standard 19-inch
telco rack or communication equipment cabinet.