
Getting Started Guide


1-13
Hardware Overview and Quick Start Installation and Initial Setup
Quick Start Hardware Installation and Initial Setup
5. Connect power to the DCM Controller. After the DCM Controller is
mounted, plug it into the nearby main power source.
(For more information, see “5. Connect the DCM Controller to a Power
Source” on page 2-7 in Chapter 2: “Detailed Hardware Installation and
Initial Setup Steps.”)
6. Connect the network cables. Using the appropriate network cables, con-
nect the DCM Controller to the network.
(For more information, see “6. Connect the Network Cable” on page 2-7
in Chapter 2: “Detailed Hardware Installation and Initial Setup Steps.”)
7. Configure the IP settings.
You can configure DCM Controller’s IP address and test connectivity using
either the LCD menu on the front panel or the console interface. These
quick start instructions explain how to use the LCD menu, but for your
reference, Table 1-4 summarizes each method and lists the section in
Chapter 2: “Detailed Hardware Installation and Initial Setup Steps” where
you can find more detailed instructions.
Table 1-4. Summary of IP Configuration Methods
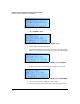
a. Locate the LCD menu on the DCM Controller’s front panel.
b. Press the accept button to access the Configuration menu.
Configuration Method Description Instructions
Using the LCD menu Locate the LCD menu on the front
panel and press the configuration
buttons to set the DCM
Controller’s IP settings.
• Quick start instructions—
next page
• Detailed instructions—
“Using the LCD Menu” on
page 2-8 in Chapter 2:
“Detailed Hardware
Installation and Initial Setup
Steps”
Use the Console
Interface
Establish a console session and
use a simply menu to configure
the DCM Controller’s IP settings.
• Detailed instructions—
“Using the Console
Interface” on page 2-12 in
Chapter 2: “Detailed
Hardware Installation and
Initial Setup Steps”