
Getting Started Guide


1-8
Hardware Overview and Quick Start Installation and Initial Setup
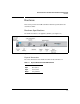
Hardware
■ Speed LED—indicates the connection speed:
• Off—10 Mbps
• Green—100 Mbps
• Orange—1000 Mbps
■ Eth/Act LED—indicates the status of the Ethernet link
Console Port
The console port is located beneath the front panel LEDs and enables out-of-
band management. The port accepts an RJ45 connector; use the RJ45 Connec-
tor/Console Cable (5188-6699) that ships with your DCM Controller.
The other end of this cable connects to a standard serial port. Plug it in to your
workstation and open a console terminal session to access the DCM Control-
ler’s menu interface.
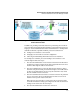
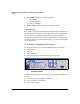
LCD Menu and Configuration Buttons
The front panel features an LCD, which initially displays the following:
■ Configuration
■ Ping test
■ Reboot/Shutdown
■ Legend for using the scroll buttons and the accept button
Figure 1-4. DCM Controller Front Panel, Showing the LCD Display and
Configuration Buttons
In addition, the panel has six buttons which you can use to perform tasks using
the LCD:
■ Four arrow buttons (left, right, up, and down)
■ An accept button (a checkmark)
■ A cancel button (an X)