
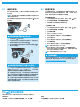
HP Color LaserJet Pro MFP M176, M177-Getting Started Guide


7
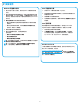
Windows
1. For Windows 7 or lower, do not connect the USB cable before
installing the software. The installation process prompts to
connect the cable at the appropriate time. If the cable is already
connected, restart the printer when installation prompts to
connect the cable.
2. Continue to “5. Locate or download the software installation
les.”
NOTE: During software installation, select the option to Directly
connect this computer using a USB cable.
Mac
1. Connect the USB cable between the computer and the printer
before installing the software.
2. Continue to “5. Locate or download the software installation
les.”
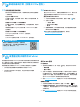
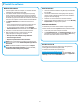
Wireless network connection
(M177fw wireless model only)
1. To connect the printer to a wireless (Wi-Fi) network, on the
printer control panel, touch the Wireless button.
2. Touch Wireless Menu, and then touch Wireless Setup Wizard.
Select the network name from the SSID list, or enter the network
name if it is not listed.
3. Use the keyboard to enter the passphrase, and then touch the OK
button.
4. Wait while the printer establishes a network connection.
5. On the printer control panel, touch the Network button.
If an IP address is listed, the network connection has been
established. If not, wait a few more minutes and try again. Note
the IP address for use during software installation. Example IP
address: 192.168.0.1
6. To print from a computer, continue to “5. Locate or download the
software installation les.” To print from a phone or tablet only,
continue to “7. Mobile and wireless printing.”
NOTE: During software installation, select the option to Help me
set up a rst-time wireless connection.
Manually congure the IP address
For information on how to manually congure the IP address, see the
printer User Guide, go to:
• www.hp.com/support/ljMFPM176series
• www.hp.com/support/ljMFPM177series
Wired (Ethernet) network connection
Use a standard network cable.
1. Connect the network cable to the printer and to the network. Wait
a few minutes for the printer to acquire a network address.
2. On the printer control panel, touch the Network button. If an IP
address is listed, the network connection has been established. If
not, wait a few more minutes and try again. Note the IP address for
use during software installation. Example IP address: 192.168.0.1
To manually congure the IP address, see “Manually congure
the IP address.”
3. Continue to “5. Locate or download the software
installation les.”
NOTE: During software installation, select the option to Connect
through a network.
USB connection directly between the
printer and the computer
Use an A-to-B type USB cable.
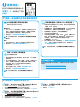
Method 1: Download from HP Easy Start
1. Go to 123.hp.com/laserjet, and click Download.
2. Follow the onscreen instructions and prompts to save the le to the computer.
3. Launch the software le from the folder where the le was saved, and continue
with “6. Install the software.”
Method 2: Download from printer support Web site
1. Go to www.hp.com/support/ljMFPM176series or
www.hp.com/support/ljMFPM177series.
2. Select Software and drivers.
3. Download the software for your printer model and operating system.
4. Launch the installation le by clicking on the .exe or .zip le as necessary, and
continue with
“6. Install the software.”
Method 3: Install from the printer CD
1. Insert the printer CD into the computer.
2. Continue with “6. Install the software.”
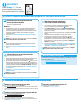
5.
Locate or download the software installation les5.
Locate or download the software installation les
IMPORTANT:
Follow Steps 1 - 3 on the
printer hardware setup poster,
then continue with Step 4 below.
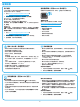
4.
Select a connection method and prepare for software installation