
HP DesignJet T2500 Multifunction Printer Series - User guide


NOTE: If you change the settings in this way, the changed settings apply to the current job but are not
saved permanently. You can change most of the default settings from the main menu: press ,
then Scan preferences.
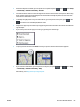
5. When you are satisfied with the scan settings, press anywhere on the screen to return to the previous
page, then press Start.
6. Once the original has been scanned, you can (if you like) check the file size and change the
automatically-generated filename of the scanned image.
7. If you are scanning to a USB flash drive, wait until the scanned image has been saved in a file, then press
on the front panel and press Eject. Remove the USB flash drive when prompted by the front
panel.
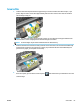
8.
Press to eject the scanned sheet from the scanner; be ready to pick it up from the rear.
9. After scanning, you can choose to scan again or go to the job queue.
TIP: All scan jobs are saved in the scan queue, where they can be accessed by any user. If your job is
private, you may wish to delete it from the queue after recovering the image file.
TIP: If you scan an image to a file and then decide to print it one or more times, you can change the print
settings every time. You can also save it to another location.
NOTE: By default, if the original is skewed in the scanner (not loaded straight), the scanner will try to
correct the skew automatically. To turn off this automatic correction, press , then , then Scan
preferences > De-skew > Off.
ENWW Scan to file 89