
Hardware reference guide
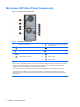
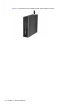
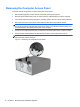
Table Of Contents
- Product Features
- Microtower (MT) Hardware Upgrades
- Serviceability Features
- Warnings and Cautions
- Removing the Computer Access Panel
- Replacing the Computer Access Panel
- Removing the Front Bezel
- Removing Bezel Blanks
- Replacing the Front Bezel
- System Board Connections
- Installing Additional Memory
- Removing or Installing an Expansion Card
- Drive Positions
- Installing and Removing Drives
- Installing a Security Lock
- Small Form Factor (SFF) Hardware Upgrades
- Serviceability Features
- Warnings and Cautions
- Removing the Computer Access Panel
- Replacing the Computer Access Panel
- Removing the Front Bezel
- Removing Bezel Blanks
- Replacing the Front Bezel
- Changing from Desktop to Tower Configuration
- System Board Connections
- Installing Additional Memory
- Removing or Installing an Expansion Card
- Drive Positions
- Installing and Removing Drives
- Installing a Security Lock
- Battery Replacement
- Removing and Replacing a Removable 3.5-inch SATA Hard Drive
- Unlocking the Smart Cover Lock
- Electrostatic Discharge
- Computer Operating Guidelines, Routine Care and Shipping Preparation
- Index

Table 1-7 Windows Logo Key Functions (continued)
Windows Logo Key + right arrow Snaps the window to the right side of the screen
Windows Logo Key + down arrow Minimizes the window
Windows Logo Key + Shift + up arrow Stretches the window to the top and bottom of the screen
Windows Logo Key + Shift + left arrow or right
arrow
Moves a window from one monitor to another
Windows Logo Key + + (on numpad) Zooms in
Windows Logo Key + - (on numpad) Zooms out
Serial Number Location
Each computer has a unique serial number and a product ID number that are located on the top
cover of the computer. Keep these numbers available for use when contacting customer service for
assistance.
Figure 1-8 Microtower Serial Number and Product ID Location
Serial Number Location 9