
Hardware reference guide


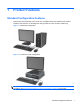
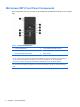
Table Of Contents
- Product Features
- Microtower (MT) Hardware Upgrades
- Serviceability Features
- Warnings and Cautions
- Removing the Computer Access Panel
- Replacing the Computer Access Panel
- Removing the Front Bezel
- Removing Bezel Blanks
- Replacing the Front Bezel
- System Board Connections
- Installing Additional Memory
- Removing or Installing an Expansion Card
- Drive Positions
- Installing and Removing Drives
- Installing a Security Lock
- Small Form Factor (SFF) Hardware Upgrades
- Serviceability Features
- Warnings and Cautions
- Removing the Computer Access Panel
- Replacing the Computer Access Panel
- Removing the Front Bezel
- Removing Bezel Blanks
- Replacing the Front Bezel
- Changing from Desktop to Tower Configuration
- System Board Connections
- Installing Additional Memory
- Removing or Installing an Expansion Card
- Drive Positions
- Installing and Removing Drives
- Installing a Security Lock
- Battery Replacement
- Removing and Replacing a Removable 3.5-inch SATA Hard Drive
- Unlocking the Smart Cover Lock
- Electrostatic Discharge
- Computer Operating Guidelines, Routine Care and Shipping Preparation
- Index
Microtower (MT) Front Panel Components
Drive configuration may vary by model. Some models have a bezel blank covering one or more drive
bays.
Table 1-1 Front Panel Components
1 5.25-inch Optical Drives 5 3.5-inch Media Card Reader (optional)
2 Hard Drive Activity Light 6 Dual-State Power Button
3 Microphone/Headphone Connector 7 Power On Light
4 USB (Universal Serial Bus) 2.0 Ports 8 Headphone Connector
NOTE: When a device is plugged into the Microphone/Headphone Connector, a dialog box will pop up asking if
you want to use the connector for a microphone Line-In device or a headphone. You can reconfigure the
connector at any time by double-clicking the Realtek HD Audio Manager icon in the Windows taskbar.
NOTE: The Power On Light is normally green when the power is on. If it is flashing red, there is a problem with
the computer and it is displaying a diagnostic code. Refer to the Maintenance and Service Guide to interpret the
code.
2 Chapter 1 Product Features