
Reference Guide
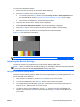
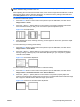

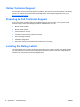
Table Of Contents
- Optimizing Monitor Performance
- Safety and Maintenance Guidelines
- Operating the Monitor
- Troubleshooting
- Agency Regulatory Notices
- LCD Monitor Quality and Pixel Policy
To use the auto-adjustment feature:
1. Allow the monitor to warm up for 20 minutes before adjusting.
2. Press the auto button on the monitor front panel.
●
You can also press the Menu button, then select Image Control > Auto-Adjustment from
the OSD Main Menu. Refer to
Adjusting the Monitor Settings on page 7 in this chapter.
●
If the result is not satisfactory, continue with the procedure.
3. Insert the CD in the disc drive. The CD menu is displayed.
4. Select Open Auto-Adjustment Software. The setup test pattern is displayed.
5. Press the auto button on the monitor front panel to produce a stable, centered image.
6. Press the ESC key or any other key on the keyboard to exit the test pattern.
Figure 3-1 Auto-Adjustment Test Pattern
NOTE: The auto-adjustment test pattern utility can be downloaded from http://www.hp.com/support.
Adjusting the Monitor Settings
The monitor settings can be adjusted from the On-Screen Display (OSD) menu.
NOTE: If there is a problem with the display settings, try resetting the settings to the factory defaults
by opening the OSD and selecting Factory Reset from the OSD menu.
Using the On-Screen Display Menu
Use the On-Screen Display (OSD) to adjust the screen image based on your viewing preferences. To
access the OSD, do the following:
1. If the monitor is not already on, press the Power button to turn on the monitor.
2. To access the OSD Menu, press the Menu button on the monitor’s front panel.
3. To navigate through the OSD Menu, press the + (Plus) button on the monitor’s front panel to
scroll up, or the – (Minus) button to scroll in reverse.
4. To select an item from the OSD Menu, use the + or – buttons to scroll to and highlight your
selection, then press the OK button to select that function (the OK button may be different on
your model).
ENWW Using and Adjusting the Monitor 7