HP LCD Monitors Reference Guide
© 2011 Hewlett-Packard Development Company, L.P. Microsoft, Windows, and Windows Vista are either trademarks or registered trademarks of Microsoft Corporation in the United States and/or other countries. The only warranties for HP products and services are set forth in the express warranty statements accompanying such products and services. Nothing herein should be construed as constituting an additional warranty. HP shall not be liable for technical or editorial errors or omissions contained herein.
About This Guide This guide provides information on safety and maintenance guidelines, operating the monitor, and troubleshooting common problems. WARNING! Text set off in this manner indicates that failure to follow directions could result in bodily harm or loss of life. CAUTION: Text set off in this manner indicates that failure to follow directions could result in damage to equipment or loss of information. NOTE: ENWW Text set off in this manner provides important supplemental information.
iv About This Guide ENWW
Table of contents 1 Optimizing Monitor Performance .................................................................................................................. 1 Use Caution When Setting Up the Monitor .......................................................................................... 1 To Get the Best Performance from Your Monitor ................................................................................. 2 2 Safety and Maintenance Guidelines .............................................
Cables ................................................................................................................................ 15 Declaration of Conformity for Products Marked with the FCC Logo (United States Only) ................. 15 Canadian Notice ................................................................................................................................. 16 Avis Canadien ........................................................................................................
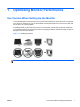
1 Optimizing Monitor Performance Use Caution When Setting Up the Monitor To prevent damage to the monitor, do not touch the surface of the LCD panel. Pressure on the panel may cause non-uniformity of color or disorientation of the liquid crystals. If this occurs the screen will not recover to its normal condition. If installing a base, lay the monitor face down on a flat surface covered with a protective sheet foam or non-abrasive cloth.
To Get the Best Performance from Your Monitor 1. Be sure to install the latest graphics card driver from your graphics card manufacturer. 2. For monitors using VGA signal input, once the monitor is operating, press the Auto button on the monitor to optimize the display. If the Auto function does not fully correct the display, run the Auto-Adjustment software available on the CD included with the monitor and then press the Auto button. 3.
2 Safety and Maintenance Guidelines Important Safety Information A power cord is included with the monitor. If another cord is used, use only a power source and connection appropriate for this monitor. For information on the correct power cord set to use with the monitor, refer to the Power Cord Set Requirements on page 17. WARNING! To reduce the risk of electric shock or damage to the equipment: • Do not disable the power cord grounding feature. The grounding plug is an important safety feature.
● Install the monitor near an outlet that you can easily reach. Disconnect the monitor by grasping the plug firmly and pulling it from the outlet. Never disconnect the monitor by pulling the cord. ● Turn the monitor off when not in use. You can substantially increase the life expectancy of the monitor by using a screen saver program and turning off the monitor when not in use. NOTE: Monitors with a “burned-in image” are not covered under the HP warranty.
3 Operating the Monitor Setting Up the Monitor Refer to the monitor user guide for your model to assemble the monitor and connect the cables. Software and Utilities The CD that comes with the monitor contains files you can install on the computer: ● an .INF (Information) file ● an .ICM (Image Color Matching) file ● auto-adjustment pattern utility ● additional software for the monitor model NOTE: If the monitor does not include a CD, the .INF and .
Installing the .INF and .ICM Files After you determine that you need to update, you can install the .INF and .ICM files from the CD or download them. Installing from the CD To install the .INF and .ICM files on the computer from the CD: 1. Insert the CD in the computer CD-ROM drive. The CD menu is displayed. 2. View the Monitor Driver Software Readme file. 3. Select Install Monitor Driver Software. 4. Follow the on-screen instructions. 5.
To use the auto-adjustment feature: 1. Allow the monitor to warm up for 20 minutes before adjusting. 2. Press the auto button on the monitor front panel. ● You can also press the Menu button, then select Image Control > Auto-Adjustment from the OSD Main Menu. Refer to Adjusting the Monitor Settings on page 7 in this chapter. ● If the result is not satisfactory, continue with the procedure. 3. Insert the CD in the disc drive. The CD menu is displayed. 4. Select Open Auto-Adjustment Software.
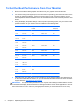
5. Adjust the item using the + or – buttons on the front panel to adjust the scale. 6. After adjusting the function, select Save and Return, or Cancel if you don’t want to save the setting, then select Exit from the Main Menu. NOTE: If the buttons remain untouched for 10 seconds while displaying a menu, the OSD automatically saves all changes and exits. The following table lists the OSD Main menu items with a brief descriptions of each item.
NOTE: When using the controls, you will obtain the best results by using the auto-adjustment pattern software utility provided on the CD. When adjusting the Clock and Clock Phase values, if the monitor images become distorted, continue adjusting the values until the distortion disappears. To restore the factory settings, select Yes from the Factory Reset menu in the on-screen display. To eliminate vertical bars (Clock): 1.
Sleep Timer Mode The Sleep Timer mode is an energy-saving feature that enables you to set a time for the monitor to power on and off at the same time every day. This also extends the life of the backlight bulbs in the monitor. The Sleep Timer has five settings: ● Set Current Time ● Set Sleep Time ● Set On Time ● Timer: On/Off ● Sleep Now To set the timer: 1. Press the Menu button on the monitor front panel to display the OSD Menu. 2. Scroll down and highlight Management. 3.
Using the HP Display Assistant Utility (select models) HP Display Assistant, included on the software and documentation CD for select models, is a software utility that guides you through the tuning process with easy to understand instructions and background patterns designed for each monitor control. It provides: ● Accurate screen calibration through the use of step-by-step instruction Wizards to obtain the best overall image quality.
● 12 Power Button Lockout—Indicates the power button is locked. If the power button is locked, the warning message Power Button Lockout displays. ◦ If the power button is locked, press and hold the power button for 10 seconds to unlock the power button function. ◦ If the power button is unlocked, press and hold the power button for 10 seconds to lock out the power button function. ● Dynamic Contrast Ratio On—Indicates that Dynamic Contrast Ratio has been turned on.
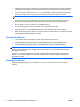
A Troubleshooting Solving Common Problems The following table lists possible problems, the possible cause of each problem, and the recommended solutions. ENWW Problem Possible Cause Solution Screen is blank. Power cord is disconnected. Connect the power cord. Power button on front panel of the monitor is turned off. Press the front panel power button. Video cable is improperly connected. Connect the video cable properly. Screen blanking is active.
Online Technical Support For the online access to technical support information, self-solve tools, online assistance, community forums of IT experts, broad multivendor knowledge base, monitoring and diagnostic tools, go to http://www.hp.com/support. Preparing to Call Technical Support If you cannot solve a problem using the troubleshooting tips in this section, you may need to call technical support.
B Agency Regulatory Notices Federal Communications Commission Notice This equipment has been tested and found to comply with the limits for a Class B digital device, pursuant to Part 15 of the FCC Rules. These limits are designed to provide reasonable protection against harmful interference in a residential installation.
For questions regarding this FCC declaration, contact: Hewlett Packard Company P. O. Box 692000, Mail Stop 510101 Houston, Texas 77269-2000 Or, call (281) 514-3333 To identify this product, refer to the Part, Series, or Model number found on the product. Canadian Notice This Class B digital apparatus meets all requirements of the Canadian Interference-Causing Equipment Regulations.
German Ergonomics Notice HP products which bear the “GS” approval mark, when forming part of a system comprising HP brand computers, keyboards and monitors that bear the “GS” approval mark, meet the applicable ergonomic requirements. The installation guides included with the products provide configuration information. Japanese Notice Korean Notice Power Cord Set Requirements The monitor power supply is provided with Automatic Line Switching (ALS).
Product Environmental Notices ENERGY STAR® Qualification As an ENERGY STAR® Partner, Hewlett Packard Company has followed the EPA's enhanced product qualification and certification process to ensure that the products marked with the ENERGY STAR® logo are ENERGY STAR® qualified per the applicable ENERGY STAR® guidelines for energy efficiency.
Disposal of Waste Equipment by Users in Private Household in the European Union This symbol on the product or on its packaging indicates that this product must not be disposed of with your household waste. Instead, it is your responsibility to dispose of your waste equipment by handing it over to a designated collection point for the recycling or waste electrical and electronic equipment.
Turkey EEE Regulation In Conformity with the EEE Regulation EEE Yönetmeliğine Uygundur Ukraine Restriction of Hazardous Substances The equipment complies with requirements of the Technical Regulation, approved by the Resolution of Cabinet of Ministry of Ukraine as of December 3, 2008 No. 1057, in terms of restrictions for the use of certain dangerous substances in electrical and electronic equipment.
C LCD Monitor Quality and Pixel Policy The TFT monitor uses high-precision technology, manufactured according to HP standards, to guarantee trouble-free performance. Nevertheless, the display may have cosmetic imperfections that appear as small bright or dark spots. This is common to all LCD displays used in products supplied by all vendors and is not specific to the HP LCD. These imperfections are caused by one or more defective pixels or sub-pixels.