261794-001.
61794-001.book Page ii Tuesday, January 22, 2002 2:20 PM © 2002 Compaq Information Technologies Group, L.P. Compaq, the Compaq logo, and iPAQ are trademarks of Compaq Information Technologies Group, L.P. in the United States and/or other countries. Microsoft, MS-DOS, Windows, Windows NT are trademarks of Microsoft Corporation in the United States and other countries. All other product names mentioned herein may be trademarks of their respective companies.
261794-001.book Page 1 Tuesday, January 22, 2002 2:20 PM 1 Getting Started Product Features The Compaq iPAQ Microportable Projector MP4800 generates crisp, clear images onto a projection screen by using Digital Light Processing (DLP) technology.
261794-001.
261794-001.
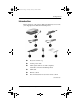
261794-001.book Page 4 Tuesday, January 22, 2002 2:20 PM Getting Started 7 Documentation kit: ■ Quick Setup card ■ CD-ROM containing the User’s Guide in eight languages ■ Important Safety Information booklet ■ Worldwide Limited Warranty and Technical Support booklet ■ Worldwide Telephone Numbers booklet ■ Program License Agreement If your shipping box does not contain all of the listed items, please contact your Compaq authorized dealer, reseller, or service provider.
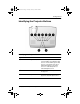
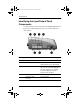
261794-001.book Page 5 Tuesday, January 22, 2002 2:20 PM Getting Started Identifying the Projector Buttons Identifying the Projector Buttons Symbol Control Function 1 Lamp Saver button Turns the Lamp Saver feature on and off. If the LED is not lit (default), lamp saver is off. If the LED is green, lamp saver is on. Turn lamp saver off for maximum brightness. Turn lamp saver on to extend lamp life at a reduced brightness level. 2 Mute button Mutes or silences the speakers on the projector.
261794-001.book Page 6 Tuesday, January 22, 2002 2:20 PM Getting Started Identifying the Projector Buttons (Continued) Symbol Control Function 4 Standby button Powers the projector lamp on and off. The Standby LED changes color modes to indicate the following operating modes: 1. Flashing green indicates the projector is going into standby mode and cannot be restarted until the LED glows green steadily. 2. The LED button rapidly flashing green indicates the lamp has automatically shut down.
261794-001.book Page 7 Tuesday, January 22, 2002 2:20 PM Getting Started Identifying the Projector Buttons (Continued) Symbol Control Function 7 Source button Selects the input source. 8 Minus button Selects and adjusts the on-screen scroll-down menu functions. 9 Plus button Selects and adjusts the on-screen scroll-up menu functions. To use standby mode, press the Standby button and, after a six to ten second delay, the unit enters Standby mode and the projector lamp turns off.
261794-001.book Page 8 Tuesday, January 22, 2002 2:20 PM Getting Started Identifying the Input/Output Panel Components A variety of cables can be connected to the Input/Output Panel on the projector, allowing the projector to use various audio and video sources.
261794-001.
261794-001.book Page 1 Tuesday, January 22, 2002 2:20 PM 2 Using the Projector Setting Up the Projector Follow the instructions below and on the following pages to set up the projector.
261794-001.book Page 2 Tuesday, January 22, 2002 2:20 PM Using the Projector Place the projector on a stable desk, table, tripod, or ceiling mount at a distance not less than 3.7 feet (1.1 meter) and not greater than 40.7 feet (12.4 meters) from the projection screen. To reduce the risk of electric shock or damage to your equipment: Å WARNING: ■ Do not disable the power cord grounding plug. The grounding plug is ■ ■ ■ 2–2 an important safety feature.
261794-001.book Page 3 Tuesday, January 22, 2002 2:20 PM Using the Projector Connecting the Projector to a Notebook Computer 1. Connect one end of the projector signal cable into the side of the projector and the other end to the DVI connector 1A or the VGA connector 1B on the notebook computer and tighten the screws. sure the signal cable aligns with the connector. Do not force ✎ Be the cable onto the connector or you may damage the signal cable or the projector. 2.
261794-001.book Page 4 Tuesday, January 22, 2002 2:20 PM Using the Projector Connecting the Projector to a Desktop Computer 1. Connect one end of the projector signal cable into the side of the projector and the other end to the DVI connector 1A or the VGA connector 1B on the desktop computer and tighten the screws. sure the signal cable aligns with the connector. Do not force ✎ Be the cable onto the connector or you may damage the signal cable or the projector. 2.
261794-001.book Page 5 Tuesday, January 22, 2002 2:20 PM Using the Projector Connecting the Projector to a Compaq iPAQ Pocket PC To connect the projector to a Compaq iPAQ Pocket PC, the Pocket PC must have a male connector adapter and a VGA-out PC Card with a 15-pin connector. VGA-out PC Card with the 15-pin connector is not included ✎ The with the Compaq iPAQ Pocket PC. For information on purchasing the optional VGA-out PC Card, contact your Compaq authorized dealer or reseller.
261794-001.book Page 6 Tuesday, January 22, 2002 2:20 PM Using the Projector 1. Connect one end of the signal cable 1 into the side of the projector and connect the other end to the VGA-out PC Card. The VGA-out PC Card may be inserted into the PC slot on the Compaq Pocket PC before or after connecting the signal cable. sure the signal cable aligns with the connector. Do not force ✎ Be the cable onto the connector or you may damage the signal cable or the projector. 2.
261794-001.book Page 7 Tuesday, January 22, 2002 2:20 PM Using the Projector Powering On the Projector 1. Make sure the power cord and signal cable are securely connected. ✎ Make sure the projector is perpendicular to the projection screen. 2. Remove the lens cap 1 from the projector by pressing in on the tabs on either side of the lens cap and pulling it straight out. 3. Press the main power switch 2 on the side of the projector and allow the projector to warm up for one to two minutes.
261794-001.book Page 8 Tuesday, January 22, 2002 2:20 PM Using the Projector 4. Power on your source (computer, Pocket PC, VCR, etc.) and launch the software application being used to display images on the projection screen. If applicable, press the Function key on the computer designated for external display.
261794-001.book Page 9 Tuesday, January 22, 2002 2:20 PM Using the Projector Powering Off the Projector 1. Press the Standby button 1 to turn off the projector lamp. The message “Going to Standby” displays and the LED on the Standby button blinks amber. the projector to cool down for about five to ten minutes ✎ Allow before turning it off. 2. Turn off the main power switch 2 on the side of the projector.
261794-001.book Page 10 Tuesday, January 22, 2002 2:20 PM Using the Projector Adjusting the Projected Image There are three ways to adjust the projected image: ■ Adjusting the projector height ■ Adjusting the image size ■ Adjusting the projector focus Adjusting the Projector Height The projector has a built-in elevator foot that can raise the projector approximately 1 inch (2.54 cm). If the projector is mounted to a tripod, do not use the Ä CAUTION: elevator foot. To adjust the height: 1.
261794-001.book Page 11 Tuesday, January 22, 2002 2:20 PM Using the Projector The projector is capable of correcting for keystone (trapezoidal) distortion caused when the projector is tilted upward or downward from its normal horizontal position. This feature corrects keystoning by making the width of the top and bottom of the screen the same. Access this feature using the Image Control selection of the on-screen display (OSD) menu.
261794-001.book Page 12 Tuesday, January 22, 2002 2:20 PM Using the Projector Adjusting the Projector Focus To focus the projected image, rotate the focus ring 1 until the image is clear. The projector will focus at distances from 3.7 feet (1.1 meters) to 40.7 feet (12.4 meters). If vertical bars appear on the display after adjusting the focus, press the Resync button 2 to automatically synchronize and track the display.
261794-001.book Page 13 Tuesday, January 22, 2002 2:20 PM Using the Projector Image Size Adjustment Projected Image Sizes at Minimum Zoom 1 Screen Diagonal 1.9’ 0.6 m 3.3’ 1.0 m 6.5’ 2.0 m 9.8’ 3.0 m 13.1’ 4.0 m 16.4’ 5.0 m 20.3’ 6.2 m Screen Width 1.5’ 0.5 m 2.6’ 0.8 m 5.3’ 1.6 m 7.9’ 2.4 m 10.5’ 3.2 m 13.1’ 4.0 m 16.3’ 5.0 m Screen Height 1.1’ 0.3 m 2.0’ 0.6 m 3.9’ 1.2 m 5.9’ 1.8m 7.9’ 2.4 m 9.8’ 3.0 m 12.2’ 3.7 m Projection Distance 3.74’ 1.1 m 6.6’ 2.0 m 13.1’ 4.0 m 19.
261794-001.book Page 1 Tuesday, January 22, 2002 2:20 PM 3 Using the On-Screen Display Menu Introducing the On-Screen Display Menu The adjustments for screen settings are located in the on-screen display (OSD) menu and can be viewed in one of the available languages. Adjusting the On-Screen Display Menu To launch and make adjustments to the OSD menu: 1. Press the Menu button 1 on the projector or the remote control. The Main menu will display on the projection screen. 2.
1794-001.book Page 2 Tuesday, January 22, 2002 2:20 PM Using the On-Screen Display Menu 3. Highlight the function to be adjusted and press the Enter/Accept button 4. is no Enter/Accept button on the remote control. If you are ✎ There using the remote control to operate the on-screen display menu, press the Menu button again to accept changes. bar on the bottom of the on-screen display menu shows the ✎ The current operating resolution as well as horizontal and vertical frequency.
261794-001.book Page 3 Tuesday, January 22, 2002 2:20 PM Using the On-Screen Display Menu Sample On-Screen Display Menu Adjustment Below is an example of how to operate the on-screen display menu. 1. To select the Image Control function, press the Minus (-) button until Image Control is highlighted, then press the Enter/Accept button on the projector to display the level 2 menu for Image Control. The level 2 menu displays expanded menu items. 2.
261794-001.book Page 4 Tuesday, January 22, 2002 2:20 PM Using the On-Screen Display Menu 6. To save all current settings and immediately exit, press the Menu button on top of the projector. or To make changes before exiting, select Exit from the Main menu. If the display is a second-, third-, or fourth-level menu, select Save and Return or Cancel, then select Exit from the Main menu.
261794-001.
261794-001.
261794-001.book Page 7 Tuesday, January 22, 2002 2:20 PM Using the On-Screen Display Menu On-Screen Display Menu Adjustments (Continued) Main Menu Menu Level 2 Factory Reset Yes No Menu Level 3 Exit Explaining Functions in the On-Screen Display Menu ■ Brightness—Adjusts the displayed image brightness. The default brightness value is 50%, and the settings range from 0 to 100. Press the Minus (-) button to darken the image. Press the Plus (+) button to lighten the image.
261794-001.book Page 8 Tuesday, January 22, 2002 2:20 PM Using the On-Screen Display Menu ❏ Clock Phase—Increases/decreases the value to minimize video distortion or video jitter. This selection is not available when a source is connected to the DVI connector. the projector image becomes distorted when adjusting the ✎ IfClock and Clock Phase values, continue adjusting the values until the distortion disappears.
261794-001.book Page 9 Tuesday, January 22, 2002 2:20 PM Using the On-Screen Display Menu ■ Language—Allows you to change the on-screen display to one of the languages in their native spelling. The current language is highlighted. Select another language to display all menu functions in that language. ■ Management—Allows you to control lamp saver characteristics of the display, view the cumulative lamp hours, or set the OSD horizontal and vertical position, timeout, and transparency.
261794-001.book Page 10 Tuesday, January 22, 2002 2:20 PM Using the On-Screen Display Menu ■ Input Signal Out of Range. Please Change Display Mode—Indicates the projector is unable to access the appropriate input signal. ■ Going to Standby—Indicates the projector is entering a sleep mode or is powering off the lamp. ■ Adjusting—Indicates the Resync button has been pressed or the Factory Reset option has been selected from the OSD menu.
261794-001.book Page 1 Tuesday, January 22, 2002 2:20 PM 4 Using the Tripod Mount and Ceiling Mount Using the Tripod Mount The Compaq Microportable Projector includes standard tripod mount capability on the bottom of the projector. This allows the projector to be mounted on tripods readily available at camera and other electronic stores. The tripod should be capable of supporting a weight of at Å WARNING: least seven pounds. Refer to the owner’s manual that came with your tripod for more information.
261794-001.book Page 2 Tuesday, January 22, 2002 2:20 PM Using the Tripod Mount and Ceiling Mount 2. If there is a guide pin on the tripod mounting block, align it with the guide pin hole 1 on the bottom of the projector. 3. Attach the tripod mounting block to the tripod mount hole 2 on the bottom of the projector.
261794-001.book Page 3 Tuesday, January 22, 2002 2:20 PM Using the Tripod Mount and Ceiling Mount 4. Attach the projector and tripod mounting block to the tripod according to the tripod manufacturer’s instructions.
261794-001.book Page 4 Tuesday, January 22, 2002 2:20 PM Using the Tripod Mount and Ceiling Mount Using the Ceiling Mount The projector also includes ceiling mount capability on the bottom of the projector. This allows the projector to be mounted from the ceiling using any ceiling mount bracket that matches the screw hole configuration on the projector. optional ceiling mount bracket with the correct screw hole ✎ An configuration is available from Compaq. The kit also includes 20 foot cables.
261794-001.book Page 5 Tuesday, January 22, 2002 2:20 PM Using the Tripod Mount and Ceiling Mount To use the projector with a ceiling mount bracket: 1. Carefully turn the projector upside down. 2. Line up the screw holes on the projector 1 with the screw holes on the ceiling mount bracket. 3. Tighten the screws. 4. Connect any necessary cables. 5. Access the on-screen display menu and select Image Control. Then select Flip Image.
261794-001.
261794-001.book Page 1 Tuesday, January 22, 2002 2:20 PM 5 Using the Remote Control The optional remote control has many convenient features. It combines the functions of the projector buttons with some of the most widely used functions of the computer mouse. Before using the remote control, be sure steps 1 through 3 have been completed under “Powering On the Projector” in Chapter 2.
261794-001.
261794-001.
261794-001.book Page 4 Tuesday, January 22, 2002 2:20 PM Using the Remote Control Mouse ball, Page Up, Page Down, Right Mouse, and Left ✎ The Mouse functions of the remote control will not work unless a desktop or notebook computer is connected to the projector with the USB cable. These functions are not available when a Compaq iPAQ Pocket PC is connected to the projector.
261794-001.book Page 5 Tuesday, January 22, 2002 2:20 PM Using the Remote Control To operate a computer using the remote control, the USB cable (included with the projector) must be used. Connect one end of the USB cable to the USB connector on the projector and the other end to the USB connector on the computer. Windows XP, Windows ME, Windows 2000, and ✎ Microsoft Windows 98 support USB connection. Microsoft Windows NT does not support USB connection.
261794-001.book Page 1 Tuesday, January 22, 2002 2:20 PM 6 Using the Home Theater Kit The Compaq Microportable Projector has been designed to integrate the video decoding functionality into the projector itself. The optional Home Theater kit uses this video decoding functionality to offer a complete home theater solution. The optional Home Theater Kit is not included with the Compaq Microportable Projector.
261794-001.book Page 2 Tuesday, January 22, 2002 2:20 PM Using the Home Theater Kit Contents of the Home Theater Kit The home theater kit contains five cables: 6–2 1 S-video cable—connects the projector to a video source with super video capabilities (e.g., DVD player, video cassette recorder, laser disc player, camcorder, satellite dish receiver, etc.) using an S-video connector. 2 Composite video cable—connects the projector to a video source without super video capabilities (e.g.
261794-001.book Page 3 Tuesday, January 22, 2002 2:20 PM Using the Home Theater Kit Connecting a DVD Player 1. Connect one end of the S-video cable 1 to the DVD player. 2. Connect the other end of the S-video cable to the S-video connector on the Input/Output Panel on the projector 2. 3. Connect one end of the power cord into the side of the projector and the other end to an electrical outlet that is easily accessible and close to the projector.
261794-001.book Page 4 Tuesday, January 22, 2002 2:20 PM Using the Home Theater Kit Connecting a Videocassette Recorder (VCR) 1. Connect one end of the composite video cable 1 to the VCR. 2. Connect the other end of the composite video cable to the composite video connector on the Input/Output Panel on the projector 2. 3. Connect one end of the power cord into the side of the projector and the other end to an electrical outlet that is easily accessible and close to the projector.
261794-001.book Page 5 Tuesday, January 22, 2002 2:20 PM Using the Home Theater Kit Connecting a Camcorder 1. Connect one end of the S-video cable 1 to the camcorder. 2. Connect the other end of the S-video cable to the Input/Output Panel on the projector 2. 3. Connect one end of the power cord into the side of the projector and the other end to an electrical outlet that is easily accessible and close to the projector.
261794-001.book Page 6 Tuesday, January 22, 2002 2:20 PM Using the Home Theater Kit Connecting an HDTV Device 1. Connect one end of the VGA-to-HDTV/component video cable 1 to the HDTV device. 2. Connect the other end of the VGA-to-HDTV/component video cable to the VGA connector 2 on the Input/Output Panel on the projector. 3. Connect the dual end of the Home Theater audio cable to the HDTV device 3. 4.
261794-001.book Page 7 Tuesday, January 22, 2002 2:20 PM Using the Home Theater Kit Connecting a Personal Computer (PC) 1. Connect one end of the VGA cable that came with the projector to the VGA connector 1 on the Input/Output Panel on the projector. 2. Connect the other end of the VGA cable to the PC 2. 3. Connect one end of the PC audio cable to the PC 3. 4. Connect the other end of the PC audio cable to the audio connector on the Input/Output Panel on the projector 4. 5.
261794-001.book Page 8 Tuesday, January 22, 2002 2:20 PM Using the Home Theater Kit HDTV Modes The Compaq Microportable Projector is capable of displaying various High Definition TV (HDTV) display modes. A variety of sources can be used to provide HDTV data to the projector for display.
261794-001.book Page 9 Tuesday, January 22, 2002 2:20 PM Using the Home Theater Kit The following modes are supported on the DVI interface: ■ ■ HD0 ❏ 640 x 480p ❏ 1280 x 720p HD1—1920 x 1080i When displaying HDTV content, it is recommended that you display it in its native 16:9 widescreen mode. For this, you may need to select the HDTV Fill to Aspect Ratio mode on the projector to preserve the height-to-width relationship of the material.
261794-001.book Page 1 Tuesday, January 22, 2002 2:20 PM 7 Care and Maintenance This section explains how to care for and maintain your Compaq projector during normal everyday use. Protecting the Projector To protect your projector from overheating and other types of damage, follow these suggestions: ■ Use only a power source and connection appropriate for this projector as indicated on the product label located on the bottom of the projector on the elevator foot.
261794-001.book Page 2 Tuesday, January 22, 2002 2:20 PM Care and Maintenance ■ Do not drop the projector or place it on an unstable surface. ■ Do not expose the projector to rain or moisture. ■ Do not allow anything to rest on the power cord. Do not walk on the cord. ■ Do not allow the projector to be exposed to high temperatures. ■ Do not open the projector or attempt to service this product for any reason other than to replace the lamp module.
261794-001.book Page 3 Tuesday, January 22, 2002 2:20 PM Care and Maintenance 2. If the cloth is dirty or smears the lens, wash the cloth. If the cloth is still dirty after washing it or the fabric is damaged, replace it. not use fabric softener when washing a cleaning cloth or ✎ Do softener sheets when drying the cloth. CAUTION: Do not store a cleaning cloth in contact with the lens for a Ä long time as doing so may contaminate the lens with dye from the cloth.
261794-001.book Page 4 Tuesday, January 22, 2002 2:20 PM Care and Maintenance Follow these steps to replace the projector lamp module: 1. Turn off the main power switch on the side of the projector. 2. Allow the projector to cool down for at least 30 minutes. WARNING: The lamp assembly operates at a very high temperature. To Å reduce the risk of personal injury, allow the projector to cool down for at least 30 minutes before opening the lamp cover.
261794-001.book Page 5 Tuesday, January 22, 2002 2:20 PM Care and Maintenance 7. Remove the three screws from the lamp module 3. 8. Pull the lever up 4 and pull the lamp module straight out of the projector 5. To reduce the risk of personal injury, do not drop the lamp Å WARNING: module or touch the glass bulb. The glass may shatter and cause an injury if it is dropped. Reverse the previous steps to replace the lamp module. The lamp contains < 0.125 percent mercury by weight.
261794-001.book Page 6 Tuesday, January 22, 2002 2:20 PM Care and Maintenance After the lamp module has been replaced, reset the lamp hours in the on-screen display menu to prevent the “Lamp May Fail Soon. Replacement Suggested” message from appearing again. To reset the lamp hours: 1. Be sure the projector is turned off. 2. Make sure all connections except the power cable are disconnected. 3. Press and hold the Menu button on top of the projector while turning the projector on.
261794-001.book Page 1 Tuesday, January 22, 2002 2:20 PM 8 Troubleshooting Troubleshooting Problem Image does not appear on the projection screen Solutions 1. Make sure the projector is powered on. 2. Ensure the lens cap has been removed. 3. Press the Standby button again. 4. Ensure that the power cable is securely connected. 5. Ensure the pins on the connectors are not crooked or broken. 6. Turn off or disable the notebook or desktop computer screen saver function. 7.
261794-001.book Page 2 Tuesday, January 22, 2002 2:20 PM Troubleshooting Troubleshooting (Continued) Problem Scrolling, cut-off, or incorrect image displayed Solutions 1. Press the Resync button. 2. Turn everything off, then power on the projector first and power on the notebook or desktop computer second. 3. If the above steps do not correct the display image, adjust the resolution of the notebook or desktop computer to 1024 x 768. 4. Access the OSD and ensure the Zoom mode is set to 1.
261794-001.book Page 3 Tuesday, January 22, 2002 2:20 PM Troubleshooting Troubleshooting (Continued) Problem Solutions Notebook computer or iPAQ Pocket PC screen is not displaying the presentation Notebook computer: Most notebook computers have a monitor loop-through or simultaneous viewing function. Press the Fn + F4 function keys on the notebook computer to switch the image from the notebook screen to the projection screen or to toggle through the following three options: 1.
261794-001.book Page 4 Tuesday, January 22, 2002 2:20 PM Troubleshooting Troubleshooting (Continued) Problem Image is out of focus Solutions 1. Adjust the Focus Ring on the projection lens. 2. Make sure the projection screen is within the required distance (3.7 to 40.7 feet, 1.1 to 12.4 meters) from the projector. 3. Check the projection lens to see if it needs cleaning. Follow the “Cleaning the Lens” procedures in Chapter 7 to clean the lens.
261794-001.book Page 5 Tuesday, January 22, 2002 2:20 PM Troubleshooting Troubleshooting (Continued) Problem Only the Compaq startup screen displays Solutions 1. Check that the cables are connected securely. 2. Verify that the proper input source is connected. 3. Make sure your notebook computer’s external video port is activated. A blue screen displays on the projection screen when a videocassette recorder, DVD player, or other video source is connected to the projector 1.
261794-001.book Page 6 Tuesday, January 22, 2002 2:20 PM Troubleshooting Troubleshooting (Continued) Problem Solutions Lamp burns out or makes a popping sound When the lamp reaches its end of life, it will burn out and may make a loud popping sound. If this happens, the projector will not turn back on until the lamp module has been replaced. Contact your local Compaq authorized dealer, seller, or reseller to purchase a replacement lamp module.
261794-001.book Page 7 Tuesday, January 22, 2002 2:20 PM Troubleshooting Troubleshooting (Continued) Problem Remote control does not operate Solutions 1. Ensure the remote control is pointed at the sensor and is within 21.0 feet (6.4 meters) of the projector. 2. The two AAA batteries may need to be replaced. 3. Verify that the batteries are installed properly. Remote mouse does not operate computer Make sure the USB cable is connected to both the computer and the projector.
261794-001.book Page 8 Tuesday, January 22, 2002 2:20 PM Troubleshooting Troubleshooting (Continued) Problem Solutions The image is upside down or a mirror image is displayed The projector has been set for operation in rear screen mode or ceiling mount mode. To display the image properly, access the on-screen display menu, select Image Control, select Flip Image, then restore the displayed image to the correct setting. Refer to Chapter 3, “Using the On-Screen Display Menu” for more information.
261794-001.book Page 1 Tuesday, January 22, 2002 2:20 PM A Agency Regulatory Notices Federal Communications Commission Notice This equipment has been tested and found to comply with the limits for a Class B digital device, pursuant to Part 15 of the FCC Rules. These limits are designed to provide reasonable protection against harmful interference in a residential installation.
261794-001.book Page 2 Tuesday, January 22, 2002 2:20 PM Agency Regulatory Notices Modifications The FCC requires the user to be notified that if any changes or modifications are made to this device, not expressly approved by Compaq Computer Corporation, this may void the user’s authority to operate the equipment. Cables Connections to this device must be made with shielded cables with metallic RFI/EMI connector hoods to maintain compliance with FCC Rules and Regulations.
261794-001.book Page 3 Tuesday, January 22, 2002 2:20 PM Agency Regulatory Notices Canadian Notice This Class B digital apparatus meets all requirements of the Canadian Interference-Causing Equipment Regulations. Avis Canadien Cet appareil numérique de la classe B respecte toutes les exigences du Règlement sur le matériel brouilleur du Canada.
261794-001.book Page 4 Tuesday, January 22, 2002 2:20 PM Agency Regulatory Notices Japanese Notice Power Cords The projector power supply is provided with Automatic Line Switching (ALS). This feature allows the projector to operate on input voltages between 100–120V or 200–240V. The power cord set (flexible cord or wall plug) received with the projector meets the requirements for use in the country where you purchased the equipment.
261794-001.book Page 1 Tuesday, January 22, 2002 2:20 PM B Specifications Compaq iPAQ Microportable Projector Projection Resolution XGA 1024 x 768 x 1 Maximum Graphics Resolution SXGA 1280 x 1024 at 75 Hz Lumen Output 2,000 lumens (1,600 in lamp saver mode) Lamp Type 200 watt High Brightness Lamp Image Size See the Image Size Adjustment table in Chapter 2. Avg. Lamp Life in Hours 1,000 hours (maximum brightness) 1,500 hours (lamp saver mode) Projection Distance 3.7 to 40.7 feet (1.1 to 12.
261794-001.
261794-001.book Page 3 Tuesday, January 22, 2002 2:20 PM Specifications Preset Display Resolutions Table The projector automatically recognizes the preset display resolutions listed in the following table. Display Resolutions Preset Modes Resolutions 1. Industry Standard 640 x 350 at 31.5 kHz/70 Hz 2. VESA Standard 640 x 350 at 37.8 kHz/85 Hz 3. Industry Standard 640 x 480 at 37.8 kHz/72 Hz 4. VESA Standard 640 x 480 at 37.5 kHz/75 Hz 5. VESA Standard 640 x 480 at 43.3 kHz/85 Hz 6.
261794-001.book Page 4 Tuesday, January 22, 2002 2:20 PM Specifications Display Resolutions (Continued) Preset Modes Resolutions 19. VESA Standard 1024 x 768 at 68.7 kHz/85 Hz 20. VESA Standard 1280 x 1024 at 64 kHz/60 Hz 21. VGA Compatibility 640 x 480 at 31.5 kHz/60 Hz 22. HDTV 720P (Progressive) 1280 x 720 at 45 kHz/60 Hz 23. HDTV 1080I (Interlaced) 1920 x 1080 at 33.