
Reference Guide
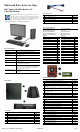

HP Compaq 8300 Elite, USDT Chassis 690359-002 page 2
Password Security
Establishing a Setup or Power-On password:
1. Turn on or restart the computer.
2. As soon as the computer turns on, press the Esc key while “Press the ESC key for Startup
Menu” message is displayed at the bottom of the screen.
3. Press the F10 key to enter Computer Setup.
4. To establish Setup password, select Security > Setup Password and follow the instructions.
- or -
To establish a Power-On password, select Security > Power-On Password and follow the
instructions on the screen
5. Before exiting, click File > Save Changes and Exit.
Changing a Setup or Power-On password:
1. Turn on or restart the computer.
To change the Setup password, go to step 2.
To change the Power-on password, go to step 3.
2. To change the Setup password, as soon as the computer turns on:
- Press the Esc key while “Press the ESC key for Startup Menu” message is displayed.
- Press the F10 key to enter Computer Setup.
3. When the key icon appears, type your current password, a slash (/) or alternate delimiter
character, your new password, another slash (/) or alternate delimiter character, and your new
password again as shown:
current password/new password/new password.
NOTE: Type the new password carefully since the characters do not appear on the screen.
4. Press Enter.
The new password will take effect the next time the computer is restarted.
Deleting a Power-On or Setup password
1. Turn on or restart the computer.
To delete the Setup password, go to step 2.
To delete the Power-On password, go to step 3.
2. To change the Setup password, as soon as the computer turns on:
- Press the Esc key while “Press the ESC key for Startup Menu” message is displayed.
- Press the F10 key to enter Computer Setup.
3. When the key icon appears, type your current password followed by a slash (/) or alternate
delimiter character as shown. Example: currentpassword/
4. Press Enter.
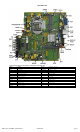
Clearing CMOS
1. Turn off the computer and disconnect the power cord from the power outlet.
2. Remove the access panel.
3. On the system board, press and hold the CMOS button for 5 seconds.
4. Replace the chassis access panel and reconnect the power cord.
5. Turn on the computer and allow it to start.
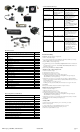
Miscellaneous Parts
1 Heat sink for use with the processor (includes thermal material) 587456-001
2 Heat sink for use on models with UMA graphics (includes thermal mate-
rial)
625256-001
* Heat sink for use on models with discrete graphics cards (includes thermal
material)
689369-001
3 Chassis fan, rear 691352-001
4 Card reader assembly 592685-001
5 Internal speaker - 20mm x 28mm 689384-001
6 Front I/O panel 587458-001
7 Rear port cover 646818-001
8 Chassis fan, front 689376-001
9 Clamp lock, includes universal cable (plate not included) 508987-001
* Optical drive rail (green plastic piece on drive) 594219-001
* Hood sensor 638816-001
* Grommet, hard drive 594220-001
* WLAN antenna hardware kit 646811-001
* USB powered speakers 636917-001
* Mouse, PS2, optical, jack black 537748-001
* Mouse, USB, HP Elite 674318-001
* Mouse, washable 619580-001
* Mouse, wireless, HP Elite 674317-001
* Mouse, USB, optical, jack black 537749-001
* HP Business Digital Headset 642738-001
* External USB Webcam 609252-001
*Not shown
Mass Storage Devices (not illustrated)
DVD-ROM drive, slim-line 608394-001
DVD±RW and CD-RW Super Multi Double-Layer Combo Drive (slim-line).
This kit also includes the drive bracket.
657958-001
500 GB, 7200 rpm, 2.5 inch, self-encrypting (SED), SATA hard drive 696442-001
500 GB, 7200 rpm, 2.5 inch, SATA hard drive 686217-001
320 GB, 7200 rpm, 2.5 inch, self-encrypting (SED), SATA hard drive 634824-001
320 GB, 7200 rpm, 2.5 inch, SATA hard drive 639135-001
256 GB Solid State Drive (SSD), self-encrypting (SED), 2.5-inch, SATA 6.0 680020-001
180 GB Solid State Drive (SSD), SATA 6.0 696622-001
160 GB Solid State Drive (SSD), SATA 3.0 646809-001
128 GB Solid State Drive (SSD), 2.5-inch, SATA 2.0 665961-001
120 GB Solid State Drive (SSD), 2.5-inch, SATA 2.0 661841-001
32 GB SATA Solid State Drive (SSD), SATA 686616-001
24 GB mSATA Solid State Drive (SSD), SATA 683306-001
16 GB Solid State Drive (SSD), SATA 688328-001
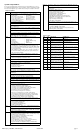
Common POST Error Messages
Screen Message Probable Cause Recommended Action
101-Option ROM Error 1. System ROM checksum
error.
2. Expansion board option
ROM checksum
1. Verify ROM, reflash if required
2. Remove suspected card, reboot
3. Clear CMOS memory, reboot
4. Replace system board
103-System Board
Failure
DMA, timers 1. Clear CMOS memory.
2. Remove expansion boards.
3. Replace system board.
164-Memory Size Error
and
201-Memory Error
Incorrect memory configu-
ration
1. Run Setup (F10).
2. Check DIMMs for proper
seating, type, and HP
compatibility.
3. Remove DIMMs singularly and
reboot to isolate faulty DIMM.
4. Replace system board.
214-DIMM Configura-
tion Warning
Populated DIMM configura-
tion is not optimized
Rearrange the DIMMs so that
each channel has the same amount
of memory.
301-, 304-Keyboard error Keyboard failure. Check keyboard connection or
keys. Check connector for bent of
missing pins. Replace keyboard.
If 304, possible system board
problem.
501-Display Adapter
Failure
Graphics display controller. 1. Reseat graphics card.
2. Clear CMOS.
3. Check monitor connection.
4. Replace graphics card.
1720-SMART Hard Drive
Detects Imminent Failure
Hard drive is about to fail.
1. Determine if hard drive is giving
correct error message. Enter
Computer Setup and run the
Drive Protection System test
under
Storage > DPS Self-test
.
2. Apply hard drive firmware
patch if applicable.
3. Back up contents and replace
hard drive.