
Specifications


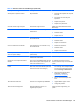

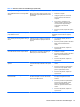

Table Of Contents
- Product Features
- Installing and Customizing the Software
- Computer Setup (F10) Utility
- Serial ATA (SATA) Drive Guidelines and Features
- Identifying the Chassis, Routine Care, and Disassembly Preparation
- Removal and Replacement Procedures All-in One (AIO) Chassis
- Preparing to Disassemble the Computer
- Synchronizing the Optional Wireless Keyboard or Mouse
- Center Access Panel
- Stand
- Memory Access Panel
- Drive Access Panel
- Optical Drive
- Hard Drive
- Memory
- Top Panel
- Webcam Module
- Rear Cover
- System Board Cover
- Sidekey Board
- Converter Board
- Speakers
- WLAN Module
- Heat Sink (Thermal Module)
- Processor
- Fan Assembly
- Display Cable
- System Board
- Stand Bracket
- Hard Drive and Optical Drive Cables and Connectors
- Front Bezel
- Display Panel
- Password Security and Resetting CMOS
- POST Error Messages
- Troubleshooting Without Diagnostics
- Safety and Comfort
- Solving General Problems
- Solving Power Problems
- Solving Diskette Problems
- Solving Hard Drive Problems
- Solving Media Card Reader Problems
- Solving Display Problems
- Solving Audio Problems
- Solving Printer Problems
- Solving Keyboard and Mouse Problems
- Solving Hardware Installation Problems
- Solving Network Problems
- Solving Memory Problems
- Solving Processor Problems
- Solving CD-ROM and DVD Problems
- Solving USB Flash Drive Problems
- Solving Internet Access Problems
- Solving Software Problems
- Contacting Customer Support
- Connector Pin Assignments
- Power Cord Set Requirements
- Specifications
- Index
Clearing and Resetting the CMOS
The computer’s configuration memory (CMOS) stores information about the computer’s configuration.
The CMOS button resets CMOS but does not clear the power-on and setup passwords.
Clearing CMOS will clear the Active Management Technology (AMT) settings in the Management
Engine BIOS Extension (MEBx), including the password. The password will default to “admin” and will
need to be reset. The AMT settings will also need to be reset. To access the MEBx, press Ctrl+P
during POST.
1. Turn off the computer and any external devices, and disconnect the power cord from the power
outlet.
2. Disconnect the keyboard, monitor, and any other external equipment connected to the computer.
WARNING! To reduce the risk of personal injury from electrical shock and/or hot surfaces, be
sure to disconnect the power cord from the wall outlet, and allow the internal system
components to cool before touching.
CAUTION: When the computer is plugged in, the power supply always has voltage applied to
the system board even when the unit is turned off. Failure to disconnect the power cord can
result in damage to the system.
Static electricity can damage the electronic components of the computer or optional equipment.
Before beginning these procedures, ensure that you are discharged of static electricity by briefly
touching a grounded metal object. See the Safety & Regulatory Information guide for more
information.
3. Remove the computer cover or access panel.
CAUTION: Pushing the CMOS button will reset CMOS values to factory defaults. It is
important to back up the computer CMOS settings before resetting them in case they are
needed later. Back up is easily done through Computer Setup. See
Computer Setup (F10) Utility
on page 9 for information.
84 Appendix A Password Security and Resetting CMOS