
Specifications
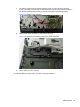
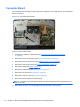
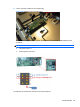
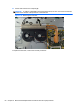
Table Of Contents
- Product Features
- Installing and Customizing the Software
- Computer Setup (F10) Utility
- Serial ATA (SATA) Drive Guidelines and Features
- Identifying the Chassis, Routine Care, and Disassembly Preparation
- Removal and Replacement Procedures All-in One (AIO) Chassis
- Preparing to Disassemble the Computer
- Synchronizing the Optional Wireless Keyboard or Mouse
- Center Access Panel
- Stand
- Memory Access Panel
- Drive Access Panel
- Optical Drive
- Hard Drive
- Memory
- Top Panel
- Webcam Module
- Rear Cover
- System Board Cover
- Sidekey Board
- Converter Board
- Speakers
- WLAN Module
- Heat Sink (Thermal Module)
- Processor
- Fan Assembly
- Display Cable
- System Board
- Stand Bracket
- Hard Drive and Optical Drive Cables and Connectors
- Front Bezel
- Display Panel
- Password Security and Resetting CMOS
- POST Error Messages
- Troubleshooting Without Diagnostics
- Safety and Comfort
- Solving General Problems
- Solving Power Problems
- Solving Diskette Problems
- Solving Hard Drive Problems
- Solving Media Card Reader Problems
- Solving Display Problems
- Solving Audio Problems
- Solving Printer Problems
- Solving Keyboard and Mouse Problems
- Solving Hardware Installation Problems
- Solving Network Problems
- Solving Memory Problems
- Solving Processor Problems
- Solving CD-ROM and DVD Problems
- Solving USB Flash Drive Problems
- Solving Internet Access Problems
- Solving Software Problems
- Contacting Customer Support
- Connector Pin Assignments
- Power Cord Set Requirements
- Specifications
- Index

To install a new processor:
1. Place the processor in its socket and close the retainer. Make sure the slot in the processor fits
into the post on the socket.
2. Secure the locking lever. If reusing the existing heat sink, go to step 3. If using a new heat sink,
go to step 6.
3. If reusing the existing fan sink, clean the bottom of the fan sink with the alcohol pad provided in
the spares kit.
CAUTION: Before reinstalling the fan sink you must clean the top of the processor and the
bottom of the fan sink with an alcohol pad supplied in the spares kit. After the alcohol has
evaporated, apply thermal grease to the top of the processor from the syringe supplied in the
spares kit.
4. Apply the thermal grease provided in the spares kit to the top of the processor and install the fan
sink atop the processor.
5. Go to step 7.
6. If using a new fan sink, remove the protective covering from the bottom of the fan sink and place
it in position atop the processor.
7. Secure the fan sink to the system board and system board tray.
CAUTION: Fan sink retaining screws should be tightened in diagonally opposite pairs (as in an
X) to evenly seat the fan sink on the processor. This is especially important as the pins on the
socket are very fragile and any damage to them may require replacing the system board.
NOTE: After installing a new processor onto the system board, always update the system ROM to
ensure that the latest version of the BIOS is being used on the computer. The latest system BIOS can
be found on the Web at:
http://h18000.www1.hp.com/support/files.
62 Chapter 6 Removal and Replacement Procedures All-in One (AIO) Chassis