
Specifications
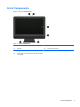
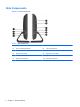
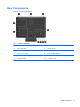
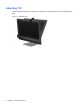
Table Of Contents
- Product Features
- Installing and Customizing the Software
- Computer Setup (F10) Utility
- Serial ATA (SATA) Drive Guidelines and Features
- Identifying the Chassis, Routine Care, and Disassembly Preparation
- Removal and Replacement Procedures All-in One (AIO) Chassis
- Preparing to Disassemble the Computer
- Synchronizing the Optional Wireless Keyboard or Mouse
- Center Access Panel
- Stand
- Memory Access Panel
- Drive Access Panel
- Optical Drive
- Hard Drive
- Memory
- Top Panel
- Webcam Module
- Rear Cover
- System Board Cover
- Sidekey Board
- Converter Board
- Speakers
- WLAN Module
- Heat Sink (Thermal Module)
- Processor
- Fan Assembly
- Display Cable
- System Board
- Stand Bracket
- Hard Drive and Optical Drive Cables and Connectors
- Front Bezel
- Display Panel
- Password Security and Resetting CMOS
- POST Error Messages
- Troubleshooting Without Diagnostics
- Safety and Comfort
- Solving General Problems
- Solving Power Problems
- Solving Diskette Problems
- Solving Hard Drive Problems
- Solving Media Card Reader Problems
- Solving Display Problems
- Solving Audio Problems
- Solving Printer Problems
- Solving Keyboard and Mouse Problems
- Solving Hardware Installation Problems
- Solving Network Problems
- Solving Memory Problems
- Solving Processor Problems
- Solving CD-ROM and DVD Problems
- Solving USB Flash Drive Problems
- Solving Internet Access Problems
- Solving Software Problems
- Contacting Customer Support
- Connector Pin Assignments
- Power Cord Set Requirements
- Specifications
- Index

Computer Setup—Storage
NOTE: Support for specific Computer Setup options may vary depending on the hardware
configuration.
Table 3-2 Computer Setup—Storage
Option Description
Device Configuration Lists all installed BIOS-controlled storage devices.
When a device is selected, detailed information and options are displayed. The following options
may be presented:
Hard Disk: Size, model, firmware, serial number, connector color, SMART, translation mode.
Translation mode lets you select the translation mode to be used for the device. This enables the
BIOS to access disks partitioned and formatted on other systems and may be necessary for users
of older versions of UNIX (e.g., SCO UNIX version 3.2). Options are Automatic, Bit-Shift, LBA
Assisted, User, and None.
CAUTION: Ordinarily, the translation mode selected automatically by the BIOS should not be
changed. If the selected translation mode is not compatible with the translation mode that was
active when the disk was partitioned and formatted, the data on the disk will be inaccessible.
Translation parameters (ATA disks only; this feature appears only when User translation mode
is selected.): Allows you to specify the parameters (logical cylinders, heads, and sectors per track)
used by the BIOS to translate disk I/O requests (from the operating system or an application) into
terms the hard drive can accept. Logical cylinders may not exceed 1024. The number of heads
may not exceed 256. The number of sectors per track may not exceed 63. These fields are only
visible and changeable when the drive translation mode is set to User.
Default Values: Allows you to specify the default values for the Multisector Transfers, Transfer
Mode, and Translation Mode for ATA devices.
CD-ROM: Model, firmware, serial number, connector color. No emulation options available.
Storage Options Removable Media Boot
Enables/disables ability to boot the system from removable media. Default is enable.
SATA Emulation
Allows you to choose how the SATA controller and devices are accessed by the operating
system. There are two supported options: AHCI and IDE.
AHCI (default option) - Allows operating systems with AHCI device drivers loaded to take
advantage of more advanced features of the SATA controller.
IDE - This is the most backwards-compatible setting of the two options. Operating systems usually
do not require additional driver support in IDE mode.
NOTE: The AHCI device driver must be installed prior to attempting to boot from an AHCI
volume. If you attempt to boot from an AHCI volume without the required device driver installed,
the system will crash (blue screen).
12 Chapter 3 Computer Setup (F10) Utility