
Specifications
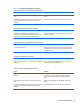

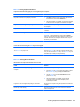
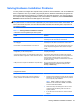


Table Of Contents
- Product Features
- Installing and Customizing the Software
- Computer Setup (F10) Utility
- Serial ATA (SATA) Drive Guidelines and Features
- Identifying the Chassis, Routine Care, and Disassembly Preparation
- Removal and Replacement Procedures All-in One (AIO) Chassis
- Preparing to Disassemble the Computer
- Synchronizing the Optional Wireless Keyboard or Mouse
- Center Access Panel
- Stand
- Memory Access Panel
- Drive Access Panel
- Optical Drive
- Hard Drive
- Memory
- Top Panel
- Webcam Module
- Rear Cover
- System Board Cover
- Sidekey Board
- Converter Board
- Speakers
- WLAN Module
- Heat Sink (Thermal Module)
- Processor
- Fan Assembly
- Display Cable
- System Board
- Stand Bracket
- Hard Drive and Optical Drive Cables and Connectors
- Front Bezel
- Display Panel
- Password Security and Resetting CMOS
- POST Error Messages
- Troubleshooting Without Diagnostics
- Safety and Comfort
- Solving General Problems
- Solving Power Problems
- Solving Diskette Problems
- Solving Hard Drive Problems
- Solving Media Card Reader Problems
- Solving Display Problems
- Solving Audio Problems
- Solving Printer Problems
- Solving Keyboard and Mouse Problems
- Solving Hardware Installation Problems
- Solving Network Problems
- Solving Memory Problems
- Solving Processor Problems
- Solving CD-ROM and DVD Problems
- Solving USB Flash Drive Problems
- Solving Internet Access Problems
- Solving Software Problems
- Contacting Customer Support
- Connector Pin Assignments
- Power Cord Set Requirements
- Specifications
- Index

Table C-12 Solving Network Problems
Wake-on-LAN feature is not functioning.
Cause Solution
S5 Maximum Power Saving feature is enabled. Disable the S5 Maximum Power Saving option in Computer
Setup. Select Power > Hardware Power Management > S5
Maximum Power Saving.
S5 Wake on LAN is disabled. : Enable the S5 Wake on LAN option in Computer Setup.
Select Advanced > Device Options > S5 Wake on LAN.
Wake-on-LAN is not enabled. 1. Select Start > Control Panel.
2. Under Network and Internet, select View network
status and tasks.
3. Click Local Area Connection.
4. Click the Properties button.
5. Click the Configure button.
6. Click the Power Management tab, then select the
check box to Allow this device to wake the computer.
Network driver does not detect network controller.
Cause Solution
Network controller is disabled. 1. Run Computer Setup and enable network controller.
2. Enable the network controller in the operating system
via Device Manager.
Incorrect network driver. Check the network controller documentation for the correct
driver or obtain the latest driver from the manufacturer’s Web
site.
Network status link light never flashes.
NOTE: The network status light is supposed to flash when there is network activity.
Cause Solution
No active network is detected. Check cabling and network equipment for proper connection.
Network controller is not set up properly. Check for the device status within Windows, such as Device
Manager for driver load and the Network Connections applet
within Windows for link status.
Network controller is disabled. 1. Run Computer Setup and enable network controller.
2. Enable the network controller in the operating system
via Device Manager.
Network driver is not properly loaded. Reinstall network drivers.
System cannot autosense the network. Disable auto-sensing capabilities and force the system into
the correct operating mode.
Solving Network Problems 119