
Specifications
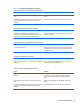

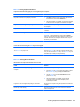
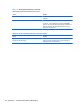
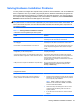


Table Of Contents
- Product Features
- Installing and Customizing the Software
- Computer Setup (F10) Utility
- Serial ATA (SATA) Drive Guidelines and Features
- Identifying the Chassis, Routine Care, and Disassembly Preparation
- Removal and Replacement Procedures All-in One (AIO) Chassis
- Preparing to Disassemble the Computer
- Synchronizing the Optional Wireless Keyboard or Mouse
- Center Access Panel
- Stand
- Memory Access Panel
- Drive Access Panel
- Optical Drive
- Hard Drive
- Memory
- Top Panel
- Webcam Module
- Rear Cover
- System Board Cover
- Sidekey Board
- Converter Board
- Speakers
- WLAN Module
- Heat Sink (Thermal Module)
- Processor
- Fan Assembly
- Display Cable
- System Board
- Stand Bracket
- Hard Drive and Optical Drive Cables and Connectors
- Front Bezel
- Display Panel
- Password Security and Resetting CMOS
- POST Error Messages
- Troubleshooting Without Diagnostics
- Safety and Comfort
- Solving General Problems
- Solving Power Problems
- Solving Diskette Problems
- Solving Hard Drive Problems
- Solving Media Card Reader Problems
- Solving Display Problems
- Solving Audio Problems
- Solving Printer Problems
- Solving Keyboard and Mouse Problems
- Solving Hardware Installation Problems
- Solving Network Problems
- Solving Memory Problems
- Solving Processor Problems
- Solving CD-ROM and DVD Problems
- Solving USB Flash Drive Problems
- Solving Internet Access Problems
- Solving Software Problems
- Contacting Customer Support
- Connector Pin Assignments
- Power Cord Set Requirements
- Specifications
- Index

Solving Hardware Installation Problems
You may need to reconfigure the computer when you add or remove hardware, such as an additional
drive or expansion card. If you install a plug and play device, Windows automatically recognizes the
device and configures the computer. If you install a non–plug and play device, you must reconfigure
the computer after completing installation of the new hardware. In Windows, use the Add Hardware
Wizard and follow the instructions that appear on the screen.
WARNING! When the computer is plugged into an AC power source, voltage is always applied to
the system board. To reduce the risk of personal injury from electrical shock and/or hot surfaces, be
sure to disconnect the power cord from the wall outlet and allow the internal system components to
cool before touching.
Table C-11 Solving Hardware Installation Problems
A new device is not recognized as part of the system.
Cause Solution
Device is not seated or connected properly. Ensure that the device is properly and securely connected
and that pins in the connector are not bent down.
Cable(s) of new external device are loose or power cables
are unplugged.
Ensure that all cables are properly and securely connected
and that pins in the cable or connector are not bent down.
Power switch of new external device is not turned on. Turn off the computer, turn on the external device, then turn
on the computer to integrate the device with the computer
system.
When the system advised you of changes to the
configuration, you did not accept them.
Reboot the computer and follow the instructions for
accepting the changes.
A plug and play board may not automatically configure when
added if the default configuration conflicts with other devices.
Use Windows Device Manager to deselect the automatic
settings for the board and choose a basic configuration that
does not cause a resource conflict. You can also use
Computer Setup to reconfigure or disable devices to resolve
the resource conflict.
USB ports on the computer are disabled in Computer Setup. Run the Computer Setup utility and ensure that Device
available is selected for appropriate USB ports under
Security > USB Security.
Computer will not start.
Cause Solution
Wrong memory modules were used in the upgrade or
memory modules were installed in the wrong location.
1. Review the documentation that came with the system to
determine if you are using the correct memory modules
and to verify the proper installation.
NOTE: DIMM1 or XMM1 must always be installed.
DIMM1 must be installed before DIMM2, and DIMM3
must be installed before DIMM4.
2. Observe the beeps and LED lights on the front of the
computer. Beeps and flashing LEDs are codes for
specific problems.
3. If you still cannot resolve the issue, contact Customer
Support.
Solving Hardware Installation Problems 117