
Service and Maintain
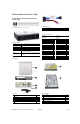


dc7900 Illustrated Parts & Service Map, USDT Chassis 506595-003 page 3
System Setup and Boot
Basic system information regarding system information, setup, power management, hardware,
and passwords is maintained in the Setup Utility held in the system ROM. The Setup Utility is
accessed by pressing the F10 key when prompted (on screen) to do so during the boot sequence.
If the screen prompt opportunity is missed, a restart will be necessary. For more information
about Setup Utilities refer to the Service Reference Guide.
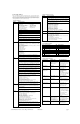
Computer Setup Menu
Heading Option/Description
File System Information - Lists the following main system specifications:
• Product name
• SKU number (some models)
• Processor type/speed/stepping
• Cache size (L1/L2)
• Memory size/speed/channels
• Integrated MAC Address
• System BIOS
• Chassis serial number
• Asset tracking number
• ME firmware version
• Management node
About - Displays copyright notice.
Set Time and Date - Allows you to set system time and date.
Flash System ROM - Allows you to select a drive containing a new BIOS.
Replicated Setup - Save to Rmv Media and Restore from Rmv Media
Default Setup
• Save Current Settings as Default
• Restore Factory Settings as Default
Apply Defaults and Exit - Applies the selected default settings and clears
any established passwords.
Ignore Changes and Exit - Exits Computer setup without saving changes.
Save Changes and Exit - Saves changes to system configuration or default
settings and exits Computer Setup.
Storage Device Configuration - Lists all installed BIOS-controlled storage devices.
The following options are available:
• Diskette Type(Legacy Diskettes only)-3.5” 1.44 MB and 5.25” 1.2 MB
• Drive Emulation
• Emulation Type - ATAPI Zip drive, hard disk, legacy diskette, CD-ROM
drive, and ATAPI LS-120 drive
• Multisector Transfers
• Translation Mode
• Translation Parameters
• SATA Default Values
Storage Options
• Removable Media Boot
• Legacy Diskette Write
• SATA Emulation
• Max eSATA Speed
DPS Self-Test - Allows you to execute self-tests on ATA hard drives.
Boot Order - Allows you to specify boot order.
• Shortcut to Temporarily Override Boot Order
Security Setup Password - Allows you to set and enable the setup (Administrator)
password.
Power-On Password - Allows you to set and enable power-on password.
Password Options - When any password exists allows you to lock legacy
resources, enable/disable network server mode, specify password require-
ment for warm boot, and allows you to enable/disable Setup Browse Mode.
Smart Cover (some models) - Allows you to lock/unlock cover lock and set
status of cover removal sensor.
Device Security (some models) - Enables/disables all I/O ports, audio, net-
work controllers, SMBus controller, and embedded security devices.
USB Security - Allows you to set Device Available/Device Hidden for front
USB ports 3-6, rear USB ports 7-12, internal USB ports 1-2.
Network Service Boot - Enables/disables boot from OS on a server.
System IDs - Allows you to set Asset tag, ownership tag, Chassis serial
number, UUID, and keyboard locale setting.
DriveLock Security - Allows you to assign/modify a hard drive password for
added security.
System Security (some models) - Allows you to enable/disable:
• Data Execution Prevention
• Virtualization Technology
• Virtualization Technology Directed I/O
• Trusted Execution Technology
• Embedded Security Device Support
• OS management of Embedded Security Device through OS
• Smart Card BIOS Password Support
• PAVP (Protect Audio Video Path) (some models)
Setup Security Level - Provides method to allow users limited access to
change specified setup options without knowing Setup password.
Power OS Power Management - Allows you to enable/disable Runtime Power
Management, Idle Power Savings, ACPI S3 Hard Disk Reset, ACPI S3 PS2
Mouse Wakeup, USB Wake on Device Insertion (some models), Unique
Sleep State Blink Rates.
Hardware Power Management - Allows you to enable/disable SATA bus
power management.
Thermal - Allows you to control minimum permitted fan idle speed.
Advanced Power-On Options - Allows you to set:
• POST mode - QuickBoot, FullBoot, or FullBoot every 1-30 days.
• POST messages - Enable/disable
• MEBx Setup prompt - Enable/disable or hidden/displayed
• F9 prompt - Enable/disable
• F10 prompt - Enable/disable
• F12 prompt - Enable/disable
• Factory Recovery Boot Support - Enable/disable
• Option ROM prompt - Enable/disable
• WOL After Power Loss - Enable/disable
• Remote wakeup boot source - Remote server/local hard drive
• After Power Loss - Off/on/previous state
• POST delay - None, 5, 10, 15, or 20 seconds
• Limit CPUID Maximum value to 3
Execute Memory Test (some models) -Restarts computer and executes
POST memory test.
BIOS Power-On - Allows you to set the computer to turn on at a preset time.
Onboard Devices - Allows you to set resources or disable onboard system
devices.
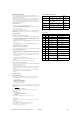
Computer Setup Menu (Continued)
Heading Option / Description
PCI Devices - Lists installed PCI devices with their IRQ settings and allows
you to reconfigure IRQ or disable devices.
PCI VGA Configuration - Allows you to specify which VGA controller will
be used when multiple video adapters are available.
Bus Options (some models) - Allows you to enable/disable PCI SERR#
Generation and PCI VGA palette snooping.
Device Options - Allows you to set:
• Printer Mode - Bi-Directional, EPP & ECP, Output Only
• Num Lock state at power-on - off/on
• S5 Wake on LAN - enable/disable
• Processor cache - enable/disable
• Integrated video - enable/disable
• Multi-Processor - enable/disable
• Internal speaker - enable/disable
• Monitor Tracking - enable/disable
• NIC PXE Option ROM Download - enable/disable
Management Devices - Only displayed in Advanced menu when BIOS
detects multiple management options.
Management Operations - Allows you to set:
• MEBx Setup Prompt - enable/disable
• Remote Help Prompt - enable/disable
• Remote Help Lockout - enable/disable
• Remote Help Connection Timeout - 5, 10, 15, 20, 30, 40, 50, 60, 120,
180, 240 seconds
• SOL Character Echo - enable/disable
• SOL Terminal Emulation Mode - enable/disable
• SOL Keyboard (enable/disable
System Hardware Interrupts
IRQ System Function IRQ System Function
0 Timer Interrupt 8 Real-Time Clock
1 Keyboard 9 Unused
2 Interrupt Controller Cascade 10 Unused, available for PCI
3 Serial Port (COM B) 11 Unused, available for PCI
4 Serial Port (COM A) 12 Mouse
5 Unused, available for PCI 13 Coprocessor
6 Diskette Drive 14 Primary ATA (IDE) Controller
7 Parallel Port (LPT 1) 15 Secondary ATA (IDE) Controller
Common POST Error Messages
Screen Message Probable Cause Recommended Action
101-Option ROM Error 1. System ROM checksum
error.
2. Expansion board option
ROM checksum
1. Verify ROM, reflash if required
2. Remove suspected card, reboot
3. Clear CMOS memory, reboot
4. Replace system board
103-System Board
Failure
DMA, timers 1. Clear CMOS memory.
2. Remove expansion boards.
3. Replace system board.
164-Memory Size Error
and
201-Memory Error
Incorrect memory configu-
ration
1. Run Setup (F10).
2. Check DIMMs for proper
seating, type, and HP
compatibility.
3. Remove DIMMs singularly and
reboot to isolate faulty DIMM.
4. Replace system board.
214-DIMM Configura-
tion Warning
Populated DIMM configura-
tion is not optimized
Rearrange the DIMMs so that
each channel has the same amount
of memory.
301-, 304-Keyboard error Keyboard failure. Check keyboard connection or
keys. Check connector for bent of
missing pins. Replace keyboard. If
304, possible system board prob-
lem.
501-Display Adapter
Failure
Graphics display controller. 1. Reseat graphics card.
2. Clear CMOS.
3. Check monitor connection.
4. Replace graphics card.
1720-SMART Hard Drive
Detects Imminent Failure
Hard drive is about to fail. 1. Determine if hard drive is
giving correct error message.
Enter Computer Setup and run
the Drive Protection System
test under Storage > DPS Self-
test.
2. Apply hard drive firmware
patch if applicable.
3. Back up contents and replace
hard drive.
1796-SATA Cabling Error One or more SATA devices
are improperly attached. For
optimal performance, the
SATA 0 and SATA 1 con-
nectors must be used before
SATA 2 and SATA 3.
Ensure SATA connectors are used
in ascending order. For one
device, use SATA 0. For two
devices, use SATA 0 and SATA 1.
For three devices, use SATA 0,
SATA1, and SATA 2.
1801-Microcode Patch
Error
Processor not supported by
ROM BIOS.
1. Upgrade BIOS to proper
version.
2. Change the processor.