
User's Manual
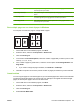

Table Of Contents
- Device basics
- Use the device
- Copy
- Fax
- Send to e-mail
- Send to a network folder
- Job Storage
- Check job status and use the job queue
- Print from a Windows computer
- Windows printer driver features
- Select a tray
- Select an output bin for print jobs
- Select a paper type
- Set the color quality
- Store jobs
- Create and use printing shortcuts
- Use watermarks
- Resize documents
- Set a custom paper size
- Print using different paper
- Insert blank or preprinted sheets
- Chapter page layout
- Print on both sides of the paper
- Print multiple pages on one sheet of paper in Windows
- Create booklets
- Shift images on the page
- Use the HP Digital Imaging Options dialog box
- Set the stapling options
- Set the color options
- Use the Services tab
- Windows printer driver features
- Print from a Macintosh computer
- Macintosh printer driver features
- Select a tray
- Select an output bin
- Select a paper type
- Set the color quality
- Store jobs
- Create and use presets
- Use watermarks
- Resize documents
- Print on a custom paper size
- Print a cover page
- Print on both sides of the paper
- Print multiple pages on one sheet of paper
- Create booklets
- Shift images on the page
- Set the stapling options
- Set the color options
- Use the Services menu
- Macintosh printer driver features
- Maintain the device
- Solve problems
- Regulatory statements
- Index

Set the color quality
1. On the File menu in the software program, click Print.
2. Select the driver, and then click Properties or Preferences.
3. Click the Paper/Quality tab.
4. In the area for Print Quality for the Color Quality, select either Professional or General Office.
Store jobs
Use the Job Storage printer-driver tab to store print jobs on the device. You can then print the job at
any time from the device control panel. For example, you might want to download a personnel form,
calendar, timesheet, or accounting form that other users can print when they need it.
Enable the Job Storage tab
You might need to enable the Job Storage tab before you can use this feature.
1. Click Start, click Settings, and then click Printers or Printers and Faxes.
2. Right-click the driver icon, and then select Properties.
3. Click the Device Settings tab.
4. Under Installable Options, click next to Job Storage, and click Enabled.
5. Click Apply.
Store a job
1. On the File menu in the software program, click Print.
2. Select the driver, and then click Properties or Preferences.
3. Click the Job Storage tab.
4. Select the job storage mode and options that you want to use.
NOTE: The text box at the top of the Job Storage tab describes each option as you select it.
5. Click OK.
Create and use printing shortcuts
Use printing shortcuts to print jobs with specific printer-driver settings. Select one of the defined shortcuts
or create custom printing shortcuts.
Create a printing shortcut
1. On the File menu in the software program, click Print.
2. Select the driver, and then click Properties or Preferences.
3. Select the print settings that you want to use.
4. Click the Printing Shortcuts tab, and then click Save as.
ENWW Print from a Windows computer 55