
User's Manual


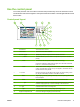

Table Of Contents
- Device basics
- Use the device
- Copy
- Fax
- Send to e-mail
- Send to a network folder
- Job Storage
- Check job status and use the job queue
- Print from a Windows computer
- Windows printer driver features
- Select a tray
- Select an output bin for print jobs
- Select a paper type
- Set the color quality
- Store jobs
- Create and use printing shortcuts
- Use watermarks
- Resize documents
- Set a custom paper size
- Print using different paper
- Insert blank or preprinted sheets
- Chapter page layout
- Print on both sides of the paper
- Print multiple pages on one sheet of paper in Windows
- Create booklets
- Shift images on the page
- Use the HP Digital Imaging Options dialog box
- Set the stapling options
- Set the color options
- Use the Services tab
- Windows printer driver features
- Print from a Macintosh computer
- Macintosh printer driver features
- Select a tray
- Select an output bin
- Select a paper type
- Set the color quality
- Store jobs
- Create and use presets
- Use watermarks
- Resize documents
- Print on a custom paper size
- Print a cover page
- Print on both sides of the paper
- Print multiple pages on one sheet of paper
- Create booklets
- Shift images on the page
- Set the stapling options
- Set the color options
- Use the Services menu
- Macintosh printer driver features
- Maintain the device
- Solve problems
- Regulatory statements
- Index

Buttons on the touchscreen
Various buttons can appear on the touchscreen.
Home button. Touch this button to go to the Home screen from any other screen.
Start button. Touch this button to begin the action for the feature that you are using.
NOTE: The name of this button changes for each feature. For example, in the Copy feature, the button
is named Start Copy.
Information button. This button appears when two or more settings are in conflict. Touch the button to
learn how to resolve the conflict.
Error button. This button appears whenever the device has an error that requires attention before it can
continue. Touch this button to see a message that describes the error. The message also has instructions
for solving the problem.
Warning button. This button appears when the device has a problem but can continue functioning. Touch
the warning button to see a message that describes the problem. The message also has instructions for
solving the problem.
Help button. Touch this button to open the built-in online Help system. For more information, see Control-
panel Help system on page 12.
Control-panel Help system
The device has a built-in Help system that explains how to use each screen. To open the Help system,
touch the Help button (
) in the upper-right corner of the screen.
For some screens, the Help opens to a global menu where you can search for specific topics. You can
browse through the menu structure by touching the buttons in the menu. You can also search for
information by using a keyword. Touch Index and then type a keyword.
For screens that contain settings for individual jobs, the Help opens to a topic that explains the options
for that screen.
If the device alerts you of an error or warning, touch the error (
) or warning ( ) button to open a
message that describes the problem. The message also contains instructions to help solve the problem.
12 Chapter 1 Device basics ENWW