
User's Manual
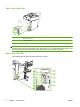


Table Of Contents
- Device basics
- Use the device
- Copy
- Fax
- Send to e-mail
- Send to a network folder
- Job Storage
- Check job status and use the job queue
- Print from a Windows computer
- Windows printer driver features
- Select a tray
- Select an output bin for print jobs
- Select a paper type
- Set the color quality
- Store jobs
- Create and use printing shortcuts
- Use watermarks
- Resize documents
- Set a custom paper size
- Print using different paper
- Insert blank or preprinted sheets
- Chapter page layout
- Print on both sides of the paper
- Print multiple pages on one sheet of paper in Windows
- Create booklets
- Shift images on the page
- Use the HP Digital Imaging Options dialog box
- Set the stapling options
- Set the color options
- Use the Services tab
- Windows printer driver features
- Print from a Macintosh computer
- Macintosh printer driver features
- Select a tray
- Select an output bin
- Select a paper type
- Set the color quality
- Store jobs
- Create and use presets
- Use watermarks
- Resize documents
- Print on a custom paper size
- Print a cover page
- Print on both sides of the paper
- Print multiple pages on one sheet of paper
- Create booklets
- Shift images on the page
- Set the stapling options
- Set the color options
- Use the Services menu
- Macintosh printer driver features
- Maintain the device
- Solve problems
- Regulatory statements
- Index
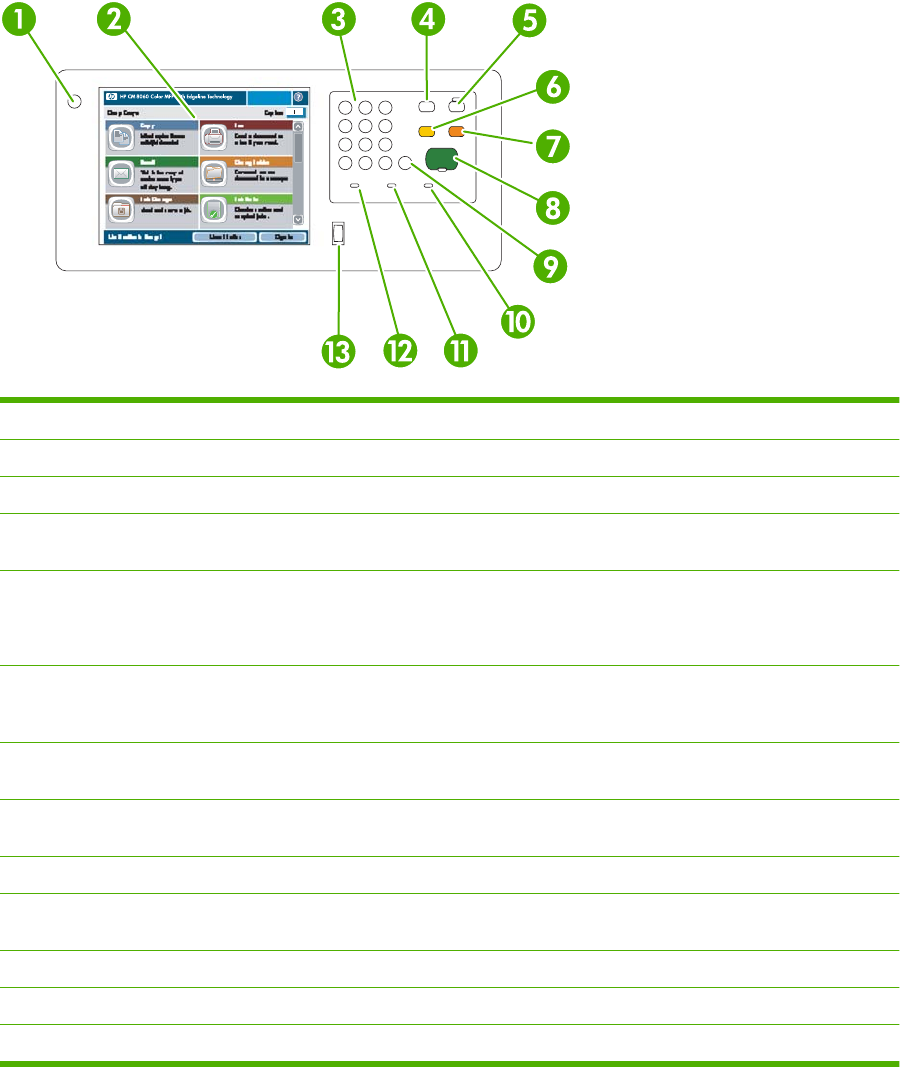
Use the control panel
The control panel has a full-color VGA touchscreen that provides easy access to all device functions.
Use the buttons and numeric keypad to control jobs and the device status. The LED lights indicate overall
device status.
Control-panel layout
1 On/off button Turn the device on and off.
2 Touchscreen Select and use all device features.
3 Numeric keypad Specify the quantity for copies and other numeric information.
4 Interrupt button Pause the device so you can insert a new job into the queue for immediate
printing.
5 Sleep button Put the device into a low-power, Sleep mode to save energy.
If the device is already in Sleep mode, the light next to the button is lit amber.
Press Sleep to return to the ready mode.
6 Reset button Restore all the device settings to the default values, and return to the Home
screen. Press this button to sign out if you are signed in. This button will also
resume the device if it is paused.
7 Stop button Halt the current job. The job status screen opens. If it was processing a scan
job, the job is immediately canceled. Touch OK to continue.
8 Start button Begin copying, scanning, printing a stored job, or resume printing a job that has
been interrupted.
9 Clear button Clear the active number or text field, or return it to the default value.
10 Attention light Indicates that the device has a condition that requires intervention. Examples
include an empty paper tray or an error message on the touchscreen.
11 Data light Indicates that the device is receiving data.
12 Ready light Indicates that the device is ready to begin processing any job.
13 Brightness-adjustment dial Controls the background lighting of the touchscreen.
ENWW Use the control panel 9