
User's Manual

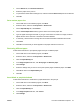
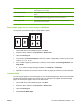
Table Of Contents
- Device basics
- Use the device
- Copy
- Fax
- Send to e-mail
- Send to a network folder
- Job Storage
- Check job status and use the job queue
- Print from a Windows computer
- Windows printer driver features
- Select a tray
- Select an output bin for print jobs
- Select a paper type
- Set the color quality
- Store jobs
- Create and use printing shortcuts
- Use watermarks
- Resize documents
- Set a custom paper size
- Print using different paper
- Insert blank or preprinted sheets
- Chapter page layout
- Print on both sides of the paper
- Print multiple pages on one sheet of paper in Windows
- Create booklets
- Shift images on the page
- Use the HP Digital Imaging Options dialog box
- Set the stapling options
- Set the color options
- Use the Services tab
- Windows printer driver features
- Print from a Macintosh computer
- Macintosh printer driver features
- Select a tray
- Select an output bin
- Select a paper type
- Set the color quality
- Store jobs
- Create and use presets
- Use watermarks
- Resize documents
- Print on a custom paper size
- Print a cover page
- Print on both sides of the paper
- Print multiple pages on one sheet of paper
- Create booklets
- Shift images on the page
- Set the stapling options
- Set the color options
- Use the Services menu
- Macintosh printer driver features
- Maintain the device
- Solve problems
- Regulatory statements
- Index
6. Select the settings that you want to use to add blank or preprinted sheets.
7. Click OK to return to the Paper/Quality tab.
8. Click OK.
Chapter page layout
Follow these instructions to set the layout of chapters in the print job.
1. On the File menu in the software program, click Print.
2. Select the driver, and then click Properties or Preferences.
3. Click the Paper/Quality tab.
4. In the Page exceptions list box, click Chapter page layout.
5. Click Settings.
6. Select the settings that you want to use to for the layout of the chapters in the print job.
7. Click OK to return to the Paper/Quality tab.
8. Click OK.
Print on both sides of the paper
You can automatically print on both sides of a page.
1. Insert enough paper into one of the trays to accommodate the print job. If you are loading special
paper, see
Load special types of paper on page 25.
2. On the File menu in the software program, click Print.
3. Select the driver, and then click Properties or Preferences.
4. On the Finishing tab, click Print on Both Sides.
5. Click OK.
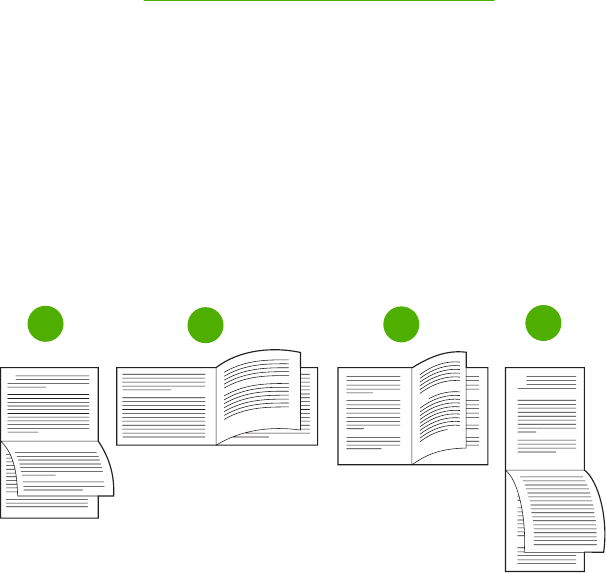
Layout options for printing on both sides
The four duplex orientation options are shown here. To select option 1 or 4, select Flip Pages Up in the
printer driver.
1
2
3
4
58 Chapter 2 Use the device ENWW