
User's Manual
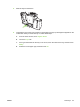
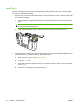

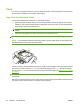
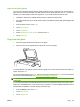
Table Of Contents
- Device basics
- Use the device
- Copy
- Fax
- Send to e-mail
- Send to a network folder
- Job Storage
- Check job status and use the job queue
- Print from a Windows computer
- Windows printer driver features
- Select a tray
- Select an output bin for print jobs
- Select a paper type
- Set the color quality
- Store jobs
- Create and use printing shortcuts
- Use watermarks
- Resize documents
- Set a custom paper size
- Print using different paper
- Insert blank or preprinted sheets
- Chapter page layout
- Print on both sides of the paper
- Print multiple pages on one sheet of paper in Windows
- Create booklets
- Shift images on the page
- Use the HP Digital Imaging Options dialog box
- Set the stapling options
- Set the color options
- Use the Services tab
- Windows printer driver features
- Print from a Macintosh computer
- Macintosh printer driver features
- Select a tray
- Select an output bin
- Select a paper type
- Set the color quality
- Store jobs
- Create and use presets
- Use watermarks
- Resize documents
- Print on a custom paper size
- Print a cover page
- Print on both sides of the paper
- Print multiple pages on one sheet of paper
- Create booklets
- Shift images on the page
- Set the stapling options
- Set the color options
- Use the Services menu
- Macintosh printer driver features
- Maintain the device
- Solve problems
- Regulatory statements
- Index

Copy
You can scan original documents by using the document feeder or the scanner glass. The device has
several options available for customizing copied output.
Copy from the document feeder
The document feeder holds a maximum of 100 sheets of paper.
1. Place the original document face-up in the document feeder, with the top edge of the document
toward the rear of the document feeder or feeding first into the input slot. For two-sided originals,
place the first side of the original face-up.
NOTE: The document feeder beeps and illuminates a green light when an original is properly
loaded.
2. Adjust the paper guides so that they are touching the original document.
NOTE: Depending on how the system administrator has configured the device, you might need to sign
in.
NOTE: For the fastest performance when using Letter or A4-size paper, place the short edge of the
document toward the rear of the document feeder.
To make copies by using the default copy options, use the numeric keypad on the control panel to select
the number of copies, and press Start. To use customized settings, touch Copy. Specify the settings,
and then press Start. For more information about using customized settings, see
Adjust the copy settings
on page 31.
NOTE: You can use either the hard Start button on the control panel or the Start Copy button on the
touchscreen.
Retrieve the original document from the output bin that is under the document feeder input-tray. Retrieve
the copies from the output bin that is on the left side of the device.
28 Chapter 2 Use the device ENWW