
User's Manual


67 | Wireless configuration HP Cloud Network Manager | User Guide
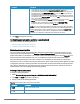
Configuring DHCP server for client IP assignment
The DHCP server is a built-in server, used for networks in which clients are assigned IP address by the VC. You
can customize the DHCP pool subnet and address range to provide simultaneous access to more number of
clients. The largest address pool supported is 2048. The default size of the IP address pool is 512.
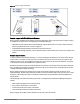
When the DHCP server is configured and if the Client IP assignment parameter for an SSID profile is set to Virtual
Controller Assigned, the Virtual Controller assigns the IP addresses to the WLANor wired clients. By default, the AP
automatically determines a suitable DHCP pool for Virtual Controller Assigned networks.
The AP typically selects the 172.31.98.0/23 subnet. If the IP address of the AP is within the 172.31.98.0/23 subnet, the
AP selects the 10.254.98.0/23 subnet. However, this mechanism does not avoid all possible conflicts with the wired
network. If your wired network uses either 172.31.98.0/23 or 10.254.98.0/23, and you experience problems with the
Virtual Controller Assigned networks after upgrading to HP Cloud Network Manager, manually configure the DHCP
pool by following the steps described in this section.
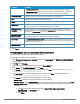
To configure a domain name, DNS server, and DHCP server for client IP assignment.
1. Select Wireless Configuration > System > DHCP. The DHCP details are displayed.
2. Enter the domain name of the client in DOMAIN NAME.
3. Enter the IP addresses of the DNS servers separated by a comma(,) in DNS SERVER.
4. Enter the duration of the DHCP lease in LEASETIME.
5. Select Minutes, Hours, or Days for the lease time from the list next to LEASE TIME. The default lease time is
0.
6. Enter the network in the NETWORK box.
7. Enter the mask in the MASK box.
To provide simultaneous access to more than 512 clients, use the Network and Mask fields to specify a larger range.
While the network (or prefix) is the common part of the address range, the mask (suffix) specifies how long the variable
part of the address range is.
8. Click Save Settings to apply the changes.
Services
This section provides the following:
l Configuring an AP for RTLSsupport on page 67
l Configuring OpenDNS credentials on page 68
l Bonjour support configuration on page 68
l Integrating an AP with Palo Alto Networks firewall on page 71
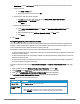
Configuring an AP for RTLSsupport
Cloud Network Manager supports the real time tracking of devices when integrated with a third-party RTLS such
as Aeroscout. With the help of the RTLS, the devices can be monitored in real time or through history.
To configure third-party RTLS such as Aeroscout:
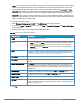
1. Select Wireless Configuration > Services > RTLS.
2. Select AEROSCOUT to send the RFID tag information to an Aeroscout RTLS.
3. Specify the IP address and port number of the Aeroscout server, to which location reports must be sent.
4. Select INCLUDE UNASSOCIATED STATIONS to send reports on the stations that are not associated to any
AP to the Aeroscout RTLSserver.