
User's Manual


61 | Wireless configuration HP Cloud Network Manager | User Guide
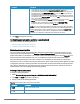
Parameter Description
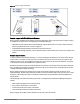
l To change the color of the splash page, click the Splash page rectangle and
select the required color from the BACKGROUND COLOR palette.
l To change the welcome text, click the first square box in the splash page, enter
the required text in the WELCOME TEXT box, and click OK. Ensure that the
welcome text does not exceed 127 characters.
l To change the policy text, click the second square in the splash page, enter the
required text in the POLICY TEXT box, and click OK. Ensure that the policy text
does not exceed 255 characters.
l To upload a custom logo, click Upload, browse the image file, and click upload
image. Ensure that the image file size does not exceed 16 KB.
l To redirect users to another URL, specify a URL in REDIRECT URL.
l To preview the captive portal page, click Preview splash page.
NOTE: You can customize the captive portal page using double-byte characters.
Traditional Chinese, Simplified Chinese, and Korean are a few languages that use
double-byte characters. Click on the banner, term, or policy in the Splash Page
Visuals to modify the text in the red box. These fields accept double-byte
characters or a combination of English and double-byte characters.
2. Click Next to configure access rules.
Configuring external captive portal for a guest network
This section provides the following information:
l External captive portal profiles on page 61
l Creating a captive portal profile on page 61
External captive portal profiles
You can configure external captive portal profiles and associate these profiles to a user role or SSID. You can
create a set of captive portal profiles in the Security > External Captive Portal data pane and associate these
profiles with an SSID or a wired profile. You can also create a new captive portal profile under the Security tab of
the WLAN wizard or a Wired Network pane. You can configure up to eight external Captive portal profiles.
When the captive portal profile is associated to an SSID, it is used before user authentication. If the profile is
associated to a role, it is used only after the user authentication. When a captive portal profile is applied to an SSID
or wired profile, the users connecting to the SSID or wired network are assigned a role with the captive portal rule.
The guest user role allows only DNS and DHCP traffic between the client and network, and directs all HTTP or
HTTPS requests to the captive portal unless explicitly permitted.
Creating a captive portal profile
To create a captive portal profile:
1. Select Wireless Configuration > Security > EXTERNAL CAPTIVE PORTAL.
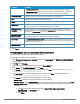
2. Click New. The New pop-up pane is displayed.
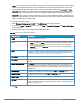
3. Specify values for the following parameters:
Parameter Description
NAME
Enter a name for the profile.
TYPE Select any one of the following types of authentication:
Table 26: Captive portal profile configuration parameters